Cutting with DROP traffic by Suricata IPS is not sufficient, because not all possible traffic signatures on port 111 are used and in most cases this port can be enumerated.
Bare metal servers offered at Scaleway are at reasonable prices, which can be compared to those on Hetzner. You even get Proxmox installation by default contrary to Hetzner were you need to install Debian first. To setup Proxmox with one public IP anf pfSense with another one you need to order Flexible IP and request for virtual MAC address. Remember that on Scaleway’s flexible IPs gateway is fixed and it is 62.210.0.1. Then for the network configuration:
auto lo
iface lo inet loopback

auto eno1
iface eno1 inet manual

iface eno2 inet manual

auto vmbr0
iface vmbr0 inet manual
        address x.x.x.x/24
        gateway y.y.y.y
        bridge-ports eno1
        bridge-stp off
        bridge-fd 0
        pointopoint y.y.y.y
        hwaddress a:b:c:d:e:f
        up route add -net a.a.a.a netmask b.b.b.b gw y.y.y.y dev vmbr0
        up ip route add z.z.z.z/32 dev vmbr0
# PUBLIC

auto vmbr1
iface vmbr1 inet static
        address 10.0.0.1/8
        bridge-ports eno2
        bridge-stp off
        bridge-fd 0
# LAN
x.x.x.x is primary Proxmox public IP. y.y.y.y is its gateway (with a.a.a.a network with b.b.b.b netmask). z.z.z.z is then your secondary public IP (flexible IP) for pfSense firewall. As you can see, there are two network adapters, eno1 and eno2. First one (eno1) is used for public IPs and second one (eno2) is for internal network only. For some reason the same configuration as on Hetzner, concerning LAN networking, does not work, so there are few changes there over that configuration at Hetzner.
If you wonder if it is possible to have private-only Proxmox cluster in Hetnzer, then the answer is yes, almost. Of couse you can order dedicated hardware to hide your boxes from public eyes, but if you are not going that way, then you can try other way.
Install the first Proxmox with public IP, VLAN na pfSense, as usual
Second step is to install another Proxmox also with public IP, set up everything you need and leave it only with VLAN deleting public IP configuration. In /etc/hosts you need to set VLAN address i reload network interface. After this you need to go to first box as number 2 is no longer available
From the first box create cluster and join the second box (from sandbox VM with VLAN)
In order to have internet connectivity from private-only boxes you need to setup its VLAN routing to the first box VLAN address
Configuration of the first box:
auto DEV
iface DEV inet manual

auto vmbr0
iface vmbr0 inet static
        address PUBLIC-IP/26
        gateway PUBLIC-GW
        bridge-ports DEV
        bridge-stp off
        bridge-fd 0
        pointopoint PUBLIC-GW
        up route add -net PUBLIC-NET netmask MASK gw PUBLIC-GW dev vmbr0
        up ip route add 2PUBLIC-IP/32 dev vmbr0
#PUBLIC

iface DEV.4xxx inet manual
auto vmbr4xxx
iface vmbr4xxx inet manual
        address 10.x.x.x/16
        bridge-ports DEV.4xxx
        bridge-stp off
        bridge-fd 0
        mtu 1400
#VLAN
Configuration of the second, private-only, box:
iface DEV.4xxx inet manual

iface DEV inet manual

auto vmbr4xxx
iface vmbr4xxx inet static
        address 10.x.x.x/16
        gateway PFSENSE-AT-1ST-BOX
        bridge-ports DEV.4xxx
        bridge-stp off
        bridge-fd 0
        mtu 1400
#VLAN
For non-users of either Proxmox or Suricata: the first one is virtualization appliance which helps firing up virtual machines as well as LXC containers and the latter is network traffic security system which is able to identify (IDS mode) or even block malicious traffic (IPS mode). Suricata works just fine on Proxmox which is usually installed on Debian Linux, but sometimes there are some hardware/software compatibility issues which I'm going to tell you about right now...
Having Proxmox server exposed in public space could be really not the best way possible. However if there is no chance for dedicated hardware, then hiding your box from the world is the only reasonable way. There is of course possibility to setup Proxmox cluster with only one server exposed and the rest being only thru private link (e.g. VLANs on vSwitch on Hetzner). But still you will be left with at least one server which needs to be accessible from outside.
Note: without dedicated networking hardware you can try setting up everything offline with KVM console (with private link only just for cluster communication), but this way if something goes wrong you will be left waiting in queue to access it as resources often are limited, just as they are on Hetzner. Usually KVM access is given within 15 – 60 minutes from request time.
So in case you have your box exposed you need to hide it somehow from malicious traffic. I prefer to disable RPC and SSH. Enable 2FA for UI authentication. And last one is to install Suricata IPS directly on Debian. Of course if you have some VM inside Proxmox (and you will have) you can install Suricata on them too, like on pfSense where it is conieniently prepackaged. Installation is straightforward but… it relies on Linux kernel features which need proper drivers and hardware compatibility. It means that you are going to have it running on almost all modern hardware but not on all of it. There are some issues with onboard NICs and Proxmox custom kernel picking up different drivers. Official documentation states that we should load nfnetlink_queue module but the most important thing on those problematic hardware is to enable and start nftables service. Without it, Suricata will pick af-packet mode, but we are interested in nfqueue mode as it supports blocking by default.
Suricata system service is configured to run in af-packet mode by default, you can check service system files. In case startup scripts recognize that there are overrides it will start in different mode, for instance in nfqueue mode. On problematic setups most probably you might need to customize it a little bit. And basically that’s all, but you are not going to read it anywhere in official documentation. So hopefully with these small things you will get big benefits.
First of all this SSD drive which I use is somehow faulty. It is a Goodram SSDPR-CX400-01T-G2 drive of 1TB. It have been working fine for few weeks until some construction worker made a electric short causing some abnormal frequences in wires resulting a faulty drives and memory sticks. One of victim was this drive:
in CrystalDisk it is reports as good,
but in Ubuntu disks utility it supposedly has 1 bad block
badblocks -svt 0x00 /dev/sdX shows no bad blocks
zeroing with dd and veryfing with cmp is fine
This drives for sure has some issues as at least one of tools shows that it as a problematic badblocks. Second of all in regular use it fails to run VM. It once switched into read-only mode in VM filesystem then after formatting it it refused to restore VM from backup. So last thing in which it might be useful is being storage for swap:
mkswap -c /dev/sdX
swapon /dev/sdX
Then in /etc/fstab:
/dev/sdX none swap sw
I set it in VM as 256 GB drive, why? Because I encountered some leaking Ruby libraries in my project and program required way more memory than it should have actually require, so the temporary solution is to increase available memory by adding such a huge amount of swap.
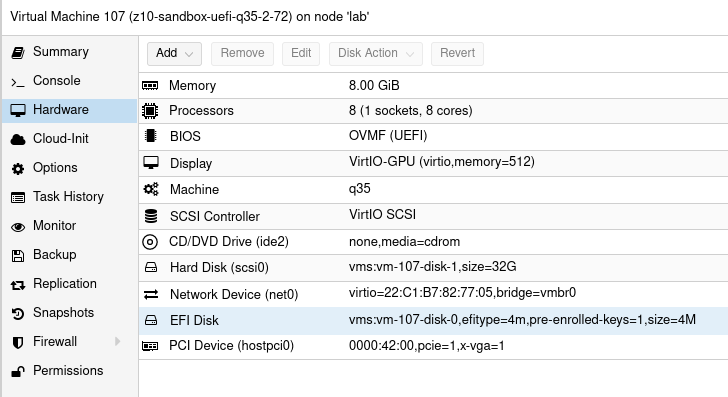
You can put your #GPU in #Proxmox server box and pass thru computational power to virtual machines… just in case you would like to run your AI/ML things alongside your virtualized NAS 😀
Finally I got it working. I think so. This Proxmox installation is simple one, just single node for experiments which is half part. The other part is VM configuration. You may ask, what exactly for do I need GPU in VM? I may need because the hardware is capable of running several additional GPUs and I can use all of them at once in different configurations and even in different operation systems. Just like people do in cloud environments and this setup mimics such thing running server-like computer with datacenter-like GPUs on board. During this test I used NVIDIA GTX 650 Ti which is consumer grade card, but now I confirm to have it working so I will put there my other cards, like NVIDIA Tesla K20xm or FX 5800 with lot more shaders/cores which can be used in OpenCL applications for AI/ML. And you will see how easy is to cross the temperature maximum of a GPU.
I have Intel Xeon E5645 so in my options I put intel_iommu. In case you have AMD or something else, then it should be adjusted. Blacklisting modules, I prefer to keep all of these as you may want to put different cards in your setup. Without this, Debian (on which Proxmox is run atop) will try to load modules/drivers and put your black console screen in higher resolution. If you blacklist these modules, then you will get low resolution output. That is want you should see here at this moment. Totally variable part is vfio-pci.ids (which can be obtained using lspci command). First one is for video adapter and the second one is for audio device. I put both however I will for sure use only the first one.
Other configurations
Second thing to modify:
root@lab:~# cat /etc/modprobe.d/blacklist.conf
blacklist nouveau
blacklist nvidia
Same here, I think that you can have it either here or in GRUB section.
Then, the modules list which should be enabled:
root@lab:~# cat /etc/modules
# /etc/modules: kernel modules to load at boot time.
#
# This file contains the names of kernel modules that should be loaded
# at boot time, one per line. Lines beginning with "#" are ignored.
vfio
vfio_iommu_type1
vfio_pci
vfio_virqfd
Next thing is to apply GRUB options with either of those commands:
update-grub
proxmox-boot-tool refresh
I am little confused as the official documentation (found here) states that you should do the first one, but actually running this command tells us that we should run the second one intead.
To verify it all of above changed anything at all, reboot your system and then:
dmesg | grep -e DMAR -e IOMMU
If you see message saying “IOMMU enabled” then you are good to go further, otherwise some different configuration should be applied. In my case I got some issue saying that my Intel chipset is unstable with IOMMU remapping so the thing is going to be disabled. So there is need to have this “allow_unsafe_interrupts” option I guess. To verify if you have working IOMMU groups:
find /sys/kernel/iommu_groups/ -type l
You should see some entries here.
Virtual Machine
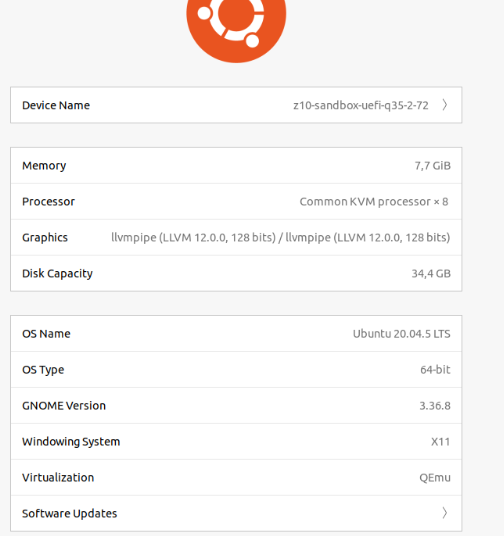
This time I tried 3 VM configurations which is Ubuntu 20 LTS Desktop. There are two main factors you should consider. Different variations may work but it is not fully predictable as you take multiple factors into consideration.
Q35 & UEFI
First one is to use Q35 instead of i440fx. This way you should be able to use PCI-E. I tried it on i440fx and it shows GPU but it is not accessible. Verification process involves the following:
clinfo showing positive number of platforms
nvidia-smi showing process list using dedicated GPU
Ubuntu about page saying that we use particular NVIDIA driver (however it is debatable…)
Second thing is using UEFI instead of default BIOS setup, but it requires you to check if your GPU actually supports UEFI. So I tried Q35 and UEFI and this combination allows us to have all of these somehow working. Regarding UEFI I disabled secure boot in VM UEFI/BIOS.
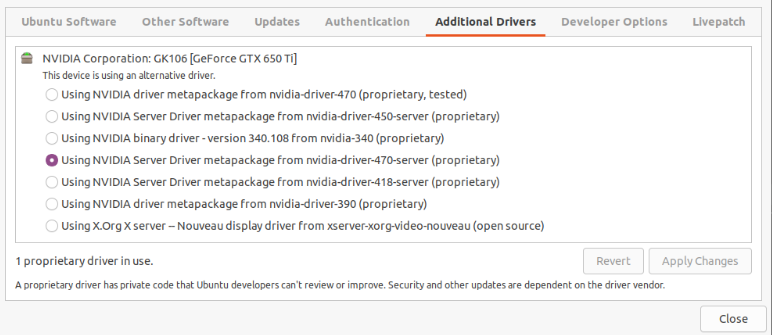
Concerning the driver (NVIDIA in my case) I use nvidia-driver-470-server but other also seems to work. It is weird that Ubuntu about page shows llvmpipe instead of this driver, but the drivers page says that the system uses NVIDIA driver. Not sure who is right here.
The drivers list:
Device resetting
The last thing which prevents this setup from working is to “remove” the devices at boot time (/root/fix_gpu_pass.sh):
Where ID is PCI-E device ID at VM level which can be checked using lspci -n command. Add it to crontab at reboot time (crontab -e):
@reboot /root/fix_gpu_pass.sh
OpenCL verification
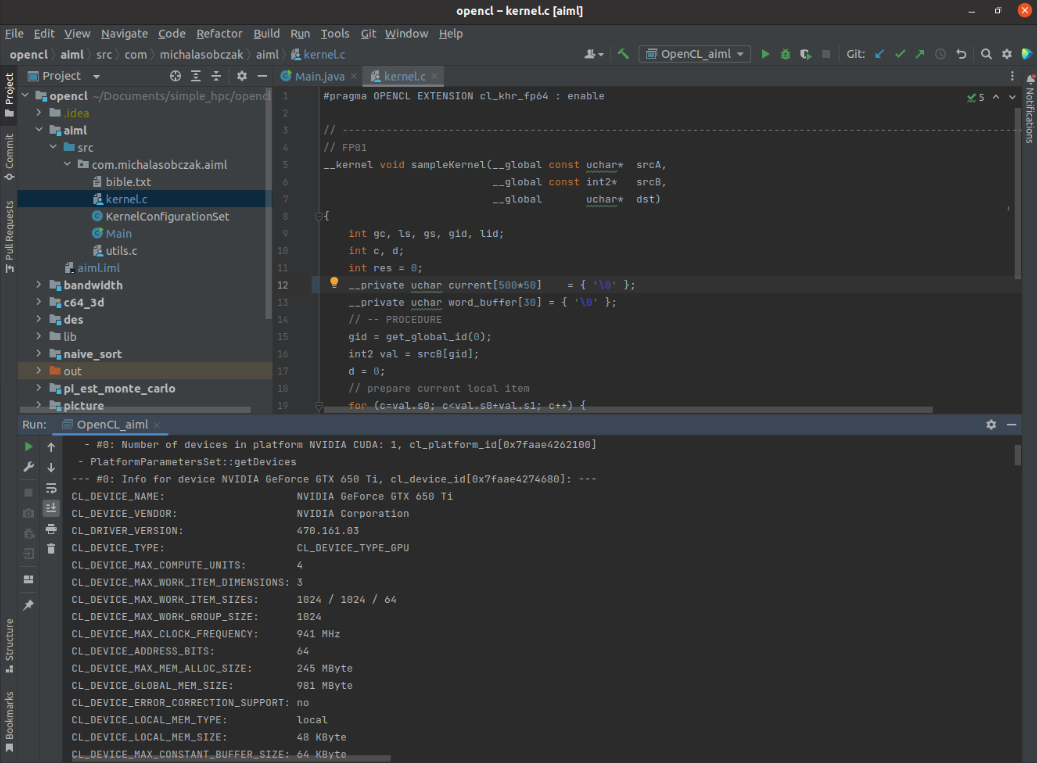
So, if you can see VNC console in Proxmox, your VM is booting and you are able to login, you can install driver, lspci/nvidia-smi/clinfo show proper values then it is now time for a grand last check which is to clone Git repository with my code and try to run it.
cd ~/Documents
git clone https://github.com/michalasobczak/simple_hpc
Then install openjdk-19 and create Application configuration for aiml module having opencl module in your classpath. You may require to rebuild opencl module also. Finally if you are able to see platforms here then you are in the correct place.
I have NVIDIA GeForce GTX 650 Ti placed in my HP z800 as a secondary GPU and the system recognizesit properly and the code runs well. Performance wise I should say that it seems to be fine. I quickly compared NVS 4200M with this card:
NVS 4200M (CL2.0 configuration profile): 30 – 40 ms
GTX 650 Ti (CL3.0 configuration profile): 4 – 5 ms
There is one culprit regarding diagnostics as nvidia-smi does not show GPU utilization and process list, but it shows memory consumption. Increasing local variables size (arrays) has direct relation on memory utilization increase that is why I assume it still works somehow! Maybe even not that bad.
Burning Tesla K20xm
As mentioned earlier after successful setup with consumer GPU it is now time to try a datacenter one. I have this Tesla K20xm which is quite powerful even in today standard. It has plenty of memory (6GB) and tons of cores (2688), even more than my RTX 3050 Ti (2560). Of cource being a previous generation hardware it will be less efficient and will drain more power. And there it is the problem. This GPU can draw up to 235W. I have over 1000W power supply but there is certain limitation on PCI-E gen 2 power output. So the maximum I’ve seen on this GPU during passtru tests was 135W. After few minutes temperature rises from 70 up to 100 degrees Celcius cauing system to switch it off… running nvidia-smi gives me such a error message, asking me nicely to reboot:
So there it is, I forgot totally that this GPU belongs to proper server case with extremely loud fans which I lack actually in PCI-e area in HP z800. This computer has plenty of various fans, even on memory modules, but this area is not covered at all. After computer reboot GPU comes back to life. Besides the problem with the temperature itself, there is efficiency drop after cross somewhere near 90 degrees, it slows down few times and near 100 degress is switches off completely.
I installed Proxmox Backup Server several times, both on bare metal and virtualized inside Proxmox VE. This time I did it in PVE as virtual machine and encountered an issue while initializing disk with GPT, creating directory, LVM or ZFS. In other words, I was unable to create any datastore at all. So there is CLI that can help us:
proxmox-backup-manager disk list
proxmox-backup-manager disk initialize sdX
proxmox-backup-manager disk fs create mydatastore --disk sdX --filesystem ext4 --add-datastore true
And that’s all, it works fine. In UI I got timeout. No idea why. Fortunately there is a alternative path.
There is not too much a precise documentation from Hetzner available if you want to know what exactly you should do to run dedicated servers with primary and secondary public IP, virtual machines and vSwitch. There are some articles but they are written in non-informative way. However their support is on very high level so far, they respond quickly.
Debian & Proxmox Installation
So, to go with Proxmox on Hetzner you will need to know that there is supported installation. You restart your server into rescue system (remember to power cycle your server) and then there is Proxmox to choose from but it is said that there is no support for it, just like it would be for other systems… If you play around with somehow complex environment you should yourself be prepared to overcome all obstacles not relaying on third parties. So now you are in the rescue system and instead of selecting Proxmox, you choose latest Debian installation.
For Debian you disable software RAID as it might and will be incompatible with ZFS later on. You put your domain name registered in public DNS. Future domain change will be difficult no to say that is may be impossible (from Proxmox perspective). Depending on your disk configuration in the server you possibly may want to adjust mount points configuration. I prefer to put Proxmox on smaller disk and to allocate all of available space to root mount instead of setting various smaller mount points. Once you are done with it save changes (F10) and wait until it prompts you to reboot.
After server reboots you are going to install Proxmox on it:
You will access your Proxmox VE UI at your public IP, port 8006. Next go to Hetzner panel and create new vSwitch instance. Add your server to newly created vSwitch. Applying network configuration takes around a minute in Hetzner. In Proxmox go to node settings and navigate to System – Network and create two empty bridges, call it vmbr0 and vmbr1. First one is for main public IP which will be used for accessing Proxmox only. Second one is for LAN as every virtual machine and container will have its own IP within the server only. For VLAN at vSwitch we are going to create bridge and VLAN manually in /etc/network/interfaces a little later. After creating these two bridge apply configuration and reboot server.
In the interfaces file remove IPv6 and any comments. First of all in most cases you will not need IPv6. If your setup requires “public” IPv6 then for now I will not try to advise anything in this matter. I think it is a very useful in things like IoT or mobile networks but for regular consumer servers not too much. You may have different point of view and it is fine, I disable IPv6 by habit. For instance my ISP provider do not offer IPv6 connectivity.
So now, we have two blank bridges and removed IPv6. Now it’s time to configure main and additional public IPv4 as well as LAN and VLAN. So let’s get started with this one. Ethernet devices start with “en” followed by “p” for PCI bus with N as a consecutive number, then “s” for slot and its number. So for instance enp5s0 can be identified as Ethernet PCI number 5 slot 0. There are also other naming conventions for WLAN and WWAN devices as well as various source of this devices like BIOS or kernel based.
source /etc/network/interfaces.d/*

auto lo
iface lo inet loopback

iface lo inet6 loopback

auto enpNs0
iface enpNs0 inet manual
Further part of network configuration file of vmbr0 bridge used for main and additional public IP:
auto vmbr0
iface vmbr0 inet static
  address 65.109.x.x/MASK
  gateway 65.109.x.x
  pointopoint 65.109.x.x # same as gateway
  bridge-ports enpNs0 # device name
  bridge-stp off
  bridge-fd 0
  up route add -net 65.109.x.x netmask 255.255.255.x gw 65.109.x.x dev vmbr0 # main IP route
  up ip route add 65.109.x.x/32 dev vmbr0 # additional IP route
  post-up ip route add x.x.x.0/24 via 65.109.x.x dev vmbr0 # LAN network via additional IP
First, few words of explaination. Address is your primary public IPv4. Gateway and pointopoint are here the same. First route added is the default one which comes from installation process, so just copy it here (should be same as in Hetzner admin portal). Second route defines additional public IPv4 address. Last one is LAN network of your choice which is passed thru vmbr0 and additional IPv4 address to outside world.
This LAN network is configured as a blank bridge and all configuration required is setup inside the gateway appliance (e.g. pfSense) and VM itself:
auto vmbr1
iface vmbr1 inet manual
	bridge-ports none
	bridge-stp off
	bridge-fd 0
The last section of network configuration file is for VLAN:
iface enpNs0.400X inet manual
auto vmbr400X
iface vmbr400X inet manual
	address 10.x.x.1/16 # VLAN gateway and network range
	bridge_ports enp41s0.400X
	bridge_sftp off
	bridge_fd 0
	mtu 1400 # important to have
We create Linux VLAN device and bridge. We define address which will be used as a local gateway for accessing machines outside the box. It is required to set up MTU with 1400.
Virtual MAC at pfSense
For LAN within the single server and outside world connectivity (internet) we use pfSense gateway. Setup is straightforward, we give it two network interfaces. First one is for WAN with additional public IPv4. We need to ask for virtual MAC in Hetzner admin panel. Second interface is for LAN and it can have automatically generated MAC address. All virtual machines within LAN should be addressed within network defined in vmbr1 with gateway set as local pfSense. For inter-server communication within VLAN we give for VM additional network interface pointed at vmbr400X device and set network within range defined at that bridge pointing bridge IP as a gateway.
Single gateway across several physical boxes
I mentioned before, that you should use both LAN and VLAN for your machines, however you might decide to go differently. You can set up single pfSense gateway with LAN and VLAN and point other VMs route at this pfSense VLAN address. One thing to remember is that you must set MTU as 1400. Any other values will give you weird results, like ping and DNS working but no bigger transfers as they exceed packet limit that is allowed at vSwitch. So setting up proper MTU value will give you ability to route your outbound internet traffic via single pfSense. It is a questionable setup as it has single point of failure. Other downside of this is that you need to keep track of public IPv4 addresses you want to use at your single gateway as this IP is bind to particular server at Hetzner with MAC address. Maybe there is a solution for this but not for now.
Note: Setup like this requires adding third network adapter to pfSense gateway.
I was replacing drives and memory in one of servers and out of a sudden node was unable to start. When finally it booted it was gone out of cluster. Weird. This node has been installed on SSD drive which had 2 years or constant runtime. Debian prompted with some file system issue at one and another time. After few reboots finally it booted successfuly but node was unable to communicate properly with other cluster members.
I tried to start time synchro from the stratch to no avail. I pulled out other drives than this one with operating system without any change. I restared also other cluster members. The node was available to log in and check it out, but I felt that any hacking could result in unpredictable behavior in the future, so I decided to reinstall it.
There are few things to remember if reinstalling node. First it will be planned operation you must cancel and remove replication jobs because after node will be shutdown there is no chance to do this from user interface. If node is already unaavailable then:
pvecm expected 1
pvesr list
pvesr delete JOBID --force
Next, from other nodes run node deletion command:
pvecm delnode NODENAME
When reinstalling node remember not to use the same IP and node name. It might work, but…