Capacitor

Signal filtering

[202] Capacitors are divided into polarized and non-polarized depending on whether the direction of their inclusion in the circuit is important. Generally speaking, capacitors filter the waveform of the power source. It is assumed that the longer lead from the capacitor is the positive pole, which is sometimes reflected in the marking in the diagram. Electrolytic capacitors consist of a metal cover and an electrolyte lined with paper. Non-polar (non-polarized) capacitors can be made of ceramic elements or foil. There are also tantalum capacitors which both offer high capacitance and relatively low losses. The physical size of a capacitor depends not only on its capacity but also on its maximum operating voltage.

Fig. Capacitor in use with timer and LED (p07)


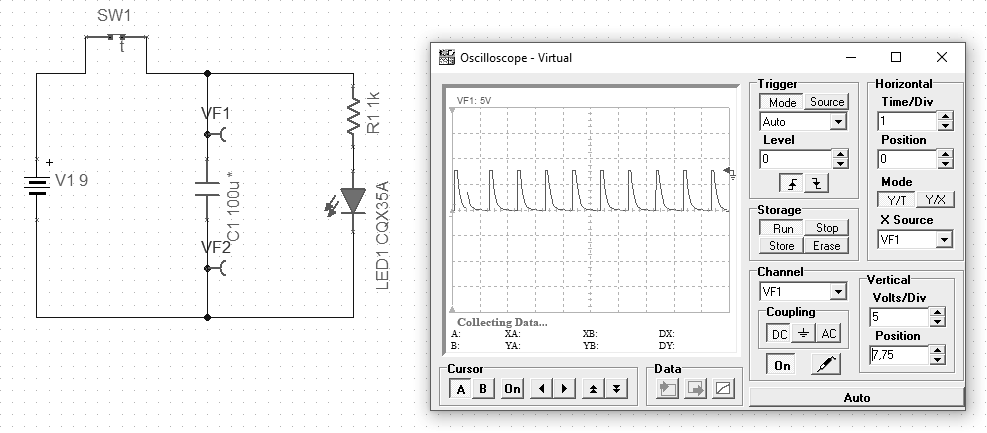
In the above example, we put a timer switch into the circuit, which in a 1 second cycle turns on for 100ms, causing the capacitor to charge. After the time specified by the parameters of the elements, the LED starts to emit light. When the switch disconnects charging, the capacitor discharges. The time of diode activation is controlled by determining the capacitance of the used capacitor.

However, the main task for capacitors is to filter the power supply. This treatment is used to protect sensitive components, e.g. a microcontroller in a digital circuit. It is most effective to use different types to filter the specific interference. Capacitors are connected to the circuit in parallel.

A capacitor is a device for the temporary storage of electric charge. What is believed to be the first capacitor was called the Leyden jar, which was invented by Pieter van Musschenbroek in 1746 at Leyden (or Leiden) University in the Netherlands. It was a glass jar wrapped inside and out with a thin metal foil. The outer foil was bonded with the ground, and the inner foil was connected to an electricity source, such as like an electrostatic generator. Though at that time, it was not understood how it worked, experimenters found that the Leiden jar seemed to store an electric charge even when unplugged from the generator. ” [206]

Examples available at https://github.com/michalasobczak/simple_hpc/tree/master/SeriesPartOne

growfs fsck required (pfSense)

In case you’ve managed to overcome other issues with system unable to boot, disk size not updated then there might be still one problem left. Sometimes resizing with gpart works fine but file system resize does not. I’ve encountered such issue and frankly speaking I’m not quite sure what is root cause of it. Is says that file system is dirty and I should run fsck which can be executed from console selecting number 5 and then F letter. System reboots and makes file system check. It says that the file system is fine, so it’s quite confusing.

Solution for this one is to boot the system in single user mode, by selecting number 5 and S. This skips few additional things normally executed during multi user boot mode. Now you can run the following to expand file system:

service growfs onestart

This command normally should be able to do its job, but this time, system should be run in single user mode to overcome it.

Azure FreeBSD (pfSense) not able to pick boot partition after disk resize

Following previous struggles on pfSense FreeBSD on Azure. After resizing disk Microsoft starts at some point adding an another drive which is temporary one. I do not need this by any means. It seems that NetGate pfSense template is also not quite compatible with cloud-init as the platform tries to execute systemctl which is not present here.

The problem with this is that FreeBSD will not be able to pick which partition it should start from. Fix for this is pretty simple. Just go and edit /etc/fstab and instead of pointing to some virtual labels. In my case it was /dev/da0s2a. You can pick the proper one during boot procedure by pressing question mark. Load will list for you all the partitions available. Try at your best. In mine case, it was the first one from the list.

What causes the problem? Being not compatible with cloud-init, NetGate template is vulnerable to unpredictable changes from my personal perspective. But here we are in public cloud environment and we should not be suprised by that.

Resize drive and partition on FreeBSD 12 (pfSense)

Recently I described how to increase drive, partition and filesystem on FreeBSD in Azure virtual machine. It turned out that this scenario was little bit different from a virtual machine running on top of VMware. First of all, with or without vm-tools I was not able to get updated drive size:

camcontrol rescan all

It gives messages that rescanning was successful, but actually it did not apply new values. However we can check new drive size with the following command:

camcontrol readcap da0 -h    # daX

If on your system you get same results, then you need to reboot.

There is also a difference of having swap space. First disable it:

cat /etc/fstab               # pick swap device to use
swapoff /dev/label/swap0     # as an example

Then remove swap partition as freebsd-ufs partition need to be a continuous space:

gpart delete -i 2 da0s1      # refer to gpart show 

Then as previously run resizing commands:

gpart resize -i X da0        # X would be probably 1
service growfs onestart

Now you are done.

WordPress migration

After 2 years on DigitalOcean I’ve decided to move out. Not because it’s bad or expensive, but because I need one more feature which is IDS/IPS. By default WordPress installation on DO contains fail2ban, which is fine, but I find Suricata way more powerful.

To start with, I’ve created a backup using All-In-One WP migration and Increate Max File Size. Former is responsible for dumping all of the site content, and the latter is giving a ability to upload this dump file into new WordPress installation.

But… you also need to edit one file in your need WP setup:

/etc/php/X.Y/apache2/php.ini

With the following:

post_max_size = 2048M
upload_max_filesize = 2048M

Then restart Apache, for instance:

sudo service apache2 restart

At plugin settings page select 2 GB. Migration plugin should be installed both on the source and target system. Before uploading dump file into new location be sure to check version if it’s the same as the source system. Then upload dump file and you should be all right with almost all the things. I’ve disabled and deleted all the plugins except for NextGen Gallery.

As I’ve been using all the backend things behind NGINX proxy, with WP it’s the same history. Nothing special should be considered here. Please remember to set Host, X-Real-IP, X-Forwarded-For and X-Original-Request headers in your configuration file. TLS configuration is managed on my NGINX by certbot so initially I give only configuration for port 80 and let it do the remaining.

On this particular migration scenario I’ve encountered one problem. There was HTTP 404 error message on all posts and categories. To overcome it go to Seetings.Permalinks and hit Save button. That’s all, maybe there is some issue with the backup tool.

MacPorts installation on 10.8.5

To bring and old MacBookPro up to date you can use MacPorts. First you should download and install MacPorts package from macports.org. There is a pkg file to use specifically for Mountain Lion. That’s the easy one. A little harder would be to grab working XCode with command line tools. You need to have Apple ID, not quite sure if there is different one to access developer.apple.com but mine works just fine.

Go and download XCode 5.1.1 and command line tools, file names are as follows:

MacPorts-2.7.2-10.8-MountainLion.dmg
Xcode_5.1.1.dmg
Command_Line_Tools_OS_X_Mountain_Lion_for_Xcode__April_2014.dmg

XCode requires accepting licence with the following command:

xcodebuild -licence

As you will install command line tools manually, then there is no need to go to XCode’s preferences – Downloads section. Still it would not probably work as Apple ID now requires 2FA which is not present in such and old operating system.

MacPorts itself require update:

sudo /opt/local/bin/port selfupdate

After that you can install various packages. Without updating you are going to have troubles installing things as there will be missing package dependencies. For instance, to install wget type:

sudo /opt/local/bin/port install wget

Proxmox setting locale failed

If you log in to Proxmox’s shell and see error stating that “setting locale failed“, then execute the following command to get rid of that message:

dpkg-reconfigure locales

Not quite sure why it happens, but I see it almost all the time.

Recover pfSense from out of disk space and config.xml corruption

I use NetGate pfSense+ version 22 based on FreeBSD 21. I encountered a problem of running out of disk space because of packet logging enable in Suricata. Out of a sudden there was high traffic and therefore high logs production. Disk space utilization was over 100%. Now there is a problem with /config/config.xml file, there is no VPN, Suricata, pf configuration available from the UI. Dashboard is corrupted also. However there is /config/backup folder with backed up configuration files. I’ve taken the last known good with proper file size and put it in place. After reboot it works just fine. However I’m not quite sure if there are other issues out there.

To be sure not running out of space, increase disk space and reconfigure Suricata packet logging with proper file sizing to fit available space. If you are on bare metal, then chances are little to zero that you put too small drive in there. In case of virtualization, go to your configuration panel and increase drive space. Then go to serial console or SSH:

gpart show
gpart resize -i 2 da0
gpart show
service growfs onestart
df -h

After this you should have both partition and file system extended.

Ruby on Rails vs PostgreSQL 14 partitioning primary keys

Starting from PostgreSQL 10 we have available new type of paritioning, which is declarative one. Before we had inheritance which is also good but has some limitations. Now, with declarative partitioning user need not to specify partition name while inserting data. To create partitioned table:

CREATE TABLE tablename 
( 
  id BIGSERIAL NOT NULL, 
  created_at TIMESTAMP WITHOUT TIME ZONE NOT NULL,
  CONSTRAINT tablename_pkey PRIMARY KEY (id, created_at)
) PARTITION BY RANGE(created_at);

There are few things worth explaining. First one is BIGSERIAL data type. It is a bigger form of integer type with automatic sequence creation, which is very convenient. Second thing is PARTITION BY RANGE(columnname). It defined that the data will be spread across paritions based on created_at date range. It positively affects query performance.

To create a partition:

CREATE TABLE tabelename_2022_09 PARTITION OF tablename
    FOR VALUES FROM ('2022-09-01 00:00:00.00') TO ('2022-09-30 23:59:59.99');

With table inheritance I’ve used partitioning with over 1000 tables. Generally speaking, PostgreSQL, even older versions, could easily handle 100 000 tables on single server and data volume around 10 TB. However with declarative partitioning you need to remember, that when executing a query o master table there will be shared lock on each and every parition and it costs memory. Althought it migth be a little simplification you need to increase max_locks_per_transaction parameter to fit required number of partitions created, attached. If you do not need online access to some old data or created future paritions upfront then either do not attach them or just detach if unsed.

Last and the most important thing related to multi-column primary key. Ruby on Rails and ActiveRecord library does not support it by default. You could use some gem to overcome this limitation, but what you only need is to point the specific colum in model definition:

self.primary_key = :id

It works just fine.