If you try using darktable 3.6 and previously been using older versions then you may be confused. In lighttable, import pane there are two buttons instead of one. Below you can find a little explanation.
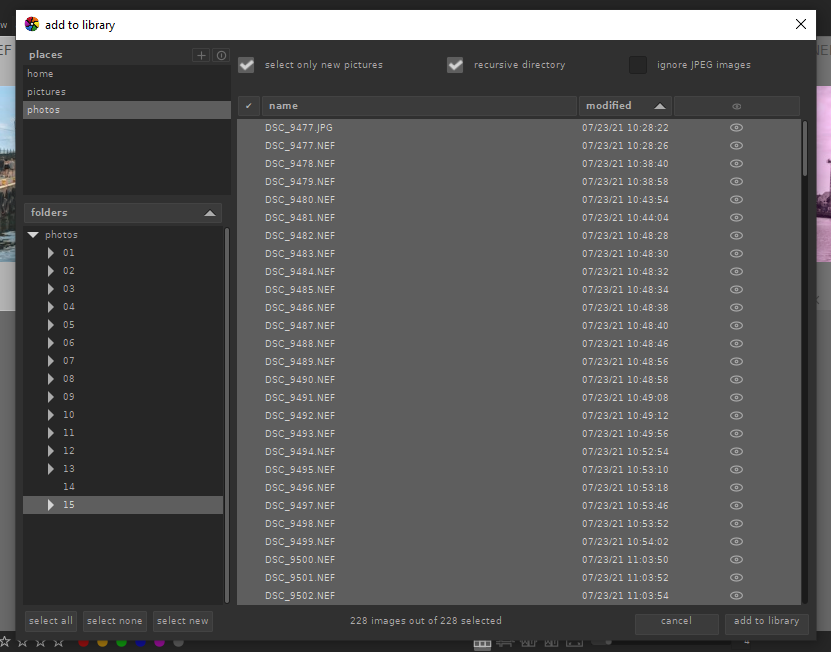
1. Add to library
By selecting “add to library” you just collect selected pictures instead of physically copying them. Be sure to check settings, storage, xmp, “write sidecar file each image”. For long time I used this setting to write these xmp files, but recently I decided to skip that option. That way the only option to move around picture with its processing settings is either to export it as JPEG (or other “developed” format) or move whole darktable stuff (database etc.).
2. Select folder
Once you decided if you want to add or copy files as well as to check if you would like to write sidecar xmp files, then step is to select which folder (and files) you would like to consider. Check “recursive directory” and default if you would like to process only RAW files, skipping JPEGs. I import both RAW and JPEGs as most of the time I take both RAW and JPEG at the same time. RAW for full processing and JPEG to quick overview.
Remember that after you press “add to library”, darktable may be a little unresponsive. Be sure to check import progress on the darktable icon. In older versions, darktable been showing import progress on bottom left, but in current versions I could not see this anymore.
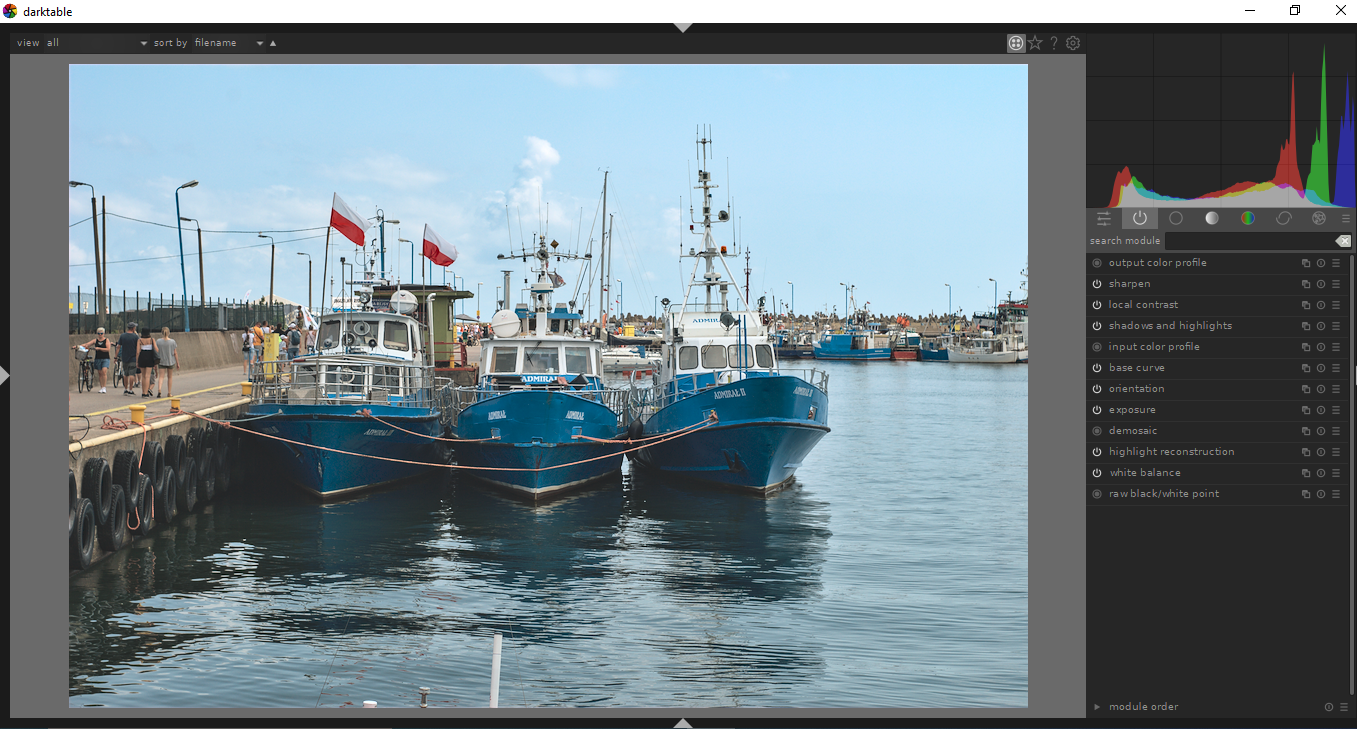
If you shoot RAW then most probably you need to have dedicated software for processing such files. I use darktable, however it is worth to mention that Windows Explorer and built-in image viewer can display RAW image. Just in case there is no other software available at the moment. Still if you need to edit RAW files and not only browse them then you should try darktable. It is open source, free of charge, available for Windows and Linux.
First of all it is great picture browser. You add or copy your files, both from local and remote drives. In case you have network folders, first you need to mount them in the operating system so darktable could see them. You can tag and rate pictures. You can show or hide specific panes depending on your needs.
lighttable
Secondly it has tons of image processing features. I use such tools as sharpen, local contrast, shadows and highlights, exposure, crop and rotate. These are basics. If you put your stuff to commercial stocks, then RAW denoise and profiled denoise are your friends. You can try to minimize chromatic, lens or perspective imperfections with dedicated tools. If you have some dead pixels then you can try tool called hot pixels.
darkroom
In case you would like to experiment a little bit then there is whole section of effects like colorize, grain or split-toning. You can have fun. I really like darktable because of its completeness and nice shortcuts like Alt+1, 2 or 3 for zooms and “w” for full screen preview. Going between light and dark modes is as easy as double clicking on the image itself. Last thing is “tab” which hides all panes except pictures grid or picture itself if in darkroom mode.
I started wondering if cheap YN lens can be compared with with some cheap Nikkor lens. Yes it can. I shoot same lens cap with Nikon D200 with these two lenses with are Yongnuo 50mm/f1.8 and Nikkor 35 – 70mm f3.3/4.5. I think that comparing fixed lens with zoom lens might be weird, but originally I though that even with zoom, Nikkor should be better. I was wrong. If anyone is not convinced why should you buy fixed-focus prime lens below you have practical explanation.
YN 50mm / f1.8 fixed lens
The reason why I even bother to compare them at such a level is that I was disappointed with the Nikkor lens. It produces flat output. I would not say that it is blurry but it is much less vibrant as cheap Chinese fixed lens. Which is somehow interesting.
Nikkor AF 35 – 70 mm / f3.3 – f4.5
As shown below on two samples YN produces much better image which is sharp with plenty of details. Nikkor produces image which is a little softer with less color details.
YN at f/5.6Nikkor at 50mm f/5.6
As a conclusion I should say that maybe comparing fixed lens with zoom is exaggeration, but it is nice to know that there are such differences.
Some time ago I got rid of my D200. But now I have another one in excellent shape. In the past I upgrade from it to D7100 which is better in terms of resolution, sharpness and features. But there are some differences like image plasticity and color vibrance which make D200 still a very good camera. If shooting low light then D7100 wins for sure because of wider dynamic range, but if lighing is fine and you need not to crop pictures then go with other cameras like D200 or D70s. They work very well and produces fine images.
It is a 24 megapixels digital SR camera. Sadly to say that I do not use this maximum resolution, because files are just too big. I even skipped using NEF raw files they are just enourmously huge for me. You can choose between 6 MP, 16MP and 24MP. I take pictures at 6 MP and select 24 MP only shooting far objects with telephoto zoom lens in order to be able to crop it. This camera has lot of pro features.
It can take pictures quite fast, I think something like 4 frames per second. It is just my perception, specification might say something different. It has live view and ability to shoot motion picture at pretty decent resolution 1080p.
D7100 has top LCD with runtime parameters. It can be lighten by moving power know right far most. It means more battery life because there is almost no need to use big screen. Viewfinder is big which is good for me, I just like that way. There are few more interesting things worth mentioning like HDR (multiple exposures, automatic lighting correction (within single frame). There is somehow funny feature of additional crop put atop of already cropped sensor (comparing to 35mm equiv.). It might be useful if you are only interested in mid section of the picture and would like to have telephoto using normal lens.
I use it with 50mm AF Yongnuo f/1.8 lens which was 60 EUR brand new. It is quite good betweem f/2.5 and f/3.5, good at f/4, very good at f/5.6. Going further up with f-stop numbers you will likely see distortions all other bad things as usual. My D7100 is far better than D70s and D200 in terms of dynamic range and signal-to-noise ratio. It is said that D70s is best at most at ISO 500, D200 at ISO 600 and this one is good even at ISO 1600.
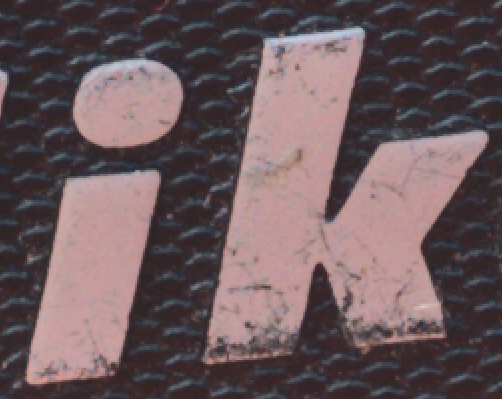
Camera has CMOS sensor as D200. D70s has CCD sensor. I read somewhere that there is no difference in terms of picture quality between these two most common technologies. The difference is in materials, filters and software. And it is. I can say that pictures taken with this camera will be similar to that taken with D200. Differences between D70 and D200/D7100 are minor but noticable at high magnifications. Especially in terms of noise.
Top picture comes from D70s and NIKKOR 50/2. Bottom one from D7100 and YN50/1.8. There is a very big difference at book background. This color artifacts make pictures taken with D70s to look little posterized. Newer cameras like D200 or D7100 outputs image which is more clear and free of such noise. Of course this is important at low light conditions and not full sun outdoors shooting – at such conditions you can shoot with almost everything.
My D7100 has already taken over 300 000 pictures. I think the risk is high, but price was low (100 EUR). I think that I will take some 10 000 picture and pass it on to someone else. It is a very nice camera. I strongly recommend it.
As previously stated, I tried to adapt SMENA 8M 40mm, f/4.0 lens to some DSLR. After week with no camera at all today I got my almost brand new NIKON D70s with only 1k pictures taken. I took NIKON F mount ring from some broken SOLIGOR lens and glued it to SMENA lens.
Of course because of registration plane (flange) distance I cannot get proper focus but still can do some tests, which you can find below.
I find it pretty good looking. In order to get out of some 30cm area I would need to have entirely different camera system, such as mirrorless. As for now I do not own such.
Continuing with USSR made SMENA 8M. I decided to take apart lens unit. It consist of upper cover with levers and lower unit with shutter blades, shutter spring-based mechanism and optics.
There are three blades. They are mounted on pins located on the rotating plate. Plate itself is moved by the shutter spring mechanism underneath.
In order to disassemble unit separating optics and shutter you just need to unscrew it hard. Most probably it will mangle focus limit pin, but I do not care about it that much.
Inside you can find a lot of grease which is good. It helps focusing ring to operate smoothly. Later I found that there is even simpler way to access optics. But it is good to know how everything works still.
In order just to access optics you need to unscrew 3 little pin-like screws on the aluminum optics unit cover. Optics, which consist only 3 elements is this little barrel in the middle on the picture below. The thing on the left is an inner plastic ring to set aperture. It presses down and lock aperture setting on the inner gap in the optics barrel.
As simple as it can be. Unscrew 3 scres and you are good to go with the optics barrel. Free of taking care of shutter spring mechanism.
About the optics itself. It has some pretty short registration distance so it could be mounted on mirrorless cameras. In order to mount it on DSLR you should use that cameras with short flange distance or use some teleconverter. I will try both later on.
Tried to manually put it on my M42 Praktica and I need to put it literally inside camera unit, just next to the mirror. Be careful then with your camera as you may damage mirror putting anything next to it.
I got this one as an exchange item for some old LCD TV. It is 35mm film compact camera made in USSR. Having quite a big monopoly on the eastern market, Soviet Russia manufacturer brought over 30 million of these to the markets. SMENA 8M is a very lightweight camera. It is made mostly of cheap plastic, springs, levers and dials. No electronics at all. No light meter, no mirror, no motor to move the film.
It has fixed lens at 40mm, f/4.0. It is made of aluminum. Mine wobbles a little bit while rotating its focus ring. Whole thing is packed into lens unit, which is shutter, aperture and optics.
SMENA 8M has no film advance mechanism. You need to manually rotate right dial to move film which goes together with frame counter. I find it a little bit confusing as it rotates more than full circle each time.
Film load, unload is completely manual. You need to be careful while unwinding the film as everything has some quite high, loose tolerance. Avoid light leaks, do not push hard if something is stuck. Better disassemble it first and fix unwinding dial. Simply screw it more not to touch viewing glass. This is the second most popular fix in this cameras. First one is blocked shutter. Mine camera fortunately is fine in this area.
Everything is packed inside lens unit. Preparing to take photo is to push the lever located on the lens. Shutter button moves down a shaft which presses shutter lever. Shutter has 3 blades. It goes as 1/8, 1/15, 1/30, 1/60, 1/125, 1/250 and bulb which means that it stays open as long as you hold shutter button depressed.
You do not control aperture in direct way. Either you set film sensitivity in ROST/DIN measurement. Of course this also means that you set aperture, but to do this you rotate inner ring just around the optics. Black one. It is very diffucult to do this while framing and taking pictures. This could be defined as aperture priority. You just set it and forget. It is build that way to avoid changing it at all. You are asked only to take pictures with broad depth-of-field, which means that everything should be in focus. ROST 65 means ISO 100 which gives f/8.0. Pretty high, but good enough to have everything in focus and sharp. Intentionally.
You cannot check focus. Just set it to particular value of distance in meters and keep your fingers crossed. You have some icons specifying closeups, group photos and landscapes. You need to be at that very distance from the subject. Keep that in mind.
You can control shutter speed both wich icons and specific shutter speeds. Starts with sunny conditions at 1/250, ends with rain clouds at 1/15. It is just a suggestion. Remember if you try to over or underexpose from the target exposure you need to change the same amount of stops in some way at aperture dial. That is why you should do this only if you experiment and know what you actually do.
Conclusion
I got this with no idea what I will do with this later. It is complete, working but frankly speaking I think that I will take lens and mount it on some DSLR and forget about the camera unit itself. Will try to write later about this idea.
It seems to be very decent lens. Especially speaking of build quality which is glass and metal with very little rubber and plastic. It is prime lens at 300mm with constant f/5.6. It is quite light. Has 3 rings. First to adjust focus. Second to adjust aperture. Third one is to open or close aperture. Second and third work together somehow.
Below you can find 100% magnification (NIKON D200) of BTS antennas. Image is reasonably sharp with little haze, blur or soap. Shot at f/5.6 which is wide open. Target at 100m.
Below you can find same target, but with COSMOS AUTO TELEPLUS 2x. Aperture goes from f/5.6 to something around f/11. I can’t see much more in terms of details. Image was taken handheld so it might be little movement.
I won’t test it against any kind of CA or coma or anything like that, just because it’s long, cheap and slow. But it gives pretty pleasant pictures at good light and that is enough. In case one would like to shoot in low light vision should spend then 10 – 100 more than the cost of this lens.
Still looking for some reason to use mentioned earlier teleconverter. Found some interesting example when it might be useful. Below please find two pictures at 400% magnification showing little crack in the ceiling of some building some 200m far. Second picture show that some extra details could be seen at 600mm instead of 300mm.
I may recommend this lens but please remember to mount it only when having good or very good light.