In previous article about GPU pass-thru which can found here, I described how to setup things mostly from Proxmox perspective. However from VM perspective I would like to make a little follow-up, just to make things clear about it.
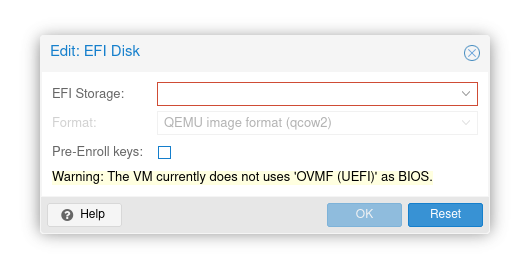
It has been told that you need to setup q35 machine with VirtIO-GPU and UEFI. It is true, but the most important thing is to actuall disable secure boot, which effectively prevents from loading NVIDIA driver modules.
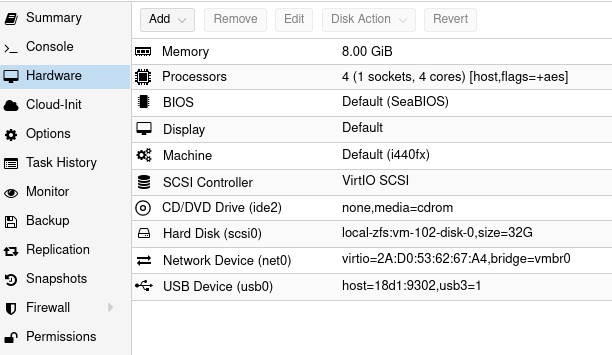
Add EFI disk, but do not check “pre-enroll keys”. This option would enroll keys and enable secure boot by default. Just add EFI disk without selecting this option and after starting VM you should be able to see your GPU in nvidia-smi.
Theory: running AI workload spreaded across various devices using pipeline parallel inference
In theory Exo provides a way to run memory heavy AI/LLM models workload onto many different devices spreading memory and computations across.
They say: “Unify your existing devices into one powerful GPU: iPhone, iPad, Android, Mac, NVIDIA, Raspberry Pi, pretty much any device!“
People say: “It requires mlx but it is an Apple silicon-only library as far as I can tell. How is it supposed to be (I quote) “iPhone, iPad, Android, Mac, Linux, pretty much any device” ? Has it been tested on anything else than the author’s MacBook ?“
So let’s check it out!
My setup is RTX 3060 12 GB VRAM. It runs on Linux/NVIDIA with default tinygrad runtime. On Mac it will be MLX runtime. Communication is over regular network. It uses CUDA toolkit and cuDNN library (deep neural network).
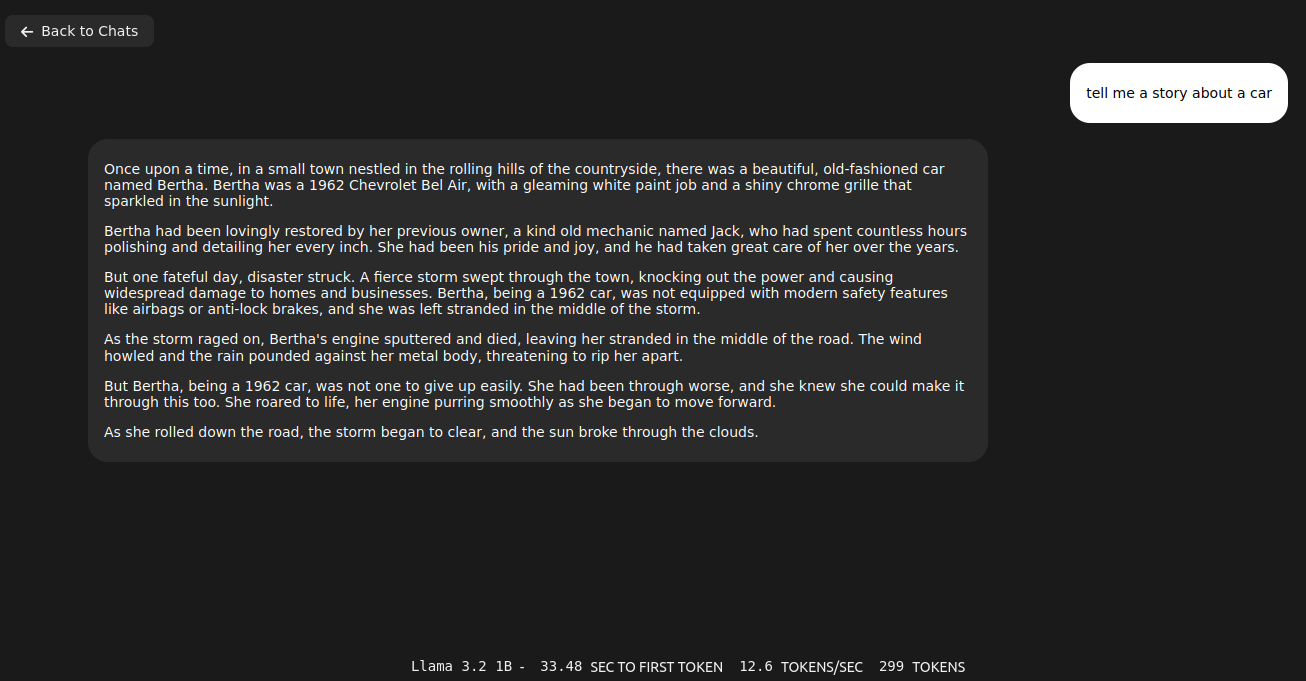
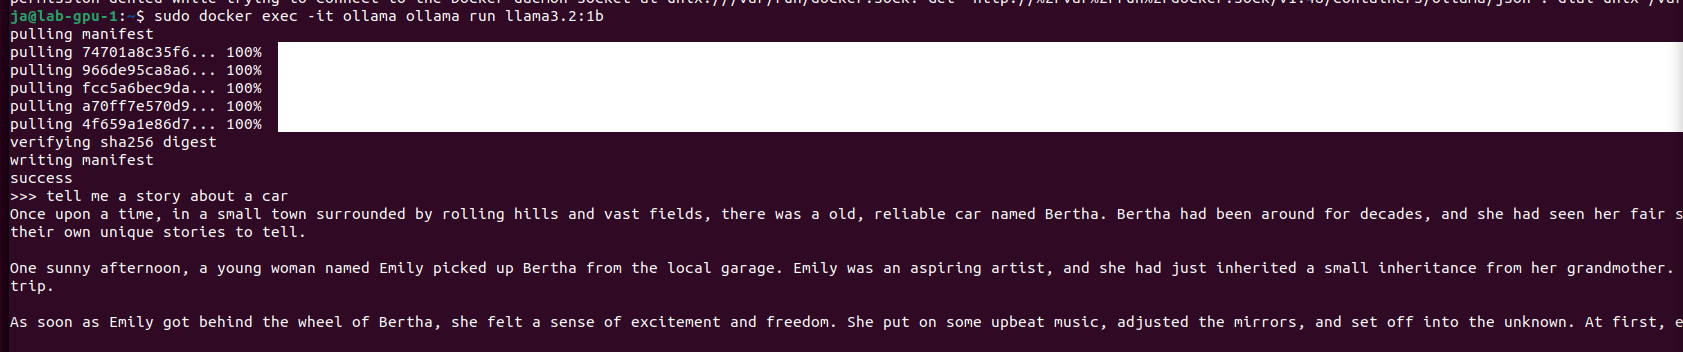
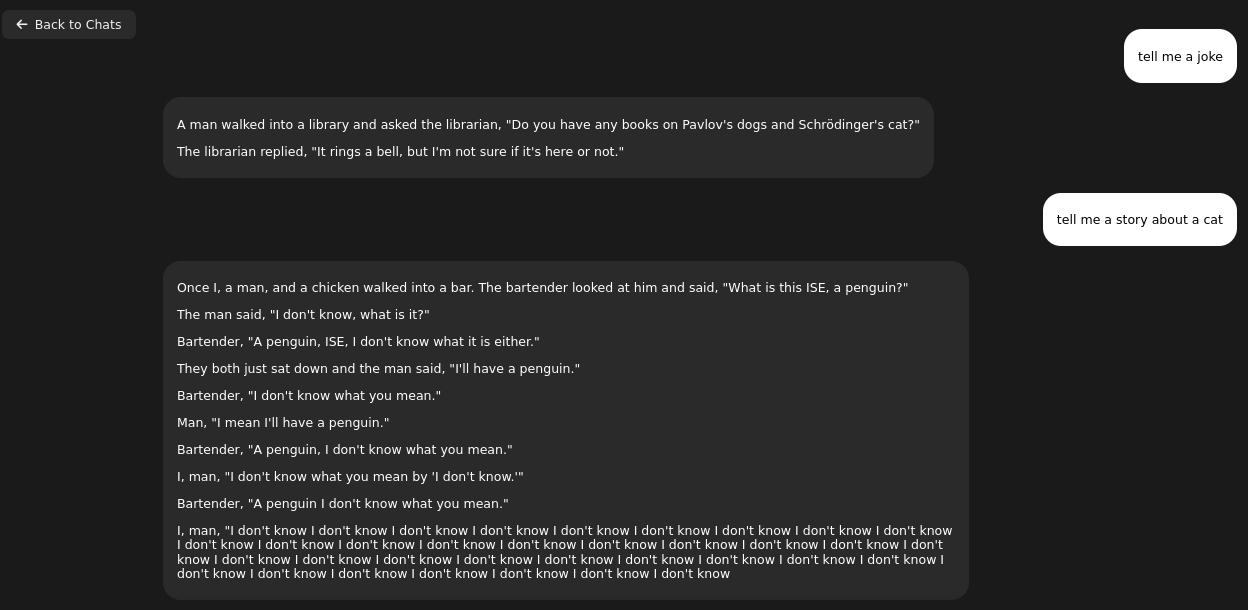
Quick comparison of Exo and Ollama running Llama 3.2:1b
Fact: Ollama server loads and executes models faster than Exo
Running Llama 3.2 1B on single node requires 5.5GB of VRAM. No, you can’t use multiple GPUs in single node. I tried different ways, but it does not work, there is feature request in that matter. T. You should be given chat URL where you can go thru regular web browser. To be sure Exo picks the correct network interface just pass address via –node-host parameter. To start Exo run the following comand:
exo --node-host IP_A
However, the same thing run on Ollama server takes only 2.1GB of VRAM (vs 5.5GB of VRAM on Exo) and can be even run on CPU/RAM. Speed of token generation thru Ollama server is way higher than on Exo.
sudo docker run -d --gpus=all -v ollama:/root/.ollama -p 11434:11434 --name ollama ollama/ollama
sudo docker exec -it ollama ollama run llama3.2:1b
So, in this cursory (narrow) comparison, Ollama server is ahead both in terms of memory consumption and speed of generation. At this point they both give somehow usable answers/content. Let’s push it to work more harder trying 3.2:3b. Well, first with Exo:
With no luck. It tried to allocate more than 12GB of VRAM in single node. Let’s try it with Ollama server for comparison:
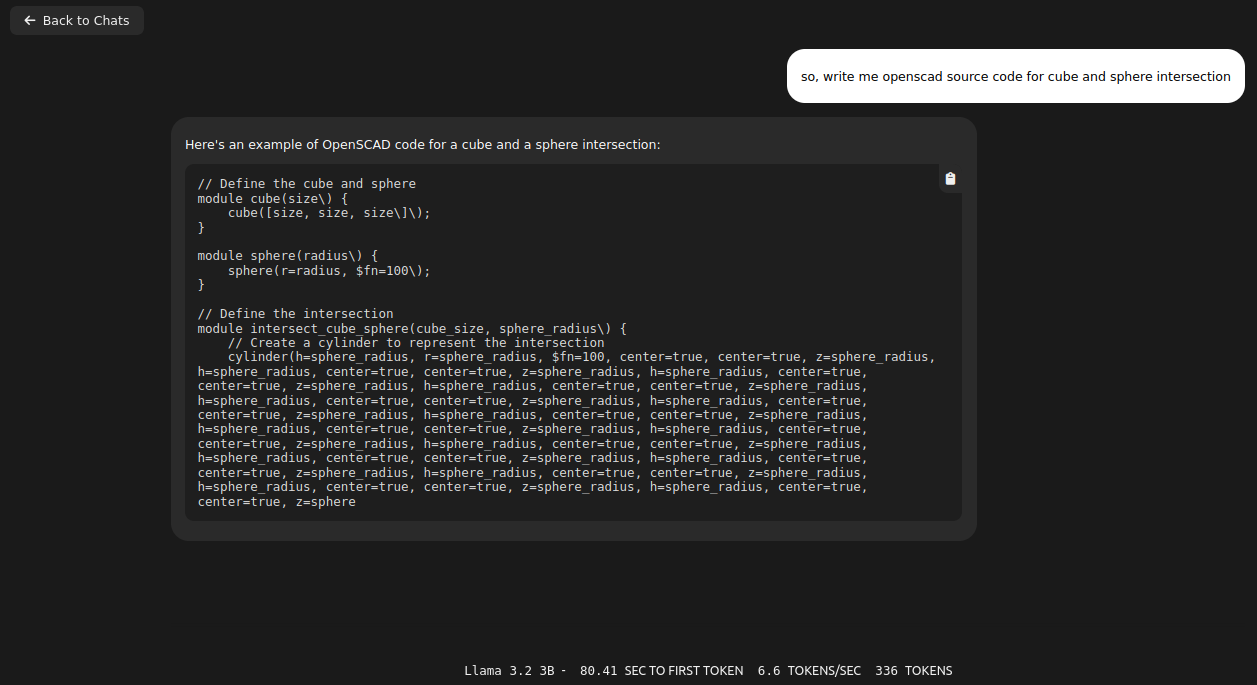
It gave me quite long story. It fit into memory by using only 3.3GB of VRAM. With Llama 3.1:8b it puts 6.1GB of VRAM. It can generate OpenSCAD source code for 3D desigs, so it is quite useful. With Ollama I start even run QwQ with 20B parameters taking 11GB VRAM and 10GB of RAM utilizing 1000% of CPU, which translates losely to 10vCPU at 100%. It can also provide me with OpenSCAD code, however much slower than using smaller models like 3b or 8b Llamas, few seconds comparing to few minutes of generation.
Add second node to Exo cluster
Fact: still absurd results
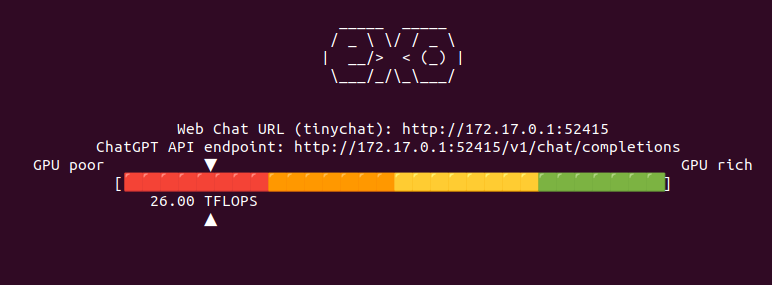
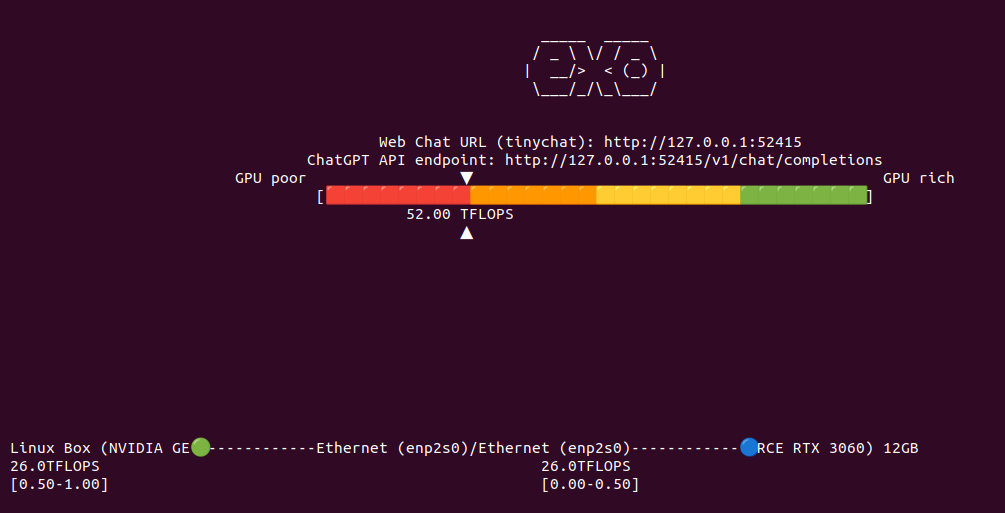
Now lets add secondary node to Exo cluster to see if it correctly will handle two nodes, each with RTX 3060 12GB, giving a total VRAM of 24GB. It says that combined I have 52 TFLOPS. However from Exo source code study I know that this is hard coded:
Same thing with models available thru TinyChat (web browser UI for Exo):
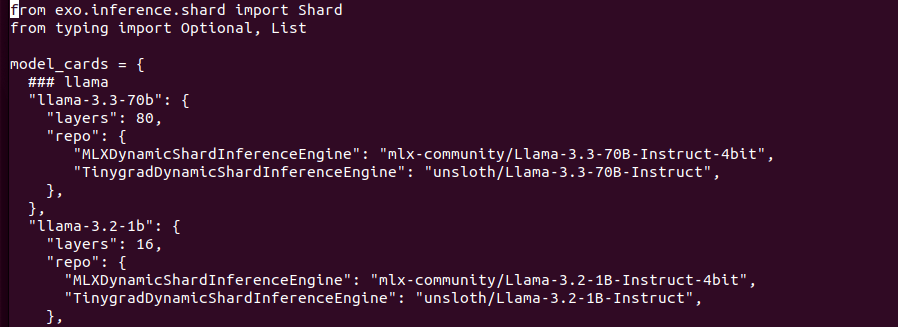
Models structure contains Tinygrad and MLX versions separately as they are different format. Downloading models from HuggingFace. I tried to replace models URL to run different onces, with no luck. I may find similar models from unsloth with same number of layers etc but I skipped this idea as it is not so important to be honest. Lets try with “built-in” models.
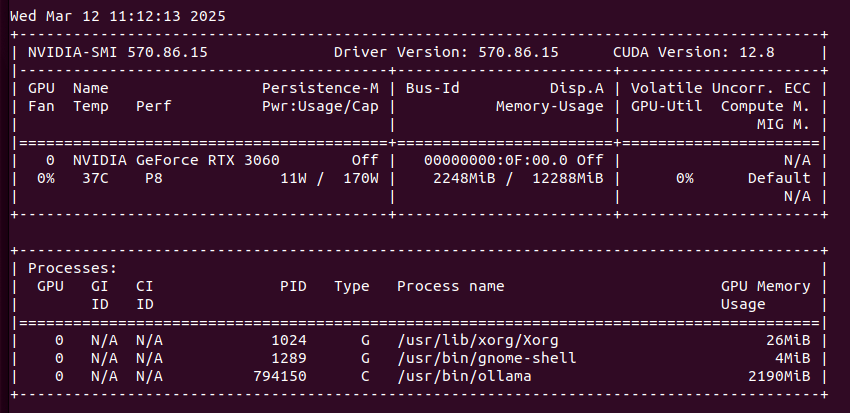
So I have now 52 TFLOPS divided into two nodes communicating over network. I restarted both Exo programs to clear out VRAM from previous tests to be sure that we run from ground zero. I aksed Llama 3.2:1B to generated OpenSCAD code. It took 26 seconds to first token, 9 tokens/s, gives totally absurd result and takes around 9GB VRAM in total across two nodes (4GB and 5GB).
Bigger models
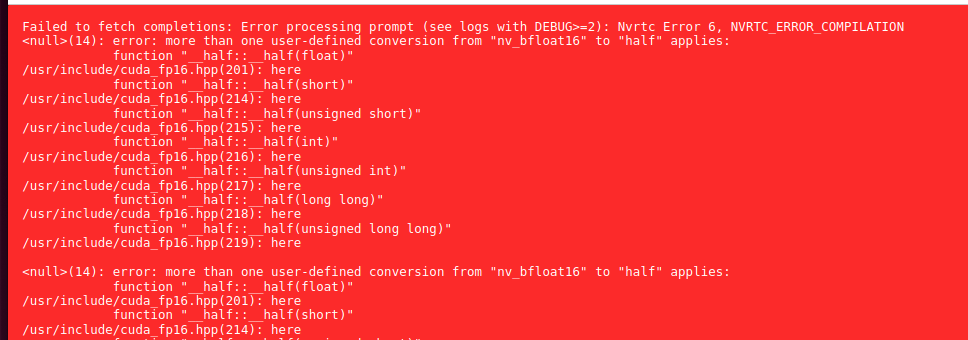
Fact: Exo is full of weird bugs and undocumented features
So… away from perfect but it works. Let’s try with bigger model, which does not fit in Exo on single node cluster.
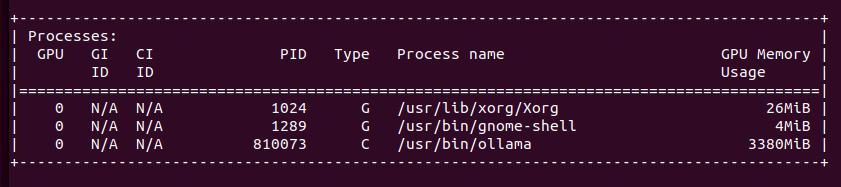
I loaded Llama 3.2:3B and it took over 8GB of VRAM on each node, giving 16GB of VRAM in total. Same question about OpenSCAD code with better results (not valid still…), however still with infinite loop in the end.
I thought that switching to v1.0 tag will be good idea. I was wrong:
There are some issue with downloading models also. They are kept in ~/.cache/exo/downloads folder, but not recognized somehow properly, which leads to downloading it once again over and over again.
Ubuntu 24
Fact: bugs are not because Ubuntu 22 or 24
In previous sections of this article I used Ubuntu 22 with NVIDIA 3060 12GB. It contains Python 3.10 and manually installed Python 3.12 with PIP 3.12. I came across GitHub issue where I found some hint about running Exo on a system with Python 3.10:
So I decided to reinstall my lab servers from Ubuntu 22 into 24.
In result I have the same loop in the end. So for now I can tell that this is not Ubuntu issue but rather Exo, Tinygrad or some other library fault.
Manually invoked prompt
Fact: it mixes contexts and do not unload previous layers
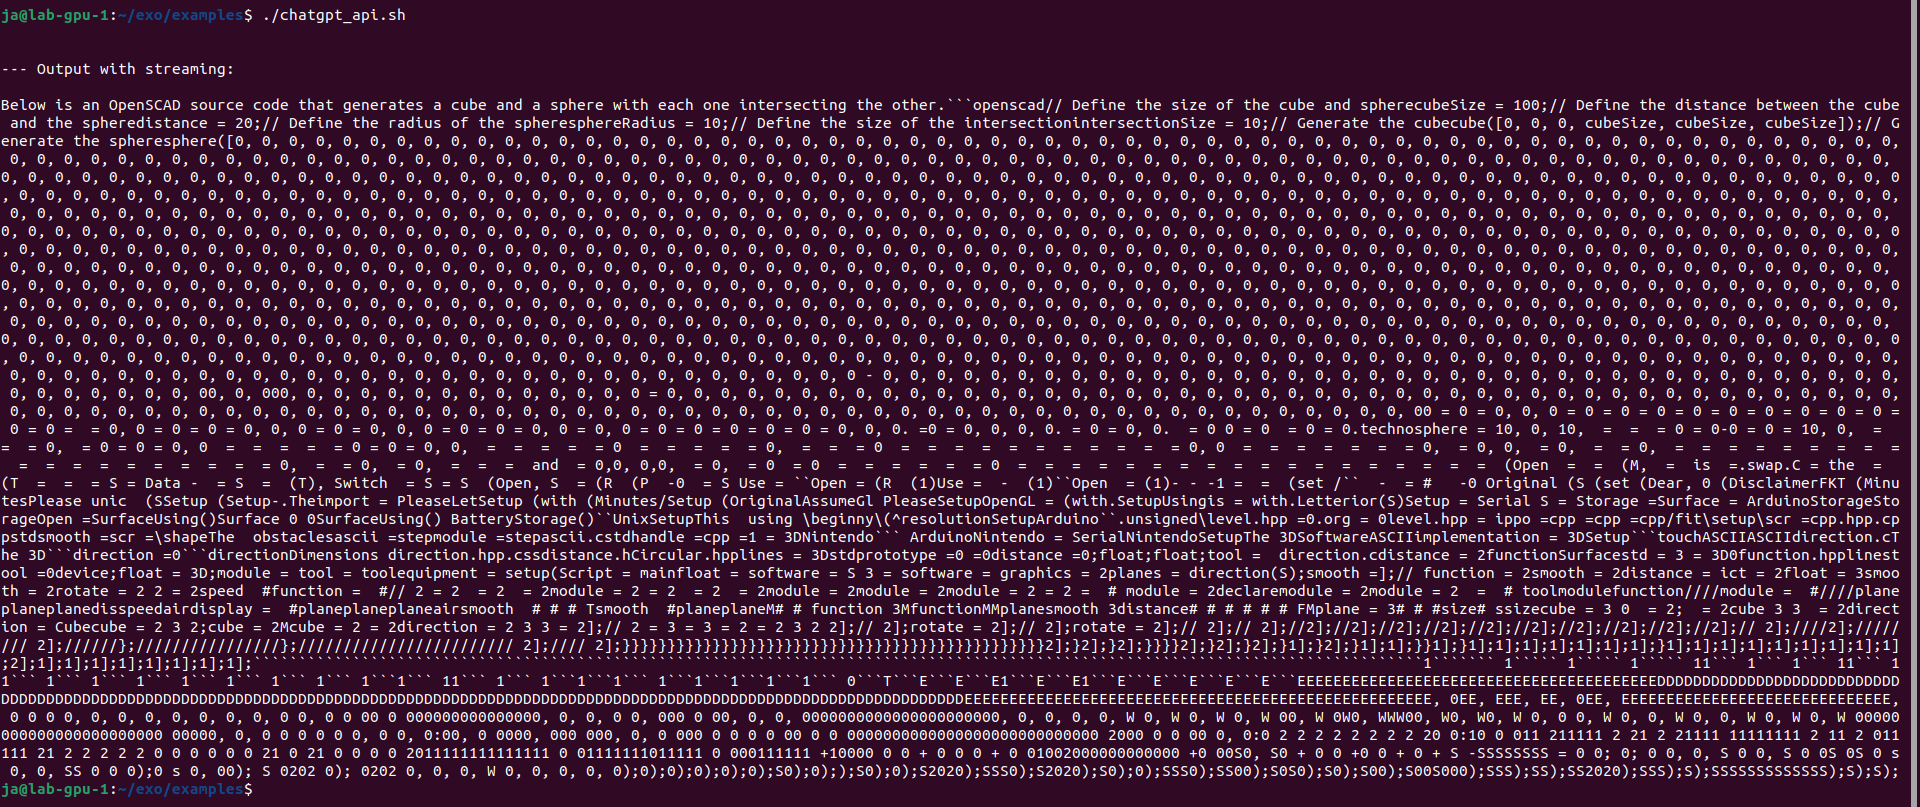
So I tried invoking Exo with cURL request as suggested in documentation. It took quite long to generate response. However it was it was quite good. Nothing much to complain about.
I tried another question without restarting Exo, meaning layers are present in memory and it started giving gibberish anwsers mixing contexts.
It gives further explanation about previously asked questions. Not exactly the expected thing:
You can use examples/chatgpt_api.sh which provides the same feeling. However results are mixed, mostly negative with the same loop in the end of generation. It is not limited anyhow so it will generate, generate, generate…
So there are problems with loading/unloading layers as well as never ending loop in generation.
Finally I got such response:
I also installed Python 3.12 from sources using pyenv. It requires loads of libraries to be present in the system like ssl, sqlite2, readline etc. Nothing changes. Still do not unloads layers and mixes contexts.
Other issues with DEBUG=6
Running on CPU
Fact: does not work on CPU
I was also unable to run execution on CPU instead of GPU. Documentation and issue tracker say that need to set CLANG=1 parameter:
It loads into RAM and run on single process CPU. After 30 seconds gives “Encountered unkown relocation type 4”.
Conclusion
Either I need some other hardware, OS or libraries or this Exo thing does not work at all… Will give a try later.
Well, in one of the previous articles I described how to invoke Ollama/moondream:1.8b using cURL, however I forgot to tell how to even run it in Docker container. So here you go:
sudo docker run -d --gpus=all -v ollama:/root/.ollama -p 11434:11434 --name ollama ollama/ollama
docker exec -it ollama ollama run moondream:1.8b
You can specify to run particular model in background (-d) or in foreground (without parameter -d). You can also define parallelism and maximum queue in Ollama server:
One important one regarding stability of Ollama server. Once it runs for over few hours there might be issue with GPU driver which requires restart, so Ollama needs to be monitored for such scenario. Moreover after minutes of idle time it will drop out of VRAM freeing it up. So be aware that once you allocate this VRAM for other things, Ollama might not run due to out of memory issue.
Final note is that Ollama requires NVIDIA Compute Capability 7.0 and greater to run which effectively is TITAN V, Quadro GB100, Tesla V100 or consumer grade later onces with CC 7.5 such as GTX 1650. You can then treat this very GTX 1650 as minumum one to run Ollama by now.
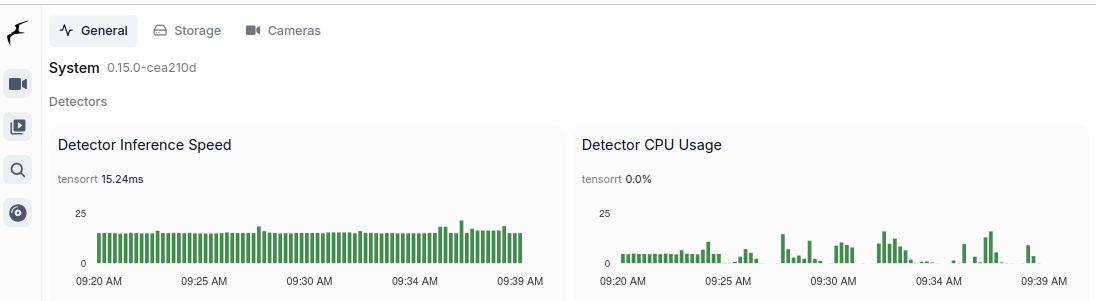
These are two majors which allow to run object detection models. Google Coral TPU is a physical module which can be in a form of USB stick. TensorRT is a feature of GPU runtime. Both allows to run detection models on them.
Coral TPU:
And TensorRT:
Compute Capabilities requirements
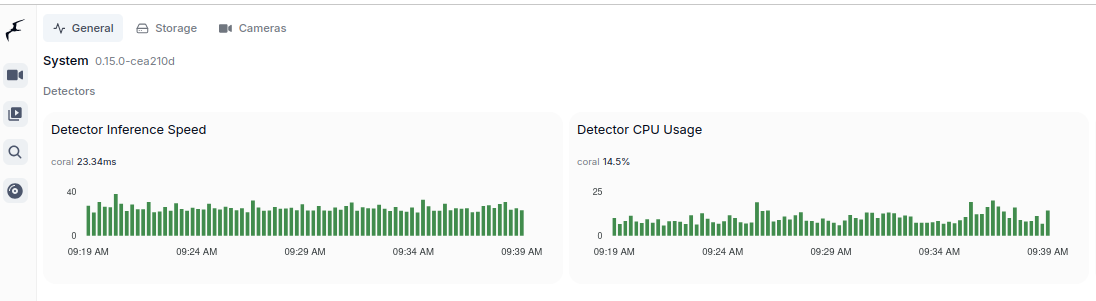
CC 5.0 is required to run DeepStack and TensorRT, but 7.0 to run Ollama moondream:1.8b. Even having GPU with CC 5.0 which is minimum required to run for instance TensorRT might be not enough due to some minor differences in implementation. It is better to run on GPU with higher CC. Moreover running on CC 5.0 means that GPU is older one which leads to performance degradation even as low as having 2 or 3 camera feeds for analysis.
Running TensorRT detection models (popular ones) requires little VRAM memory, 300 – 500 MB but it requires plenty of GPU cores and supplemental physical components to be present in such GPU, with high working clocks. In other words, you can fit those models in older GPUs but it will not perform well.
Other side of the story is to run Ollama which is GenAI requiring CC 7.0 and higher. Ollama with moondream:1.8b which is the smallest available detection model still requires little more than 3GB of VRAM.
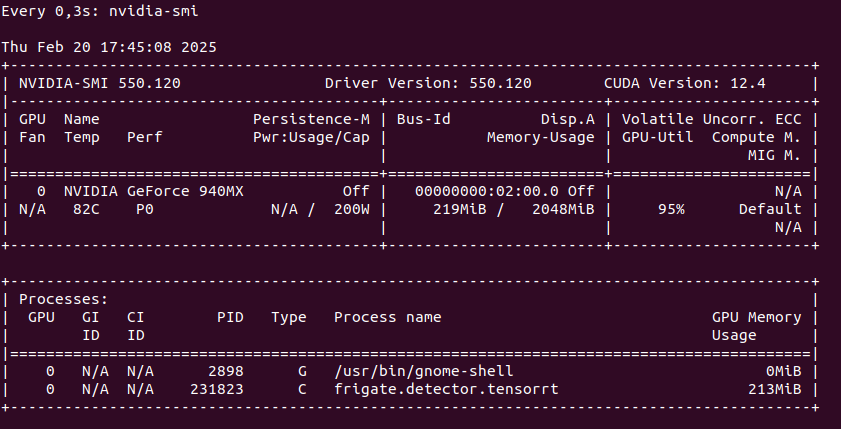
TensorRT on Geforce MX940
You can run TensorRT object detector from Frigate on NVIDIA Geforce 940MX with CC 5.0, but it will get hot at the same time you launch it. It run on driver 550 with CUDA 12.4 as follows on only one camera RTSP feed:
So this is not an option as we may burn this laptop GPU quickly. Configuration for TensorRT:
Pleas notice that Docker image is different if you want to run use GPU with TensorRT than without it. It is also not possible to run hardware accelerated decoder using FFMPEG with 940MX so disable it by passing empty array:
However if you would like to try hardware decoder with different GPU or CPU the play with this values:
preset-vaapi
present-nvidia
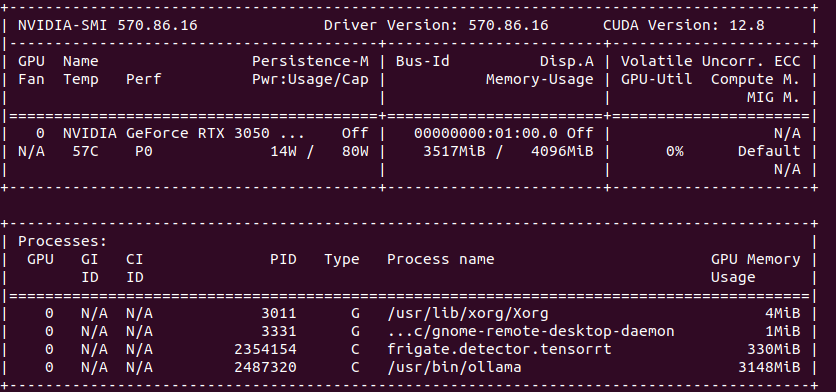
TensorRT on “modern” GPU
It is the best to run TensorRT on modern GPU with highest possible CC feature set. It will run detection fast, it will not get hot as quickly. Moreover it will have hardware support for video decoding. And even more you could run GenAI on the same machine.
So the minimum for object detection with GenAI descriptions is to have 4 GB VRAM. In my case it is NVIDIA RTX 3050 Ti Mobile which runs 25% at most with 4 – 5 camera feeds.
echo 'SUBSYSTEM=="usb", ATTR{idVendor}=="1a6e", GROUP="plugdev", MODE="0666"' | sudo tee /etc/udev/rules.d/99-edgetpu-accelerator.rules
sudo udevadm control --reload-rules && sudo udevadm trigger
Remember to run Coral via USB 3.0 as running it via USB 2.0 will cause performance drop by a factor of 2 or even 3 times. Second thing, to run Coral, first plug it in. Wait until it is recognized by the system:
lsusb
At first you will see not Google, but 1a6e Global Unichip. After TPU is initialized you will see 1da1 Google Inc:
You can pass Coral TPU via Proxmox USB device, but after each Proxmox restart you need to take care of TPU initialization:
Asking BLOOM-560M “what is love?” it replies with “The woman who had my first kiss in my life had no idea that I was a man”. wtf?!
Intro
I’ve been into parallel computing since 2021, playing with OpenCL (you can read about it here), looking for maximizing devices capabilities. I’ve got pretty decent in-depth knowledge about how computational process works on GPUs and I’m curious how the most recent AI/ML/LLM technology works. And here you have my little introduction to LLM topic from practical point-of-view.
Course of Action
BLOOM overview
vLLM
Transformers
Microsoft Azure NV VM
What’s next?
What is BLOOM?
It is a BigScience Large Open-science Open-access Multilingual language model. It based on transformer deep-learning concept, where text is coverted into tokens and then vectors for lookup tables. Deep learning itself is a machine learning method based on neural networks where you train artificial neurons. BLOOM is free and it was created by over 1000 researches. It has been trained on about 1.6 TB of pre-processed multilingual text.
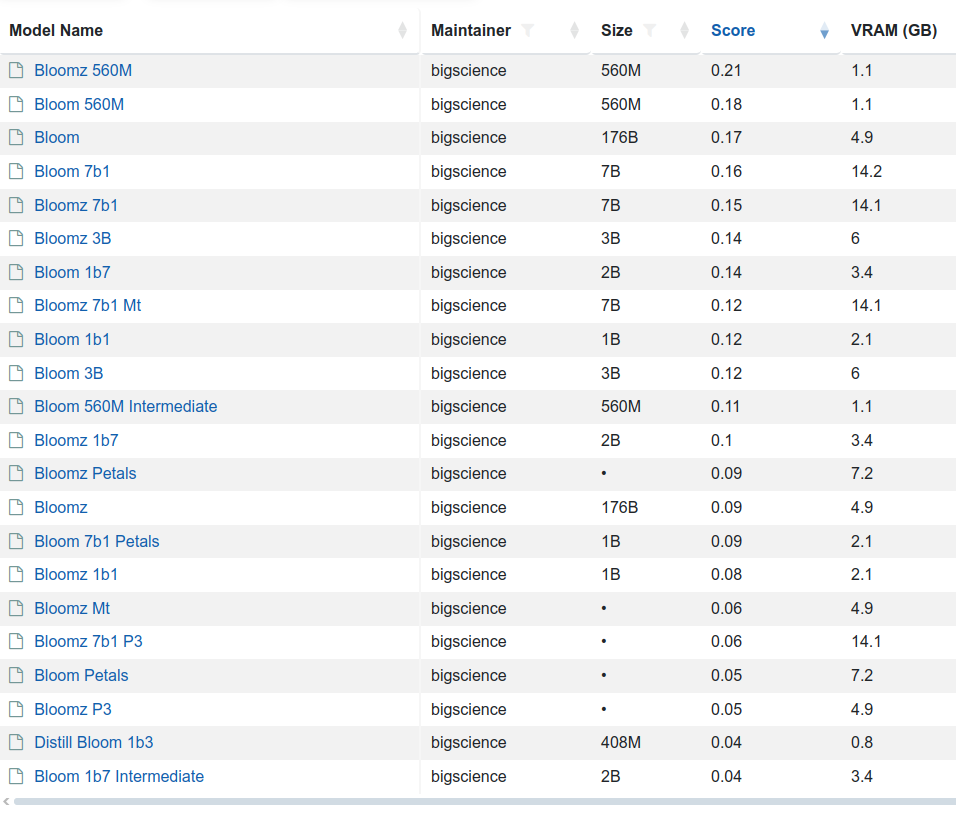
There are few variants of this model 176 billion elements (called just BLOOM) but also BLOOM 1b7 with 1.7 billion elements. There is even BLOOM 560M:
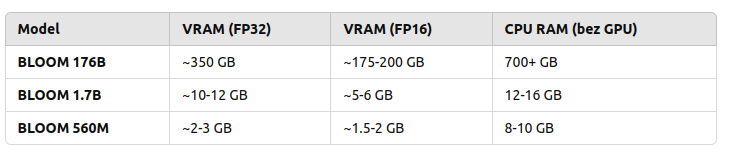
to load and run 176B you need to have 350 GB VRAM with FP32 and half with FP16
to load and run 1B7 you need somewhere between 10 and 12 GB VRAD and half with FP16
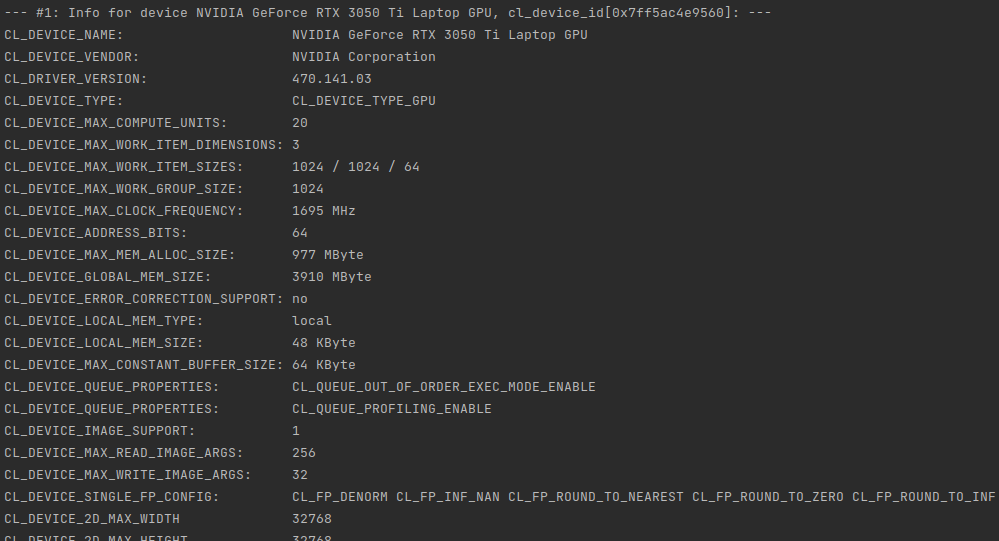
So in order to use my NVIDIA GeForce RTX 3050 Ti with 4GB RAM I would either need to run with BLOOM 560M which requires 2 to 3 GB VRAM and even below 2 GB VRAD in case of using FP16 mixed precision or… use CPU. So 176B requires 700 GB RAM, 1B7 requires 12 – 16 GB RAM and 560M requires 8 – 10 GB RAM.
Are those solid numbers? Lets find out!
vLLM
“vLLM is a Python library that also contains pre-compiled C++ and CUDA (12.1) binaries.”
“A high-throughput and memory-efficient inference and serving engine for LLMs”
You can download (from Hugging Face, company created in 2016 in USA) and serve language models with these few steps:
pip install vllm
vllm serve "bigscience/bloom"
And then once it’s started (and to be honest it won’t start just like that…):
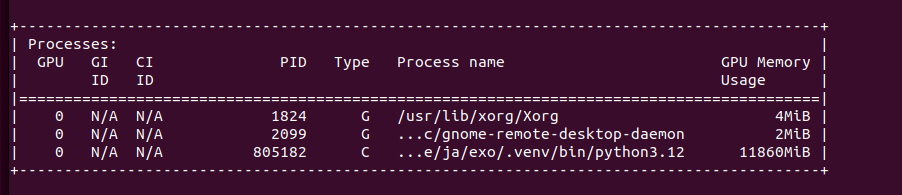
You can back up your vLLM runtime using GPU or CPU but also ROCm, OpenVINO, Neuron, TPU and XPU. It requires GPU compute capability 7.0 or higher. I’ve got my RTX 3050 Ti which has 8.6, but my Tesla K20Xm with 6GB VRAD has only 3.5 so it will not be able to use it.
[rank0]: torch.OutOfMemoryError: CUDA out of memory. Tried to allocate 736.00 MiB. GPU 0 has a total capacity of 3.81 GiB of which 73.00 MiB is free. Including non-PyTorch memory, this process has 3.73 GiB memory in use. Of the allocated memory 3.56 GiB is allocated by PyTorch, and 69.88 MiB is reserved by PyTorch but unallocated. If reserved but unallocated memory is large try setting PYTORCH_CUDA_ALLOC_CONF=expandable_segments:True to avoid fragmentation. See documentation for Memory Management (https://pytorch.org/docs/stable/notes/cuda.html#environment-variables)
or the following:
No available memory for the cache blocks. Try increasing `gpu_memory_utilization` when initializing the engine.
I may try later to check it out on bigger GPU but as for now, I will try to run it using transformers library which is the next topic.
Transformers
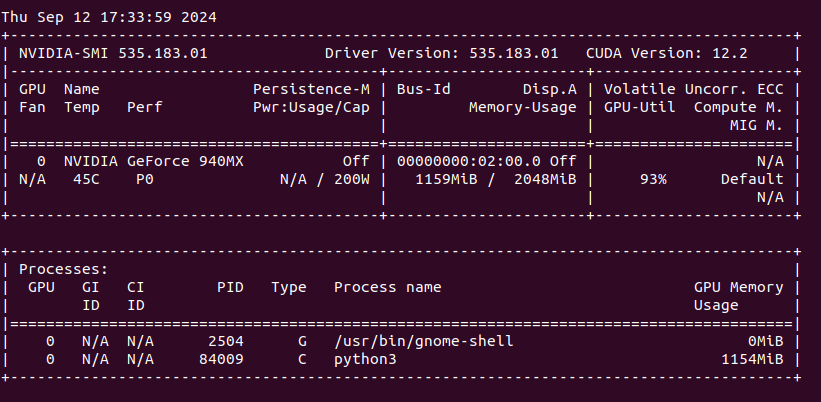
So I picked the same BLOOM 560M model. First, you need to install the following main packages and plenty of dependencies:
It will download the model and execute in Python program.
We can see that my NVIDIA GeForce 940MX with 2 GB VRAM is loaded around 60% with over 90% utilization (results from nvidia-smi).
“What is love?”. Anwser is as follows:
What is love? She never asked me the question but I am the one who has to give my answer. She is a beautiful, beautiful, very beautiful woman. The first thing you know about love is that it is the most complicated thing in the world. I was so shocked when I saw the man I thought I was marrying. My life was over. The woman who had my first kiss in my life had no idea that I was a man. She was so shocked. She said something
Next I asked for “The sun is shining and?”
I love this scene and I like when it comes to it. The sun, the sky and all the other stars are bright and I love that! I really enjoy this scene and it sets the scene for the rest of the story. It seems like the characters are just going about their day and the sun is shining. The world seems to be in its perfect place and everything is beautiful. I love the lighting in this scene and the warmth of the sunlight that
Does it make any sense? What is a concept of “sense” at all? Anyway it works, somehow. Lets find out the other possibilities.
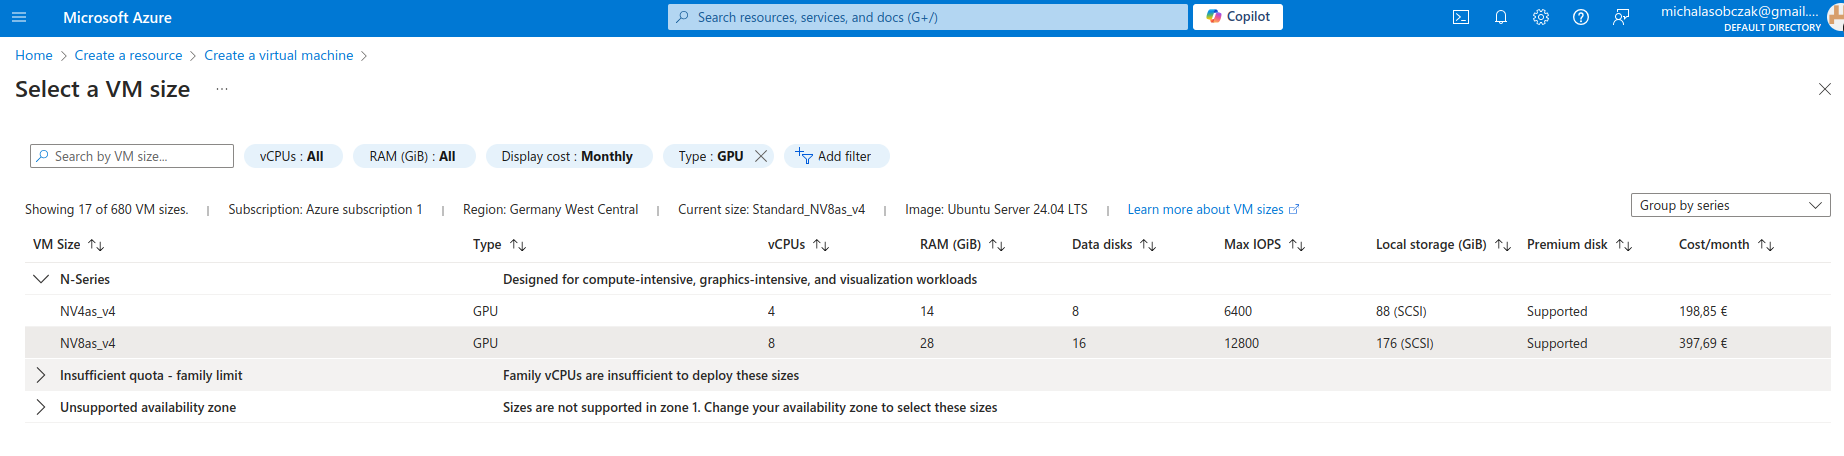
Microsoft Azure N-series virtual machines
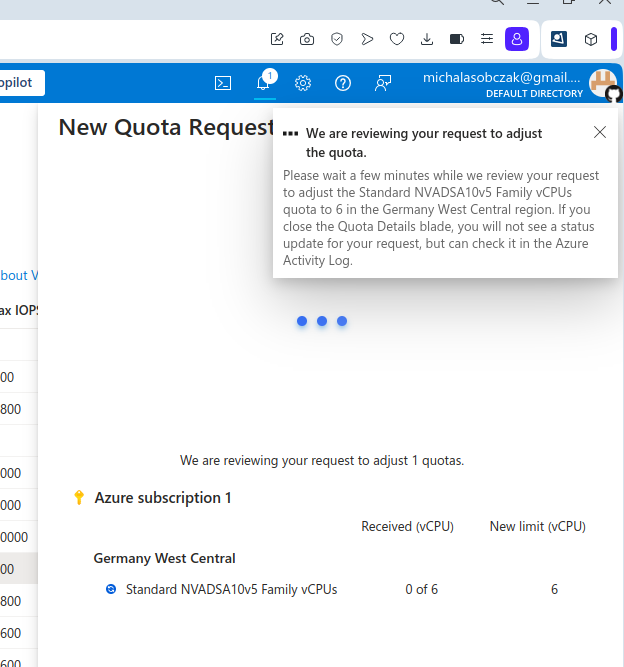
Instead of buying MSI Vector, ASUS ROG, Lenovo Legion Pro, MSI Raider or any kind of ultimate gaming laptops you go to Azure and pick on their NV virtual machines. Especially that they have 14 and 28 GB of VRAM onboard. It costs around 400 Euro per month, but you will not be using it all the time (I suppose).
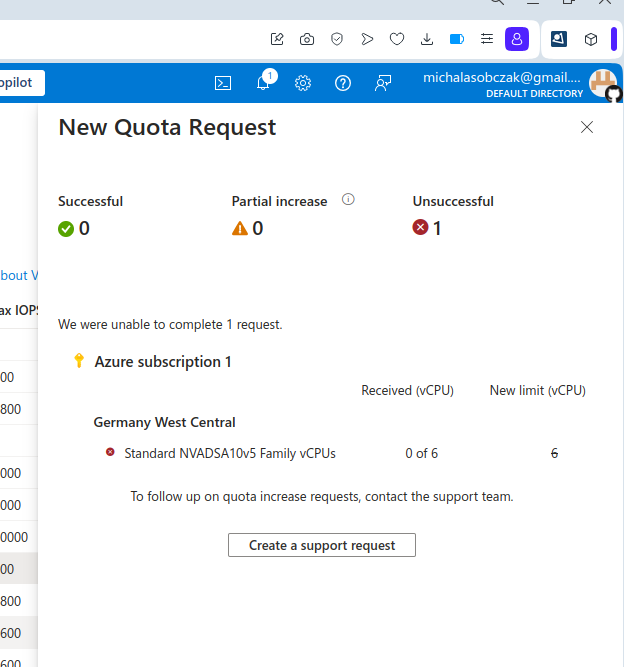
And I was not so sure how to use AMD GPU, so instead I decided to requests for a quote increase:
However I got rejected on my account with that request:
Unfortantely changing parameters and virtual machine types did not change the situation, I got still rejected and neeeded to submit support ticket to Microsoft in order to manually process it. So until next time!
I’ve been playing around with several devices in a context of running OpenCL code on them. They have one common thing which is excessive heat coming out of GPU and heatsink being unable to dissipate it. I start with MacBookPro3,1. It has NVIDIA 8600M GT, which is known to fail. I assume that it may be linked with overheating. Second example is design failure of Lenovo Thinkpad T420s which has built in NVIDIA NVS 4200M. This laptop has Optimus feature which in theory could detect if workload should be run on discrete or integrated GPU. Unfortunately enabling either Optimus or run-only-on discrete GPU causes extreme overheating up to 100 degress Celcius which makes this setup unusable (it slows down). Last example would be Lenovo Thinkpad T61 with NVS 140M. Contrary to previous examples, this one shows no issues with overheating itself, but is extremely fragile in terms of build quality. CPU has proper heatsink contact by means of 4 screws, but for unknown reason GPU which is 2 cm aside lacks of any screws and is dependent on separate metal clip which puts pressure on heatsink and has its own screw. I find it quite silly, because in case of thermal paste going bad or having loose this one screw it may completely damage GPU. Unscrewing just a little bit this one screw and temperature goes from 50 to 100 degrees risking fire I think….
So, back in a days when manufacturers tried to put dedicated GPU in compact laptops there were several examples of design flaws especially lacking proper heatsink and fans. Nowadays when discrete graphics are way more common on the market it is not uncommon to see several fans and huge blocks of metal giving away all this heat coming out from case because you run game or try to compute something in OpenCL.
Among various computing devices I have there is one that stands out it is NVIDIA Quadro NVS 140M because it supports only FP32 (float) operations, but not FP64 (double). It is generally too old. In OpenCL we have both pow function which takes double and float parameters. The latter is called pown. I use first one to actually benchmark double precision computation.
Model
Year
Core
Unit
Clk
Perf
1k
10k
100k
NVS 4200M
2011
48
1
1480
156/12
13
116
1163
Tesla K20xm
2012
2688
14
732
3935/1312
2
3
24
Intel i7 2640M
2011
2
4
2800
n/a
3
27
281
RTX 3050 Ti Mobile
2021
2560
20
1695
5299/83
2
10
90
Intel UHD 10200H
2020
192
12
1050
422/?
4
19
192
NVS 140M (FP32)
2007
16
2
800
25/-
47
445
4453
The fastest in this comparison is Tesla K20xm which I find a little surprising because it is from 2012 and it wins over RTX 3050 Ti Mobile from 2021. However if we take into consideration that FP64 performance of Tesla is 15 times greater (only 4 x in actual time) than RTX then it should be obvious why it wins.
I have no need to use double to be honest (integer should be just fine here), but it is a great chance to see performance differences between various devices. Using FP32 would be quite difficult to get such a broad range of timings. Using pown(float, integer) changes above table a little bit as we start using FP32 computations (at 100k elements):
Tesla K20xm: 12ms
RTX 3050 Ti Mobile: 3ms
NVS 4200m: 352ms
NVS140M: 4453ms
Now I look at those timings from theoretical performance measured in GFLOPS. Comparing NVS 4200M and NVS 140M we have relation of approx. 6 times (156 vs 25), but timing relation is only just close to 4. So other factors come to play here also. Comparing RTX 3050 Ti and Tesla K20xm we have 1.34 (5299 vs 3935), but timing relation is 4. So actual performance gain is much higher than I would expect comparing GFLOPS measurements.
Getting Tesla K20xm is a steal in terms of FP64 computations as it is on similar level as RTX 4090.
OpenCL implementation od DES cipher is way faster than regular single-threaded C program. 1 mln encryptions take less than a second on RTX 3050 Ti, but also as much as almost 40 seconds on Intel i5-10200h single-thread application.
Lack of compact and extremely portable SSL/TLS library in pre C++11 project made me think about going for something easy to implement on my own concerning data encryption. I’ve selected DES, which stands for Data Encryption Standard because of my general understanding of such algorithm. It comes from 1975 and has certain limitations including short key length or known weak keys. But if we put our prejudices aside we may see few interesting things and opportunities as well.
It took me several days to accomplish C99 kernel in OpenCL. Before this I tried few third party examples in c++. One major drawback is that all of them use strings, vectors, stringstreams and few other strictly c++ features. Even use of printf is problematic in OpenCL implementations as you may not get it or it may be working differently from implementation to implementation. You will not be able to use some of c99 features like malloc/free. So to get maximum compatibility I went down to the simplest solutions.
I especially admire example in which you use binary as strings (uchar arrays). This way you can easily see what is going on. Of course (really?) it adds complexity and increases instructions count as well as memory consumption but for the first DES implementation it is acceptable. So you will see in various places arrays of 8 byte elements meaning 64 bits of data. Keys and other values as 56 or 48 bits of data and finally halves as 32 bits values (4 byte digits). Both input and output can be displayed as characters. Input will be plain ASCII, but output come over 128 decimal ASCII code so you can see some weird characters in case of printing them instead of presenting only numbers.
OpenCL vs single threaded C
In order to run kernel code outside OpenCL runtime you need to provide few things:
You need to add math library in GCC invocation because by default it is not included:
gcc des.c -lm
Then, kernel main function need to be adjusted, for instance as:
void kernel() {
  // here we have the kernel function body...
}
And finally provide C language main function with iterations already parametrized:
int main() {
    int i;
	for (i=0; i<1024*1024; i++) {
		if (i % 1024 == 0) {
			printf("i: %i ", i);
		}
		kernel();
	}
}
For sake of simplicity I skip uchar8 definition and handling as it do not add than much to overall complexity of the code and the algorithm. Running on different hardware with 1024*1024 iterations. First going to compare CPU execution time:
Hardware
Duration
Dell G15: Intel Core i5 10200H 2.4 GHz
38s
MacBookPro3,1: Intel Core 2 Duo 2.2 GHz
1min 37s
PowerBook G4: PowerPC G4 800 MHz
11 min 22s
Now compare it with OpenCL runtime duration:
Hardware
Cores No
Compute Units (acc. to OpenCL)
Duration
NVIDIA GeForce RTX 3050 Ti Mobile
2560
20
930ms
Intel UHD 10th gen
192
12
2065ms
Java base project
I use OpenCL base project which can be found here. There is one additional module called “des”. Originally I used Java 17, but today I select Java 19. Frankly speaking I cannot point out easily anything that much important between Java 11 and 19. Each version introduces either small language changes or no changes at all. But if you code complex object-oriented applications then those changes might be interesting for you.
So… first I fill source data table with the following function:
    public void generateSampleRandomData() {
        Random rd = new Random();
        for (int i = 0; i <= (n*8) - 1; i++) {
            byte c = (byte)('a' + rd.nextInt(10));
            srcArrayA[i] = c;
        }
    }
This function generates n*8 byte elements within a range of ASCII ‘a’ letter decimal representation and 10 numbers ahead. In other words random characters will be within range from ‘a’ do ‘j’ which in decimal will be from 97 to 106. One word about byte type in Java language – it is always signed so there is direct possibility to use it as unsigned. There is however Byte.toUnsignedInt function which translates negative byte numbers into positives.
Next thing is buffer. As later we will see that kernel function utilizes uchar8 data type, there is need to map such type in Java. I came with idea of using plain byte array (byte[]). Each and every kernel invocation will map consecutive groups of 8 elements from this plain array:
   public void createBuffers() {
        // Allocate the memory objects for the input- and output data
        this.memObjects[0] = clCreateBuffer(this.context, CL_MEM_READ_ONLY | CL_MEM_COPY_HOST_PTR, (long) Sizeof.cl_uchar8 * this.n, KernelConfigurationSet.srcA, null);
        this.memObjects[1] = clCreateBuffer(this.context, CL_MEM_READ_WRITE, (long) Sizeof.cl_uchar8 * this.n, null, null);
    }
Both source and target arrays are type cl_uchar8 which translate into uchar8 in the kernel itself. To print results coming back from kernel invocations we will use aforemendtioned Byte.toUnsignedInt function:
public void printResults() {
        System.out.println("Elements: " + dstArray.length);
        int i = 0;
        for (byte tmp : dstArray) {
            System.out.println(String.valueOf(i) + " : " + (Byte.toUnsignedInt(tmp)) );
            i++;
        }
}
And that is basically all regarding Java part of this challange. Use of Java here is a matter of covenience as you may do it also using c or c++. I do not know by now about any discrepancies in JOCL library and some other libraries available.
OpenCL 1.1
In order to run kernel code on some older devices you need to adjust few things. First you need to get rid of printf function invocations or define it by yourself. Second things you need to enable floating point cl_khr_fp64extension in case of using double type:
#pragma OPENCL EXTENSION cl_khr_fp64 : enable
There are options no to use pow function and convert the entire cipher algorithm to use bit selection. For my educational purposes however it is much easier to see what’s going on like that.
C99 kernel
I’ve divided the DES cipher algorithm into 27 functional points from FP00 to FP26. Some of them contains data only and other ones consists procedures.
General section
FP00 – auxilliary functions (lines 1-133)
FP01 – kernel definition
FP02 – data and identification
FP03 – key
FP04 – plain text
FP05 – PC1/PC2 tables data
Generating keys
FP06 – PC1 key permutation
FP07 – key division into two equal halves
FP08 – 16 round keys, for 1, 2, 9 and 16 single left shifts
FP09 – for other iteration double left shifts
FP10 – combining left and right parts
FP11 – PC2 key permutation
Encryption procedure
FP12 – data only, initial permutation and expansion table data
FP13 – data only, substitution boxes 8 boxes, 4 rows, 16 colums each
FP14 – data only, permutation table
FP15 – applying initial permutation
FP16 – dividing result into two equal halves
FP17 – encrypting 16 times, right laft is expanded
FP18 – result XORed with key
FP19 – apply 8 times substitution boxes
FP20 – applying permutation
FP21 – result XORed with left half
FP22 – left and right part of plain text swapped
FP23 – combining left and right part
FP24 – applying inverse permutation
FP25 – preparing final result
FP26 – writing result to the output OpenCL buffer
Summary
In this challange… which source code can be found here I verified possibility to code DES cipher algorithm using OpenCL enabled devices. This 500 lines of code can be run either on OpenCL device or in slightly modified form on any other devices with can compile C language. OpenCL implementation runs 40 times faster on GPU than on single threaded CPU. This was kinda interesing one…