BLOOM LLM: how to use?

Asking BLOOM-560M “what is love?” it replies with “The woman who had my first kiss in my life had no idea that I was a man”. wtf?!

Intro

I’ve been into parallel computing since 2021, playing with OpenCL (you can read about it here), looking for maximizing devices capabilities. I’ve got pretty decent in-depth knowledge about how computational process works on GPUs and I’m curious how the most recent AI/ML/LLM technology works. And here you have my little introduction to LLM topic from practical point-of-view.

Course of Action

  • BLOOM overview
  • vLLM
  • Transformers
  • Microsoft Azure NV VM
  • What’s next?

What is BLOOM?

It is a BigScience Large Open-science Open-access Multilingual language model. It based on transformer deep-learning concept, where text is coverted into tokens and then vectors for lookup tables. Deep learning itself is a machine learning method based on neural networks where you train artificial neurons. BLOOM is free and it was created by over 1000 researches. It has been trained on about 1.6 TB of pre-processed multilingual text.

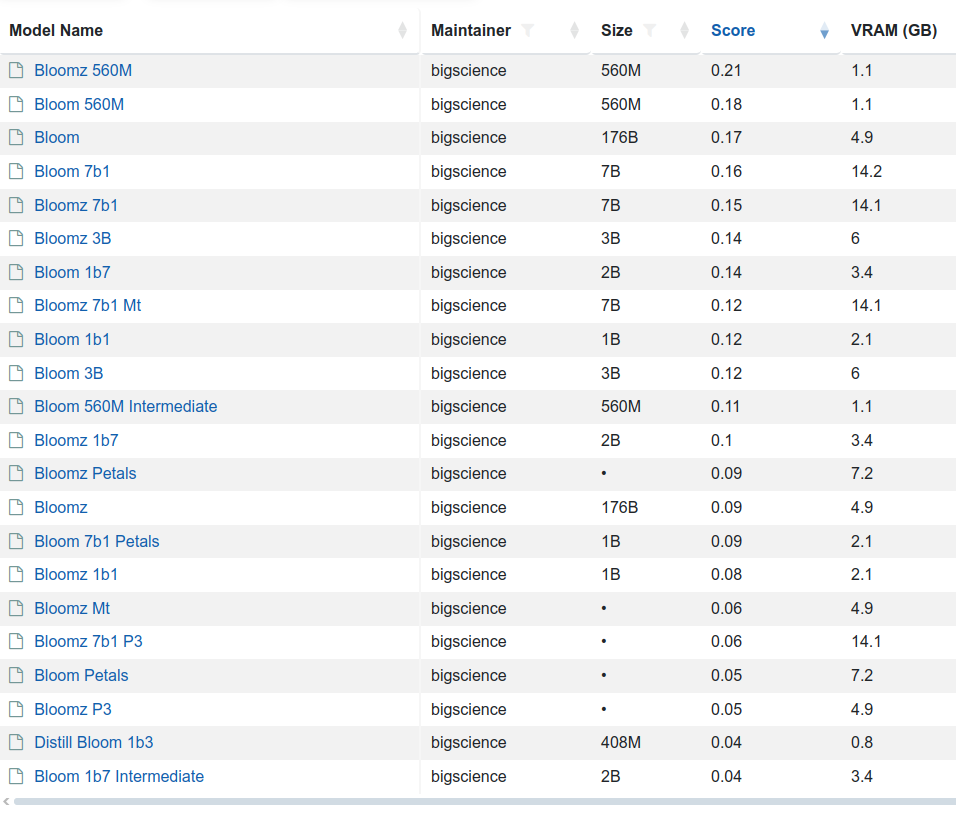
There are few variants of this model 176 billion elements (called just BLOOM) but also BLOOM 1b7 with 1.7 billion elements. There is even BLOOM 560M:

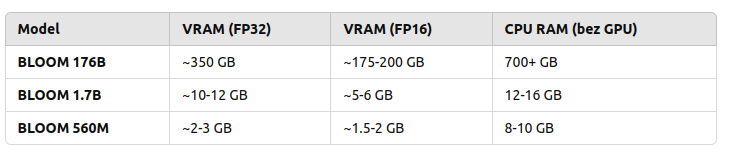
  • to load and run 176B you need to have 350 GB VRAM with FP32 and half with FP16
  • to load and run 1B7 you need somewhere between 10 and 12 GB VRAD and half with FP16

So in order to use my NVIDIA GeForce RTX 3050 Ti with 4GB RAM I would either need to run with BLOOM 560M which requires 2 to 3 GB VRAM and even below 2 GB VRAD in case of using FP16 mixed precision or… use CPU. So 176B requires 700 GB RAM, 1B7 requires 12 – 16 GB RAM and 560M requires 8 – 10 GB RAM.

Are those solid numbers? Lets find out!

vLLM

“vLLM is a Python library that also contains pre-compiled C++ and CUDA (12.1) binaries.”

“A high-throughput and memory-efficient inference and serving engine for LLMs”

You can download (from Hugging Face, company created in 2016 in USA) and serve language models with these few steps:

pip install vllm
vllm serve "bigscience/bloom"

And then once it’s started (and to be honest it won’t start just like that…):

curl -X POST "http://localhost:8000/v1/chat/completions" \ 
	-H "Content-Type: application/json" \ 
	--data '{
		"model": "bigscience/bloom"
		"messages": [
			{"role": "user", "content": "Hello!"}
		]
	}'

You can back up your vLLM runtime using GPU or CPU but also ROCm, OpenVINO, Neuron, TPU and XPU. It requires GPU compute capability 7.0 or higher. I’ve got my RTX 3050 Ti which has 8.6, but my Tesla K20Xm with 6GB VRAD has only 3.5 so it will not be able to use it.

Here is the Python program:

from vllm import LLM, SamplingParams
model_name = "bigscience/bloom-560M"
llm = LLM(model=model_name, gpu_memory_utilization=0.6,  cpu_offload_gb=4, swap_space=2)
question = "What is love?"
sampling_params = SamplingParams(
    temperature=0.5,     
    max_tokens=10,
)
output = llm.generate([question], sampling_params)
print(output[0].outputs[0].text)

In return, there is either:

[rank0]: torch.OutOfMemoryError: CUDA out of memory. Tried to allocate 736.00 MiB. GPU 0 has a total capacity of 3.81 GiB of which 73.00 MiB is free. Including non-PyTorch memory, this process has 3.73 GiB memory in use. Of the allocated memory 3.56 GiB is allocated by PyTorch, and 69.88 MiB is reserved by PyTorch but unallocated. If reserved but unallocated memory is large try setting PYTORCH_CUDA_ALLOC_CONF=expandable_segments:True to avoid fragmentation.  See documentation for Memory Management  (https://pytorch.org/docs/stable/notes/cuda.html#environment-variables)

or the following:

No available memory for the cache blocks. Try increasing `gpu_memory_utilization` when initializing the engine.

I may try later to check it out on bigger GPU but as for now, I will try to run it using transformers library which is the next topic.

Transformers

So I picked the same BLOOM 560M model. First, you need to install the following main packages and plenty of dependencies:

pip install transformers
pip install torch
pip install accelerate

Source code of Python program using those libraries is as follows:

from transformers import AutoTokenizer, AutoModelForCausalLM
import torch
tokenizer = AutoTokenizer.from_pretrained("bigscience/bloom-560m")
model = AutoModelForCausalLM.from_pretrained(
    "bigscience/bloom-560m", 
    device_map="auto", 
    torch_dtype="auto"
)
def ask_bloom(question, max_length=100, temperature=0.7):
    inputs = tokenizer(question, return_tensors="pt").to(model.device)
    output = model.generate(
        inputs['input_ids'],
        max_length=max_length,  
        temperature=temperature,   
        pad_token_id=tokenizer.eos_token_id, 
        do_sample=True             
    )
    answer = tokenizer.decode(output[0], skip_special_tokens=True)
    return answer
question = "What is love?"
answer = ask_bloom(question)
print(f"Q: {question}\nAnwser: {answer}")

To run:

python3 transformers-torch.py

It will download the model and execute in Python program.

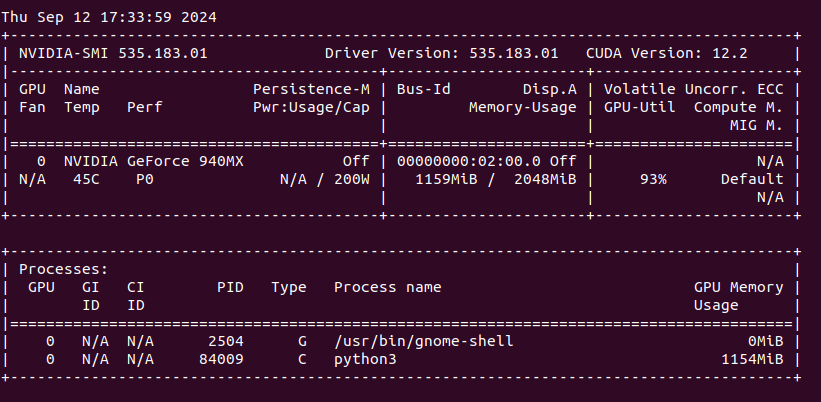
We can see that my NVIDIA GeForce 940MX with 2 GB VRAM is loaded around 60% with over 90% utilization (results from nvidia-smi).

“What is love?”. Anwser is as follows:

What is love? She never asked me the question but I am the one who has to give my answer. She is a beautiful, beautiful, very beautiful woman. The first thing you know about love is that it is the most complicated thing in the world. I was so shocked when I saw the man I thought I was marrying. My life was over. The woman who had my first kiss in my life had no idea that I was a man. She was so shocked. She said something

Next I asked for “The sun is shining and?”

I love this scene and I like when it comes to it. The sun, the sky and all the other stars are bright and I love that! I really enjoy this scene and it sets the scene for the rest of the story. It seems like the characters are just going about their day and the sun is shining. The world seems to be in its perfect place and everything is beautiful. I love the lighting in this scene and the warmth of the sunlight that

Does it make any sense? What is a concept of “sense” at all? Anyway it works, somehow. Lets find out the other possibilities.

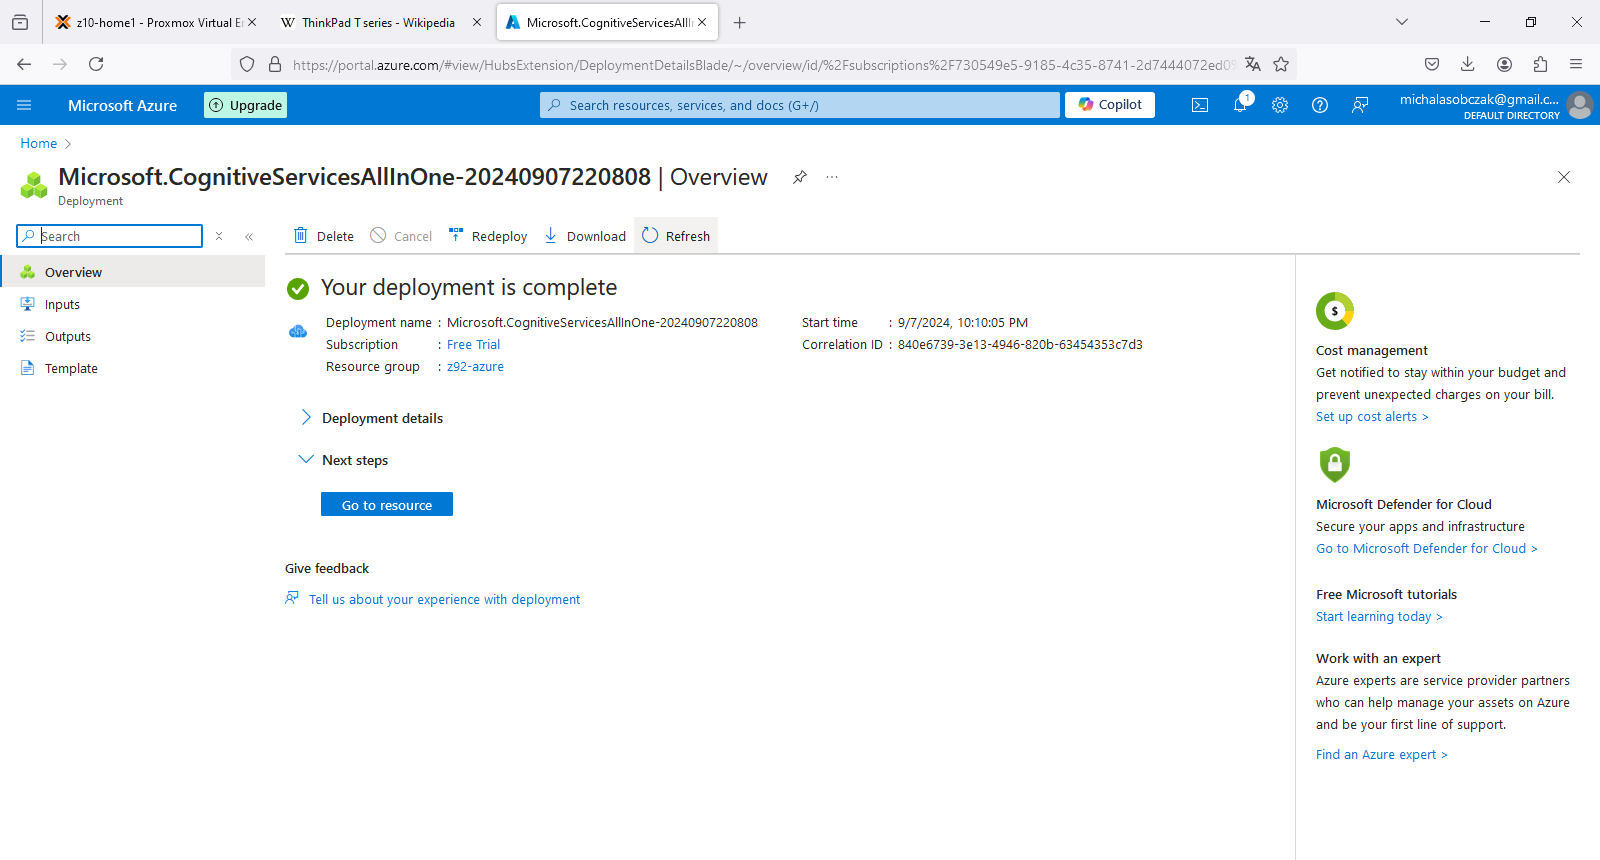
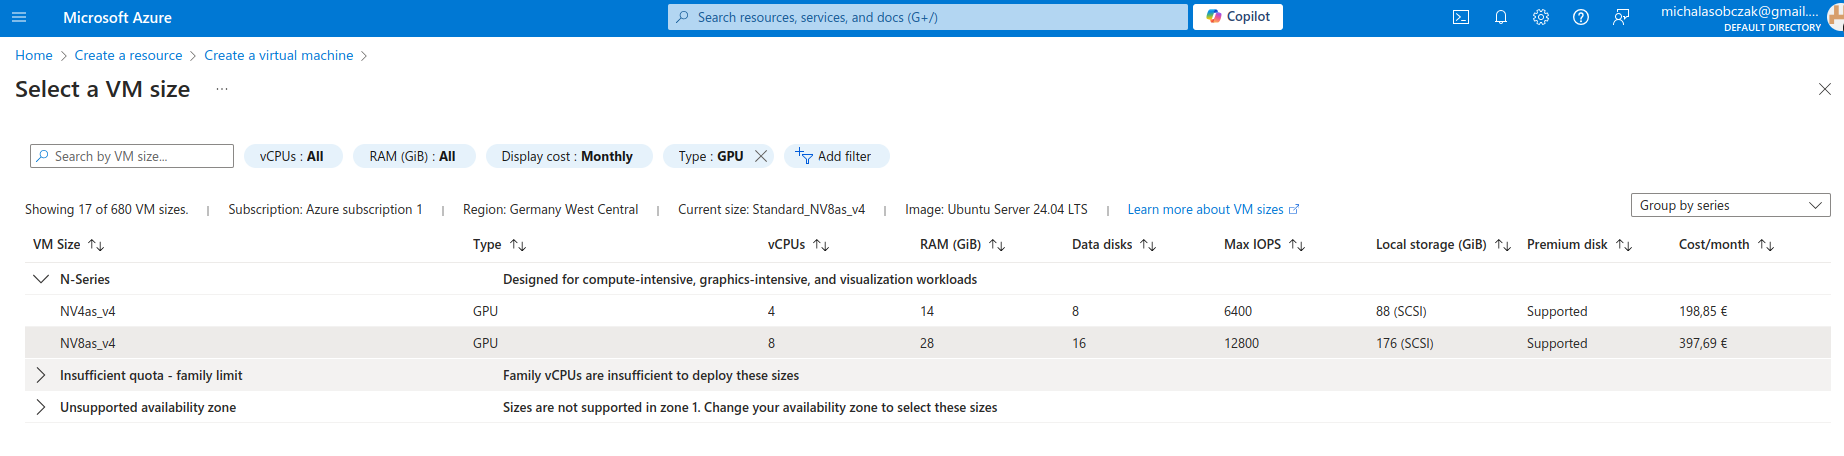
Microsoft Azure N-series virtual machines

Instead of buying MSI Vector, ASUS ROG, Lenovo Legion Pro, MSI Raider or any kind of ultimate gaming laptops you go to Azure and pick on their NV virtual machines. Especially that they have 14 and 28 GB of VRAM onboard. It costs around 400 Euro per month, but you will not be using it all the time (I suppose).

We have:

root@z92-az-bloom:/home/adminadmin# lspci 
0002:00:00.0 VGA compatible controller: Advanced Micro Devices, Inc. [AMD/ATI] Vega 10 [Instinct MI25 MxGPU/MI25x2 MxGPU/V340 MxGPU/V340L MxGPU]

And I was not so sure how to use AMD GPU, so instead I decided to requests for a quote increase:

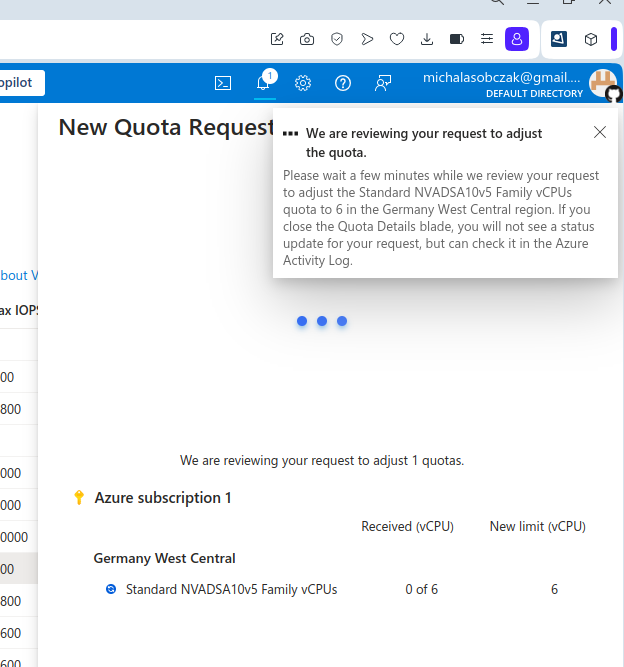
However I got rejected on my account with that request:

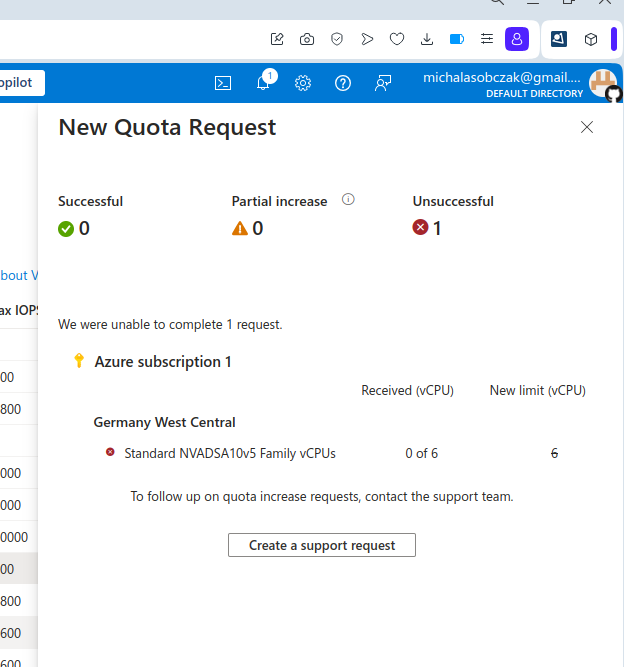
Unfortantely changing parameters and virtual machine types did not change the situation, I got still rejected and neeeded to submit support ticket to Microsoft in order to manually process it. So until next time!

What’s next to check?

AWS g6 and Hetzner GEX44. Keep reading!

Further reading

Big-tech cloud vs competitors: price-wise

Imagine you would like run 2 x vCPU and 4 GB RAM virtual machine. Which service provider do you choose? Azure, AWS or Hetzner?

With AWS you pay 65 USD (c5.large instance… and by the way why this is called large at all?). You pick Microsoft Azure you pay 36 Euro (B2s). If you would pick DigitealOcean then you pay 24 USD (noname “droplet”). Choosing Scaleway you pay 19 Euro (PLAY2-NANO compute instance in Warsaw DC). However, with Hetzner Cloud you pay as little as 4.51 Euro (CX22 virtual server). How is that even possible? So it goes like this (converted from USD to Euro):

  • AWS: 59 Euro
  • Azure: 36 Euro
  • DigitalOcean: 22 Euro
  • Scaleway: 19 Euro
  • Hetzner Cloud: less than 5 Euro

With different offers for vCPU and RAM the propotion stays similar, especially in Microsoft Azure. Both Azure and AWS are big-tech companies which make billions of dollars on this offer. Companies like DigitalOcean, Scaleway and Hetzner cannot be called big-tech, because they are much narrower in their businesses and do not offer that high amount of features in their platforms, contrary to Azure and AWS which have hundreds of features available. Keep in mind that this is very synthetic comparison, but if you would like to go with that specific use case scenario you will see the difference.

Every platform has its best. AWS was among the first on the market. Microsoft Azure has its gigantic platform and it is the most recognizable. DigitalOcean, Scaleway and Hetzner are many more (like Rackspace for instance) are the most popular, reliable among other non-big-tech dedicated servers and cloud services providers. I personally especially like services from Hetzner, not only because of their prices but excellent customer service, which is hard to offer within Microsoft or Amazon. If you want somehow more personal approach then go for non-big-tech solutions.

Important notice: any kind of recommendations here are my personal opinion and has not been backup-up by any of those providers.

Who’s got the biggest load average?

Ever wondered what can be the highest load average on the unix-like system? Do we even know what this parameter tells about? It shows the average number of either actively running or waiting processes. It should be close to the number of logical processors present on the system, otherwise, in case it is greater than this, some things will need to wait in order to be executed.

So I was testing 1000 LXC containers on the 2 x 6 core Xeon system (totalling as 24 logical processors) and leave it for a while. Once I got back I saw that there is something wrong with system responsiveness.

And my load average was 1min: 5719, 5 min: 2642, 15 min: 1707. I think that this the highest I have ever seen on systems under my supervision. What is interesing is that the system was not totally unresponsive, rather it was a little sluggish. Proxmox UI recorded load up to somewhere around 100 which should be a quite okey value. But then it sky-rocketed and Proxmox lost its ability to keep track of it.

I managed to login into the system and at that moment load average was already at 1368/2030/1582, which is way less than a few minutes before. I tried to cancel top command and reboot it, but even such trival operation was too much at that time.

Once I managed to initiate system restart it started to shut down all those 1000 LXC containers present on the system. It took somwhere around 20 minutes to shut everything down and proceed with reboot.

Make Opera browser great again!

Get rid of ads and stop sending your data for free to Opera

Little history

My favourite browser was Opera for so many years. Between 2000 and 2005 it was adware showing, well… ads. In 2005 ads have been remove as the financing came from Google, Opera’s default search engine. In 2013 Opera dropped its own rendering engine in favor to Chromium. In 2023 Opera gets some AI features.

What is all about?

I still like Opera.

It has this great multi workspace feature, battery saving mode and in general it is much more capable of running plenty of tabs comparing to other major browsers like Firefox or Chome. However…

Opera has tons of “features” like shopping, Booking.com, promotional offers, AI services etc. Most of those features, including wallet, address data, spelling and payment options are enabled by default. Image how much data you share with Opera this way. Image how many of features can be used against you. Fortunately you can disable all of these, which makes Opera the great browser again.

Start with blank configuration page

Click on Opera logo and select Settings. You will go to configuration page in which you find multiple sections like Basic, Advanced, Privacy & security, Features and Browser. Remember that in some cases configuration page navigation is not linear.

Privacy & Security

Here in this section you find settings which concerns suggestions and diagnostics, but also here you can find promotional notifications and promotional Speed Dials, bookmarks and campaigns. As you can see it is mixed. This is the main issue with Opera settings, there are mixed to confuse you more so you will not be able to identify whether you disabled all unwanted features already.

In this section you can find:

  • Improve search suggestions
  • Automatically send crash reports to Opera
  • Fetch images for suggested sources in News, based on history
  • Display promotional notifications
  • Receive promotional Speed Dials, bookmarks, and campaigns

Change search engine to non-big-tech

Instead of using Google, and feed big-tech with loads of your search data, you can use DuckDuckGo as your primary engine. Fortunately there is option to change default search engine.

In this section you can find:

  • Search engine used in the address bar – set to DuckDuckGo 🙂

Password manager

I prefer to manually enter passwords which I keep in secure encrypted place and I know how they are secured. Saving passwords in any other form could be dangerous as you do not know to whom you give those passwords and in what form. And there are several examples of similar tools that have been hacked in the past.

In this section you can find:

  • Offer to save passwords
  • Sign in automatically

Payment methods

I think that anything (id est information) remembered/saved about my person, location or browsing scheme could be potentially monetized by those companies like Opera or Google which offer browsers. You may say that those things like payment types or passwords probably are locally save. Maybe, but how about future upgrades? Will someone give me guarantee about this? I’m not so sure.

In this section you can find:

  • Save and fill payment methods
  • Allow sites to check if you have payment method saved

Address forms

In case of form data it is more about malicious websites stilling data than Opera as such. There are known vulnerabilities which offer hidden form elements which will be auto-filled even if you could not see them. Keeping this option as “on” may cause to similar issues in the future. And actually it does not matter if Opera is vulnerable to this kind of “attack” today or it is not, it is all about approach.

In this section you can find:

  • Save and fill addresses

Crypto wallet

If you own some cryptos you may wonder if this option is a safe place for your crypto wallets. I am not so sure about this. As far as I remember it is all about having some private key. So keep your private key private. Keeping any keys or IDs in such place from my perspective is not a good idea. You may see this in other colors and keep using this, but this my opinion.

In this section you can find:

  • Enable Wallet Selector

AI services

It is nothing bad about having AI features in a browser. I do not see any major issues with this one as I do not think that Opera would send all the traffic and data to those machine learning pipelines. So with that being crossed-out, you may only think about your battery life if you have more and more features enabled. Please note that I did not conduct any test, so it is only my opinion about this one.

In this section you can find:

  • Aria in the sidebar
  • AI Prompts in text hightlight popup

My Flow

My files on my computer and phone at the same time? It sounds like sending my data outside of my device? I would not do this as I do not use OneDrive and Dropbox and as I identify that my device contain such software it is immediately uninstalled. If I want to send some files to where else I send it by myself and on my own rules. You may choose differently, it is my approach, the secure way.

In this section you can find:

  • Enable My Flow
  • Enable Pinboards

Start page

So here you have suggestions, which are based on our data. You have Booking.com options. It should be self-explaining that these are commercial contracts which are based either or data or on affiliation, which still my identify you as a person making a purchase somewhere else.

In this section you can find:

  • Hide search box
  • Hide Speed Dial
  • Show Continue Shopping section
  • Show Continue on Booking.com section
  • Show weather widget

Spell check

This feature itself is not harmuf, but consumes battery. You may leave it enabled if you want.

In this section you can find:

  • Check for spelling errors when you type text on web page

Social media

Messenger and WhatsApp are the most popular ways of communicating nowadays but having Telegram here… well, I have heard that are some issues with this, so be sure you know what you are doing actually. WhatsApp works just fine. Messenger is just a little bit less crippled that the whole Facebook thing.

In this section you can find:

  • You can disable Telegram 🙂

What’s next?

With beforementioned adjustments you can start using your Opera in way more secure way that comparing to its default settings which are stupendous but still somehow understandable. Opera is a commercial company which would like to make money, and they make money thru various channels like: ads, affiliations, “by-defaulting” things, data/diagnostics, features inclusion as services. With just a little time spend on this configuration you get great and efficient workspace. I think it is worth spending this time.

Microsoft Azure AI Services: computer vision

Use Microsoft Azure AI Services to analyze images, voice, documents. No AI/ML or coding skills required. Responsible AI applies by EU AI act. Formerly Cognitive Services.

Course of Action

  • Create AI Services multi-account in Azure
  • Run computer vision OCR on image

What is Microsoft Azure?

It is Microsoft’s public cloud platform offering broad range of products and services, including virtual machines, managed containers, databases, analytics platforms as well as AI Services. Major competitors of Azure are Amazon AWS and Google’s GCP.

What are AI Services (formerly Cognitive Services)?

It is a set of various services concerning recognition and analysis procedures based on already trained ML models (or even traditional programming techniques). You can use it to describe documents, run OCR tasks, face recognition etc. Actually, those services tend to be categorized under Cognitive Services section, which concerns recognition which is a synonym of cognitive. Name change process which happend in July 2023 was more-or-less rebranding and provided non breaking changes only as a part of marketing. It is obvious that AI services would sell better than Cognitive Services.

Create AI multi-service account in Azure portal

In order to create Microsoft Azure AI Services multi-service account you need to have valid Azure subscription, either Free Trial or regular account. Type “AI” in search field in portal.azure.com and you will find this service thru service catalog.

It is worth menitioning that you get “Responsible AI Notice” which relates to AI Act which includes European Union, USA and UK. It defines what AI/ML models can do and what should not allow. Accoring to KPMG source it covers among others: social scoring, recruitment and deep-fake disclosure as the most crucial areas which require regulations. What about the rest of the world? Well, it might be same as with CO2 emissions or plastic garbage recycling. situation.

Deployment process in Azure is especially meaningful when speaking about configurable assets with data. However in terms of deploying services it is a matter of linking them to our account, so the deployment process of AI Services finishes within seconds.

AI Services account overview

To use Azure AI services you need to go to Resource Management, Keys and Endpoint. You will know to which Endpoint you should send your API calls/requests and what is the access key. This key is then mapped to “Ocp-Apim-Subscription-Key” header which should be passed during HTTP call.

As for S0 standad pricing tier on Free Tier subscription, estimate 1 000 calls to API (requests made) would cost less than 1 Euro. It might be “cheap” however it is starting point of pricing and I suspect that it might be actually a different value in real production use case scenario especially when speaking about decision making (still could be ML based only) services and not only those services which could be replaced by traditional programming techniques, which is notabene OCR processes which are present on the market for few decades already.

Run example recognition task

Instead of programming (aka coding) in various SDKs for AI Services (Python, JavaScript etc) you can also invoke such services within HTTP request using curl utility. As far as I know every Windows 10 and 11 should have curl present. As for Linux distributions you most probably have curl already installed.

So, in order to invoke recognition task, pass subscription key (here replaced by xxx), point at specific Endpoint URL and pass url parameter which should be some publicly available image on which recognition service will run over. I found out that not every feature is available in every Endpoint. In that case, you would need to modify “features” parameter:

curl -H "Ocp-Apim-Subscription-Key: xxx" -H "Content-Type: application/json" "https://z92-azure-ai-services.cognitiveservices.azure.com//computervision/imageanalysis:analyze?features=read&model-version=latest&language=en&api-version=2024-02-01" -d "{'url':'https://michalasobczak.pl/wp-content/uploads/2024/08/image-6.png'}"

I passed this image for analysis, which contains dozen of rectangular boxes with text inside. It should should be straighforward to get proper results as text is not rotated, it is written in machine font and color contrast at proper value.

In return we receive the following JSON formatted output. We can see that it properly detected word “rkhunter” as well as “process”. However we need to provide additional layer of processing in order to merge those adjacent words in separate lines to make them phrases instead of just separate words.

{
   "modelVersion":"2023-10-01",
   "metadata":{
      "width":860,
      "height":532
   },
   "readResult":{
      "blocks":[
         {
            "lines":[
               {
                  "text":"rkhunter",
                  "boundingPolygon":[
                     {
                        "x":462,
                        "y":78
                     },
                     {
                        "x":519,
                        "y":79
                     },
                     {
                        "x":519,
                        "y":92
                     },
                     {
                        "x":462,
                        "y":91
                     }
                  ],

                  ...

                  "words":[
                     {
                        "text":"process",
                        "boundingPolygon":[
                           {
                              "x":539,
                              "y":447
                           },
                           {
                              "x":586,
                              "y":447
                           },
                           {
                              "x":586,
                              "y":459
                           },
                           {
                              "x":539,
                              "y":459
                           }
                        ],
                        "confidence":0.993
                     }
                  ]
               }
            ]
         }
      ]
   }
}

Conclusion

I think that price-wise this AI Service, formerly known as Cognitive Services, it is reasonable way of running recognition tasks in online environment. We could include such recognition into our applications for further automation, in, for instance ERP FI invoice processing.

1000 Docker containers in Swarm mode

I defined Docker Swarm cluster with 20 nodes and created service using Nginx HTTP server Docker image. I scaled it to 1000 container instances, which took a while on my demo hardware. Containers are up and running but to get such statistics from Portainer CE UI is quite difficult, so I suggest using CLI in such a case:

docker service ps nginx3 | grep Running | wc -l

I got exacly 1000 containers on my service named “nginx3”.

Hardware is not so much utilized, combined 2 servers RAM usage oscillates around 50GB, load stays low as there is not much happening, so even using 20 VM and Docker containers, we do not get too much overhead of using both virtualization and containers. What about trying to spin 2000 or even 10 000 containers… Well, actually without putting load on those containers, measuring it will not be too much useful. We can scale even up to 1 000 000 containers, but what for?

Deploy 20 x Docker Swarm nodes using Terraform and Ansible

If you wonder how to automatically deploy 20 nodes of Docker Swarm and run 100 Docker containers in it, then continue reading. I will show how to achieve this by using Terraform, Ansible and Portainer.

Course of action

  • Terraform 20 x Ubuntu virtual machines
  • Install Docker Swarm using Ansible
  • Install Portainer
  • Deploy 100 containers across Swarm cluster

What is Docker Swarm and why I need to have 20 of these?

Docker is containers toolkit utilizing cgroups, namespaces which allows to control and share resources of the CPU and operating system. Docker Swarm its a special kind of runtime mode, which allows to run multiple clustered nodes which can be separate physical computers or virtual machines. It gives us scalability and resource separation yet keeping it all within same management utitlities. You can make work much easier by installing Portainer CE, which is management UI for containers orchestration (de facto operations management).

So back to the question, why 20 of these? You can have single Docker Swarm node being both manager and worker and put loads of resources that you have, like CPU and RAM. But for sake of better maintanane, equal resources utilization and securing resources, you use clustered mode such as Docker Swarm with more than one node.

What is Terraform and Ansible and the whole automation thing?

Terraform is automation tool for automating construction of systems, for instance provisioning virtual machines. You can do it also with Ansible, but its role here is more like to manage already provisioned systems instead of provisioning themself. So both tool could be used possible for all the tasks, however Terraform which Telmate Proxmox plugin do it the easiest way. I use Ansible to automate tasks across resources created with Terraform. This is my way, your might be different.

Why to deploy 100 containers of the same application?

If your application perfectly handles errors and tools outages and it’s capable of running multiple processes with multiple threads and you know that will never be redeployed, then stick with 1 container. But in any of these cases, having muliple containers, instances, of the same application will be beneficial. You increate your fault-tolerance, make software releases easier. You need not bother that much about application server configuration, etc, because all of these is mitigated by deploying in N > 1 instances.

You can have 2 containers for frontend application, 2 containers for backend application, 1 application for background processing and many other composites of your single or multiple repositories. You could have 50 frontends and 50 backends, it depends on a case. You could introduce auto-scaling, which by the way is present in OKD, OpenShift, Kubernetes, but Docker Swarm and Portainer lack of such feature. It is unfortunate, but still you can do it yourself or plan and monitor your resources usage. In case of dedicated hardware it is not so important to have autoscaling, just overallocate for future peaks. In case of public cloud providers, when you pay for what you use it will be important to develop auto-scaling feature.

Terraform 20 Ubuntu VM

So in order to deploy more than one VM using Terraform and Telmate Proxmox provider plugin you need to either copy resource section multiple times or use count notation. I defined terraform and provider sections as well as two resource sections each for different target Proxmox server. By using count, you get ability to interpolate ${count.index} for each consecutive execution of resource. I used it for name and network IP address. Target server is differentiated using target_node. Be sure to use appropriate clone name and disk storage name at which your VMs will be placed.

terraform {
    required_providers {
        proxmox = {
            source  = "telmate/proxmox"
            version = "2.9.0"
        }
    }
}

provider "proxmox" {
    pm_api_url      = "https://192.168.2.11:8006/api2/json"
    pm_user         = "root@pam"
    pm_password     = "xxx"
    pm_tls_insecure = true
    pm_timeout       = 300
    pm_parallel      = 2
}

resource "proxmox_vm_qemu" "ubuntu_vm_xx" {
    count       = 10
    name        = "z10-ubuntu-22-from-terraform-2-${count.index}"
    target_node = "lab2" 
    clone       = "new-template"
    full_clone  = true
    memory      = 4000
    cores       = 2 
    bootdisk = "virtio0"
    network {
        bridge = "vmbr0"
        model = "virtio"
    }
    disk {
        storage = "single-dir-ssd-256GB"
        size = "10G"
        type = "virtio"
    }
    os_type = "cloud-init"
    ipconfig0 = "ip=192.168.2.${count.index}/22,gw=192.168.1.1"
    ciuser = "xxx"
    cipassword = "xxx"
}

resource "proxmox_vm_qemu" "ubuntu_vm_lab" {
    count       = 10
    name        = "z10-ubuntu-22-from-terraform-3-${count.index}"
    target_node = "lab" 
    clone       = "z10-ubuntu-22-template-RAW"
    full_clone  = true
    memory      = 4000
    cores       = 2 
    bootdisk = "virtio0"
    network {
        bridge = "vmbr0"
        model = "virtio"
    }
    disk {
        storage = "vms1"
        size = "10G"
        type = "virtio"
    }
    os_type = "cloud-init"
    ipconfig0 = "ip=192.168.3.${count.index}/22,gw=192.168.1.1"
    ciuser = "xxx"
    cipassword = "xxx"
}

With above notation you will create 10+10 Ubuntu VM. You can run it with:

terraform apply -parallelism=1

After VM are created you need to wait until cloud-init finshes its job. If you are not sure if its running or then, then reboot this VM so you will not get any stuck processes which could collide with the next step which is installing Docker with Ansible.

Install Docker service with Ansible

First we define the inventory:

[lab]
192.168.2.0
192.168.2.1
192.168.2.2
192.168.2.3
192.168.2.4
192.168.2.5
192.168.2.6
192.168.2.7
192.168.2.8
192.168.2.9
192.168.3.0
192.168.3.1
192.168.3.2
192.168.3.3
192.168.3.4
192.168.3.5
192.168.3.6
192.168.3.7
192.168.3.8
192.168.3.9

[lab:vars]
ansible_user=xxx
ansible_password=xxx

Second of all, we define and run installation of required packages:

---
- name: Docker reqs installation
  hosts: all
  vars:
    ansible_ssh_common_args: '-o ServerAliveInterval=60'

  tasks:
    - name: Install aptitude
      apt:
        name: aptitude
        state: latest
        update_cache: true

    - name: Install required system packages
      apt:
        pkg:
          - apt-transport-https
          - ca-certificates
          - curl
          - software-properties-common
          - python3-pip
          - virtualenv
          - python3-setuptools
        state: latest
        update_cache: true

And finally insallation of Docker itself:

---
- name: Docker installation
  hosts: all
  vars:
    ansible_ssh_common_args: '-o ServerAliveInterval=60'

  tasks:
    - name: Add Docker GPG apt Key
      apt_key:
        url: https://download.docker.com/linux/ubuntu/gpg
        state: present

    - name: Add Docker Repository
      apt_repository:
        repo: deb https://download.docker.com/linux/ubuntu jammy stable
        state: present

    - name: Update apt and install docker-ce
      apt:
        name: docker-ce
        state: latest
        update_cache: true

    - name: Install Docker Module for Python
      pip:
        name: docker

We could include those steps into Packer configuration and that way Docker with its requirements would be included by default. However it is good to know not only Packer and Terraform, but also how to run it from Ansible.

Configure Docker Swarm and join cluster

I decided to configure single manager with Portainer, so I picked 192.168.2.0 for this job:

sudo docker swarm init
curl -L https://downloads.portainer.io/ce2-21/portainer-agent-stack.yml -o portainer-agent-stack.yml
sudo docker stack deploy -c portainer-agent-stack.yml portainer

Now we have Docker Swarm initialized, installed Portainer stack. After initializing Swarm mode you get a token for nodes inclusion. You can join more manager nodes, but for simple installation demo you can stick with single one and join additional 19 worker nodes, by using Ansible command:

ansible all -i inventory -m shell -a "sudo docker swarm join --token SWMTKN-1-4ph10h6ck7aqonnr7bunok3be63nl7itnjkua4owm0cvmyh2z1-754wirc3y36igf86porgwtbjh 192.168.2.0:2377" --become -o -f 1

In portainer there is cluster visualizer, where you see all nodes and what is inside of them:

Running containers workloads

Using Portainer CE you can scale service instances, ie containers by just entering number of Docker container ro run. You can either run replicated mode, where you explicitly define how many container you would like to start, or you can use global mode, where number of containers will automatically equal number of nodes in your Docker Swarm cluster.

Docker Swarm scheduler will try to place containers equally according to service definiotion and hardware capabilities. You can try gradually increase number of instances and monitor hardware resources usage. There is whole separate topic regarding deployment webhooks, deployment strategies etc.

Performance comparison scenario

Installation is initialized by terraform init -parallel=1 command. On older hardware I suggest go for one-by-one strategy, instead of high parallel leve which could lead to some unexpected behavior like disk clone timeout or other issues.

With that step done we can see how those two Terraform resource sections transformed into 5+5 virtual machines on two Proxmox nodes. Terraform keeps track of the baseline/state of your deloyment, however, it is not 100% safe to rely on it only. It is good to double check the results. In my tests I experienced situation when Terraform said that it destroyed all the content, but it did not actually. Same with resources creation, even if you are told here that everything is done be sure check it out. The problem may lay within at least 4 places, which are Terraform itself, Telmate Proxmox provider, Proxmox golang APIa and finally Proxmox itself with its hardware and software.

Both with apply and destroy you will be shown the proposed changes based on your configuration, you can then review what is going to happen and if this fits your needs:

It is crucial to know on what hardware you are working on. At least from performance perspective. In case of Proxmox VE and bare-metal hardware what you see is what you get. But this strategy can be also applied on many other platform providers, yo can what brings the specific AWS or Azure virtual machines. So to illustrate it, I compared Server load between 2 Proxmox nodes within the same cluster. Here is one with 2 x Intel Xeon X5560:

And here you have 2 x Intel Xeon E5645:

You can see exactly that difference in terms on CPU theoretical performance is confirmed in real scenario. The first server gets load up to 14 and the second one up to 16. There is also difference in terms of RAM usage. Same goes with drives performance. All those factors can be important if running plenty of Ansible or Terraform tasks concurrently.

Conclusion

With Terraform, Ansible and even Packer, you easily deploy multiple virtual resources and scale your applications deployment.

Use Packer & Terraform to generate Ubuntu 22.04-4 server image and deploy it automatically to Proxmox

If you wonder how to automate Ubuntu virtual machine creation and then deploy it to Proxmox in multple copies, then you are looking for Packer and Terraform.

Side note: going for virtual machines in Proxmox is the proper way. I tried for several days to have LXC containers working, however finally I will say that it is not the best option with lot of things going bad like cgroups, AppArmor, nesting, FUSE, ingress networking etc. There is literally too much to handle with LXC and with VM there is no such problem, so discussion end here in favour of Proxmox Qemu. Keep LXC contrainers for simple things.

Why to automate?

Because we can.

Because it is a better way of using our time.

Because it scales better.

Because it provides some form of self-documentation.

Why to use Proxmox and Ubuntu VM?

Ubuntu is a leading Linux distribution without licensing issues with 34% of Linux market share. It has strong user base. It is my personal preference also. It gives us ability to subscribe to Ubuntu Pro which comes with several compliance utilities.

And Proxmox/Qemu started being an enterprise class virtualization software package few years back and it is also a open source leading solutions in its field. In contains clustering features (including failover) as well as support for various storage types. Depending on a source it has around 1% of virtualization software market share.

Installation of Packer and Terraform

It is important to have both Packer and Terraform at its proper versions coming from official repositories. Moreover it is important that the exact way of building specific version of operating system differs from vesion to version, that is way the title of this article says 22.04-4 and not 22.04-3, because there might be some differences.

Install valid version of Packer. The version which come from Ubuntu packages it invalid and it does not contain ability to manage plugins, so be sure to install Packer with official repository.

curl -fsSL https://apt.releases.hashicorp.com/gpg | sudo apt-key add -
sudo apt-add-repository "deb [arch=amd64] https://apt.releases.hashicorp.com $(lsb_release -cs) main"
sudo apt-get update && sudo apt-get install packer

Install valid version of Terraform. Having issues with bundled version of Packer I decided to go for official way of installing at first try:

sudo apt-get update && sudo apt-get install -y gnupg software-properties-common

wget -O- https://apt.releases.hashicorp.com/gpg | \
gpg --dearmor | \
sudo tee /usr/share/keyrings/hashicorp-archive-keyring.gpg > /dev/null

gpg --no-default-keyring \
--keyring /usr/share/keyrings/hashicorp-archive-keyring.gpg \
--fingerprint

echo "deb [signed-by=/usr/share/keyrings/hashicorp-archive-keyring.gpg] \
https://apt.releases.hashicorp.com $(lsb_release -cs) main" | \
sudo tee /etc/apt/sources.list.d/hashicorp.list

sudo apt update

sudo apt-get install terraform

Terraform Telmate/Proxmox

Important note regarding Terraform and its plugin for Proxmox. This plugin as well as Proxmox golang API is provided by a single company which Telmate LLC. This plugin has some compability issues and at the moment for Proxmox 7 I recommend using Telmate/proxmox version 2.9.0. The latest version which is 2.9.14 has some difficulties with handling cloud-init which leads to 50% chance of VM that requires manual drives reconfiguration. As for 2024/09/06 there is no stable 3.0.1 release.

If you happen to have the latest one and would like downgrade, then remove .terraform and .terraform.lock.hcl and then initialize once again with the following command:

terraform init

Generate Ubuntu 22.04-4 template for Proxmox with Packer

Starting from few versions back the Ubuntu project changed its way of automating installations. Instead of seeding you now have a autoinstall feature. Packer project structure contains few files, and I will start with ubuntu-22-template/http/user-data containing cloud-config:

#cloud-config
autoinstall:
  version: 1
  locale: en_US
  ssh:
    install-server: true
    allow-pw: true
    disable_root: true
    ssh_quiet_keygen: true
    allow_public_ssh_keys: true
  packages:
    - qemu-guest-agent
    - sudo
  storage:
    layout:
      name: lvm
      sizing-policy: all
      # password: xxx
  user-data:
    package_upgrade: false
    timezone: Europe/Warsaw
    users:
      - name: temporary
        groups: [sudo]
        lock-passwd: false
        sudo: ALL=(ALL) NOPASSWD:ALL
        shell: /bin/bash
        passwd: "here you place SHA512 generated hash of a password"

In order to turn LUKS on, uncomment storage.layout.password field and set desired password. users.passwd can be generated with mkpasswd using SHA-512. Next is ubuntu-22-template/files/99-pve.cfg:

datasource_list: [ConfigDrive, NoCloud]

Credentials get its own file (./credentials.pkr.hcl). You can of course place it directly into your file, however if you SCM those files it will be permament and shared with others, that is why you should separate this file and even do not include it into your commits:

proxmox_api_url = "https://192.168.2.10:8006/api2/json"
proxmox_api_token_id = "root@pam!root-token"
proxmox_api_token_secret = "your Proxmox token"
my_ssh_password = "your new VM SSH password"

Finally, there is ubuntu-22-template/ubuntu-22-raw.pkr.hcl file, where you define variables, source and build. We source ISO image and define Proxmox VE Qemu VM parameters. The most crucial and cryptic things is to provide valid boot_command. http* sections refers to your machine serving files over HTTP, ssh* section on the other hand refers to configuration relate to the remote machine (newly created VM on Proxmox). Our local machine acts as shell commands provider over HTTP which then being passed to remote machine are executed during system installation.

variable "proxmox_api_url" {
    type = string
}
variable "proxmox_api_token_id" {
    type = string
}
variable "proxmox_api_token_secret" {
    type = string
    sensitive = true
}
variable "my_ssh_password" {
    type = string
    sensitive = true
}

source "proxmox-iso" "ubuntu-server-jammy" {
    proxmox_url = "${var.proxmox_api_url}"
    username =    "${var.proxmox_api_token_id}"
    token =       "${var.proxmox_api_token_secret}"
    insecure_skip_tls_verify = true
    node = "lab"
    vm_id = "141"
    vm_name = "z10-ubuntu-22-template-RAW"
    template_description = "Ubuntu Server Raw Encrypted"
    iso_file = "local:iso/ubuntu-22.04.4-live-server-amd64.iso"
    iso_storage_pool = "local"
    unmount_iso = true
    qemu_agent = true
    scsi_controller = "virtio-scsi-single"
    disks {
        disk_size = "10G"
        format = "raw"
        storage_pool = "vms1"
        storage_pool_type = "directory"
        type = "virtio"
    }
    cores = "2"    
    memory = "4096" 
    network_adapters {
        model = "virtio"
        bridge = "vmbr0"
        firewall = "false"
    } 
    cloud_init = true
    cloud_init_storage_pool = "local"
    boot_command = [
        "<esc><wait>",
        "e<wait>",
        "<down><down><down><end>",
        "<bs><bs><bs><bs><wait>",
        "ip=${cidrhost("192.168.2.0/24", 100)}::${cidrhost("192.168.1.0/24", 1)}:${cidrnetmask("192.168.0.0/22")}::::${cidrhost("1.1.1.0/24", 1)}:${cidrhost("9.9.9.0/24", 9)} ",
        "autoinstall ds=nocloud-net\\;s=http://{{ .HTTPIP }}:{{ .HTTPPort }}/ ---<wait>",
        "<f10><wait>"
    ]
    boot = "c"
    boot_wait = "5s"
    http_directory = "ubuntu-22-template/http" 
    http_bind_address = "IP of machine from which you will run Packer"
    http_port_min = 8802
    http_port_max = 8802
    ssh_host = "192.168.2.100" # new VM proposed IP address
    ssh_username = "temporary"
    ssh_password = "${var.my_ssh_password}"
    ssh_timeout = "20m"
}


build {
    name = "ubuntu-server-jammy"
    sources = ["proxmox-iso.ubuntu-server-jammy"]
    provisioner "shell" {
        inline = [
            "while [ ! -f /var/lib/cloud/instance/boot-finished ]; do echo 'Waiting for cloud-init...'; sleep 1; done",
            "sudo rm /etc/ssh/ssh_host_*",
            "sudo truncate -s 0 /etc/machine-id",
            "sudo apt -y autoremove --purge",
            "sudo apt -y clean",
            "sudo apt -y autoclean",
            "sudo cloud-init clean",
            "sudo rm -f /etc/cloud/cloud.cfg.d/subiquity-disable-cloudinit-networking.cfg",
            "sudo rm -f /etc/netplan/00-installer-config.yaml",
            "sudo sync"
        ]
    }
    provisioner "file" {
        source = "ubuntu-22-template/files/99-pve.cfg"
        destination = "/tmp/99-pve.cfg"
    }
    provisioner "shell" {
        inline = [ "sudo cp /tmp/99-pve.cfg /etc/cloud/cloud.cfg.d/99-pve.cfg" ]
    }
}

To run it:

packer build -var-file=credentials.pkr.hcl ubuntu-22-template/ubuntu-22-raw.pkr.hcl

The installation process is automated and you do not see usual configuration screens. Instead we provide autoinstall configuration and leave few options to be setup later during cloud-init, which is user details and network configuration details. This way we can achieve automation of deployments of such system, which will be show in a moment in Terraform section of this article.

A full overview of project structure is as follows:

├── credentials.pkr.hcl
├── main.tf
├── packer_cache
│   └── port
├── terraform.tfstate
├── terraform.tfstate.backup
└── ubuntu-22-template
    ├── files
    │   └── 99-pve.cfg
    ├── http
    │   ├── meta-data
    │   └── user-data
    └── ubuntu-22-raw.pkr.hcl

5 directories, 8 files

After successful Ubuntu installation system will reboot and convert itself into template so it can be later used as a base for further systems, either as linked clone or full clone. If you prefer having great elasticity then opt for full clone, because you will not have any constraints and limitations concerning VM usage and migration.

Deploy multiple Ubuntu VMs with Terraform

To use Proxmox VM template and create new VM upon it you can do it manually from Proxmox UI. However in case of creating 100 VMs it could take a while. So there is this Terraform utility, which with help of some plugins is able to connect to Proxmox and automate this process for you.

Define Terraform file (.tf) with terraform, provider and resource sections. Terraform section tell Terraform which plugins you are going to use. Provider section tells how to access Proxmox virtualization environment. Finally, resource section where you put all the configuration related to your Ubuntu 22.04-4 backed up with cloud-init. So we start with terraform and required provider plugins. It depends on Proxmox version whever it is 7 or 8 you will be need to give different resource configuration:

terraform {
    required_providers {
        proxmox = {
            source  = "telmate/proxmox"
            version = "2.9.0" # this version has the greatest compatibility
        }
    }
}

Next you place Proxmox provider. It is also possible to define all sensitive data as variables:

provider "proxmox" {
    pm_api_url      = "https://192.168.2.10:8006/api2/json"
    pm_user         = "root@pam"
    pm_password     = "xxx"
    pm_tls_insecure = true
}

First you need to initialize Terraform “backend” and install plugins. You can do this with terraform and provider sections only if you would want. You can also do it after you complete your full spec of tf file.

terraform init

Finally, the resource itself:

resource "proxmox_vm_qemu" "ubuntu_vm" {
    name        = "z10-ubuntu-22-from-terraform-1-20"
    target_node = "lab" 
    clone       = "z10-ubuntu-22-template-RAW"
    memory      = 4000
    cores       = 2 

    network {
        bridge = "vmbr0"
        model = "virtio"
    }

    disk {
        slot = 0
        storage = "vms1"
        size = "10G"
        type = "virtio"
    }
  
    os_type = "cloud-init"
    ipconfig0 = "ip=192.168.2.20/22,gw=192.168.1.1"
    ciuser = "xxx"
    cipassword = "xxx"
}

To run this terraform script you first check it with plan command and execute with apply command:

terraform plan
terraform apply

With that, this mechanism is going to fully clone template as new virtual machine with given cloud-init definitions concering user and network configuration.

I prepared two sample templates, one with LUKS disk encryption and the other one without LUKS encryption. For demo purposes it is enough to use unencrypted drive however for production use it should be your default way of installating operating systems.

Checkpoint: we have created Ubuntu template with Packer and use this template to create new VM using Terraform.

Further reading

  • https://github.com/Telmate/terraform-provider-proxmox/tree/v2.9.0
  • https://registry.terraform.io/providers/Telmate/proxmox/2.9.0/docs/resources/vm_qemu

Video playback not working on LinkedIn in Opera on Ubuntu 22

On fresh installation of Ubuntu 22, using Opera for video playback can be an issue. So even after installing all things that you may think it could help – it does not work. The solution is to install chromium-ffmpeg and copy its libffmpeg.so library into Opera installation folder.

sudo snap install chromium-ffmpeg
cd /snap/chromium-ffmpeg/xx/chromium-ffmpeg-yyyyyy/chromium-ffmpeg
sudo cp libffmpeg.so /usr/lib/x86_64-linux-gnu/opera/libffmpeg.so

Be aware that snap installation path differs in few places so check your installation. After copying ffmpeg library, just restart Opera and the video, previously not loading in LinkedIn, will work.