Qwen LLM

What is Qwen?

This is the organization of Qwen, which refers to the large language model family built by Alibaba Cloud. In this organization, we continuously release large language models (LLM), large multimodal models (LMM), and other AGI-related projects. Check them out and enjoy!

What models do they provide?

They provide wide range of models, since 2023. Original model was just called Qwen and can be still found on GitHub. The current model Qwen2.5 has its own repository, also on GitHub. General purpose models are just Qwen, but there are also code specific models. There are also Math, Audio and few other.

Note from the creator:

We do not recommend using base language models for conversations. Instead, you can apply post-training, e.g., SFT, RLHF, continued pretraining, etc., or fill in the middle tasks on this model.

However, I tried the following models, because I can:

  • Qwen/Qwen-7B: 15 GB of model, 31 GB in RAM
  • Qwen/Qwen2-0.5B, 1 GB of model, 4 GB in RAM
  • Qwen/Qwen2.5-Coder-1.5B, 3 GB of model, 7 GB in RAM

Yes, you can run those models solely in memory rather than on GPU. This will be significantly slower, but it works.

How to run?

In order to validate the source of data which have been used for training I think we can ask something domain-specific:

from transformers import AutoModelForCausalLM, AutoTokenizer

model_name = "Qwen/Qwen2.5-Coder-1.5B"

tokenizer = AutoTokenizer.from_pretrained(model_name, trust_remote_code=True)
model = AutoModelForCausalLM.from_pretrained(model_name, trust_remote_code=True)

input_text = "How to install Proxmox on Hetzner bare-metal server?"
inputs = tokenizer(input_text, return_tensors="pt")

outputs = model.generate(**inputs, max_new_tokens=200)
generated_text = tokenizer.decode(outputs[0], skip_special_tokens=True)

print(generated_text)

This model uses Qwen2ForCausalLM architecture and it is released under Apache 2.0 licence. To run it we need to have few additional Python packages installed:

transformers>=4.32.0,<4.38.0
accelerate
tiktoken
einops
transformers_stream_generator==0.0.4
scipy

Where did it get the data from?

So the output for given question “How to install Proxmox on Hetzner bare-metal server?”

wget https://enterprise.proxmox.com/debian/proxmox-ve-release-6.x.gpg -O /etc/apt/trusted.gpg.d/proxmox-ve-release-6.x.gpg
echo "deb http://enterprise.proxmox.com/debian/pve buster pve-no-subscription" > /etc/apt/sources.list.d/pve-enterprise.list
apt-get update
apt-get install proxmox-ve

It suggests installing Proxmox 6 even if Proxmox 7 is already outdated as for 2024. Moreover it suggests running Debian Buster and specific hardware setup with 16 GB of RAM and 2 x 1TB HDD. It seems like some sort of forum or stackexchange or stackoverflow thing. It might be also a compilation or translation of few other as the small size of the model implies.

Reading package lists... Done
Building dependency tree
Reading state information... Done
E: Unable to locate package proxmox-ve

It is no brainer: this is offline thing. It’s very interesting that it is still able to try to answer even if it is not precise.

Install Proxmox on Scaleway using Dell’s iDRAC

Last time (somewhere around 2023) there was an option on Scaleway to install Proxmox 7 directly from appliance. There was also possiblity to use Debian 11 and install Proxmox atop of it. This time (2024/Nov) there is no direct install and installing on Debian gives me some unexpected errors which I do not want to overcome as it should work just like that.

But there is option to use Dell’s iDRAC interface for remote access.

NVIDIA CC 7.0+: how to run Ollama/moondream:1.8b

Well, in one of the previous articles I described how to invoke Ollama/moondream:1.8b using cURL, however I forgot to tell how to even run it in Docker container. So here you go:

sudo docker run -d --gpus=all -v ollama:/root/.ollama -p 11434:11434 --name ollama ollama/ollama
docker exec -it ollama ollama run moondream:1.8b

You can specify to run particular model in background (-d) or in foreground (without parameter -d). You can also define parallelism and maximum queue in Ollama server:

sudo docker run -d --gpus=all -v ollama:/root/.ollama -e OLLAMA_NUM_PARALLEL=8 -e OLLAMA_MAX_QUEUE=32 -p 11434:11434 --name ollama ollama/ollama

One important one regarding stability of Ollama server. Once it runs for over few hours there might be issue with GPU driver which requires restart, so Ollama needs to be monitored for such scenario. Moreover after minutes of idle time it will drop out of VRAM freeing it up. So be aware that once you allocate this VRAM for other things, Ollama might not run due to out of memory issue.

Final note is that Ollama requires NVIDIA Compute Capability 7.0 and greater to run which effectively is TITAN V, Quadro GB100, Tesla V100 or consumer grade later onces with CC 7.5 such as GTX 1650. You can then treat this very GTX 1650 as minumum one to run Ollama by now.

OpenVINO in AI computer vision object detection (Frigate + OpenVINO)

What is OpenVINO?

“Open-source software toolkit for optimizing and deploying deep learning models.”

It is developed by Intel since 2018. It supports LLM, computer vision and generative AI. It runs on Windows, Linux and MacOS. As for Ubuntu, it is recommended to run on 22.04 LTS and higher. It utilizes OpenCL drivers.

In theory, libraries using OpenCL (such as OpenVINO) should be cross platform contrary to vendor-locked similar solutions like CUDA. In theory OpenVINO should then work on both Intel and AMD hardware. Internet says that is works, but as for now I need to order some additional hardware to check it out on my own.

Side note: Why CUDA/NVIDIA vendor-lock is bad? You are forced to buy hardware from single vendor, so you are prone to price increase and if whole concept would fail to are left with nothing. That is why open standards are better then closed ones.

OpenCL readings

For polish language speakers I recommend checking out my book covering OpenCL. There are also various articles which you can check out here.

Requirements

You can run OpenVINO on Intel Core Ultra series 1 and 2, Xeon 6, Atom X, Atom with SSE 4.2, various Pentium processors. By far the most important is that it runs on Intel Core gen 6 onwards. It is supported by Intel Arc GPU also, but in term of GPUs it is supported by Intel HD, UHD, Iris Pro, Iris Xe, Iris Xe Max. Especially compatibility with Core 6 gen and integrated HD, UHD graphics is the most crucial.

Intel OpenVINO documentation says also that it supports Intel Neural Processing Unit, in short NPU.

VMMX instruction set is available since 10th Intel CPU generation. AMX instruction set is available since 12th Intel CPU generation. Both VMMX and AMX highly increses speed and thruput of inference.

OpenVINO base GenAI package

wget https://apt.repos.intel.com/intel-gpg-keys/GPG-PUB-KEY-INTEL-SW-PRODUCTS.PUB
sudo gpg --output /etc/apt/trusted.gpg.d/intel.gpg --dearmor GPG-PUB-KEY-INTEL-SW-PRODUCTS.PUB
echo "deb https://apt.repos.intel.com/openvino/2025 ubuntu22 main" | sudo tee /etc/apt/sources.list.d/intel-openvino-2025.list
sudo apt update
sudo apt install openvino

Run Frigate video surveillance with OpenVINO object detector

In Linux, Ubuntu 22 particularly, Intel devices are exposed thru /dev/dri devices, which are Direct Rendering Infrastructure. It is Linux framework present since 1998. The latest version DRI-3.0 comes from 2013.

We can test OpenVINO runtime/libraries and thus Intel hardware using Frigate, DRI device and Docker container. Here is Docker container specification:

cd
mkdir frigate-config
mkdir frigate-media
sudo docker run -d \
  --name frigate \
  --restart=unless-stopped \
  --stop-timeout 30 \
  --mount type=tmpfs,target=/tmp/cache,tmpfs-size=1000000000 \
  --shm-size=1024m \
  --device /dev/bus/usb:/dev/bus/usb \
  --device /dev/dri/renderD128 \
  -v ./frigate-media:/media/frigate \
  -v ./frigate-config:/config \
  -v /etc/localtime:/etc/localtime:ro \
  -e FRIGATE_RTSP_PASSWORD='password' \
  -p 8971:8971 \
  -p 8554:8554 \
  -p 8555:8555/tcp \
  -p 8555:8555/udp \
  ghcr.io/blakeblackshear/frigate:stable

We use frigate:stable image. For other detectors such as TensorRT (Tensor RunTime) we would use frigate:stable-tensorrt image.

After launching container open logs to grab admin password:

sudo docker logs $(sudo docker ps | grep frigate | cut -d ' ' -f 1) -f -n 100

It should look something like this:

Start with the following configuration file:

mqtt:
  enabled: false
logger:
  logs:
    frigate.record.maintainer: debug
objects:
  track:
    - person
    - car
    - motorcycle
    - bicycle
    - bus
    - dog
    - cat
    - handbag
    - backpack
    - suitcase
record:
  enabled: true
  retain:
    days: 1
    mode: all
  alerts:
    retain:
      days: 4
  detections:
    retain:
      days: 4
snapshots:
  enabled: true
  retain:
    default: 7
  quality: 95
review:
  alerts:
    labels:
      - person
      - car
      - motorcycle
      - bicycle
      - bus
  detections:
    labels:
      - dog
      - cat
      - handbag
      - backpack
      - suitcase
cameras:
  demo:
    enabled: true
    ffmpeg:
      inputs:
        - path: rtsp://user:pass@ip:port/stream
          roles:
            - detect
            - record
      hwaccel_args: preset-vaapi
    detect:
      fps: 4
version: 0.15-1
semantic_search:
  enabled: true
  reindex: false
  model_size: small

Frigate says that CPU detectors are not recommended. We did not define OpenVINO detector yet in Frigate configuration:

Frigate even warn us about the fact that CPU detection is slow:

So, now lets try with OpenVINO detectors:

detectors:
  ov:
    type: openvino
    device: GPU
model:
  width: 300
  height: 300
  input_tensor: nhwc
  input_pixel_format: bgr
  path: /openvino-model/ssdlite_mobilenet_v2.xml
  labelmap_path: /openvino-model/coco_91cl_bkgr.txt

After restarting you should be able to see in logs:

2025-03-09 09:41:01.085519814  [2025-03-09 09:41:01] detector.ov                    INFO    : Starting detection process: 430

Intel GPU Tools

To verify CPU/GPU usage you can use intel-gpu-tools:

sudo apt install intel-gpu-tools
sudo intel_gpu_top

Will show something like this:

It should include both detection and video decoding as we set hwaccel_args: preset-vaapi in Frigate configuration. In theory it should use both Intel and AMD VAAPI.

Automatically detected vaapi hwaccel for video decoding

Computer without discrete GPU

In case we have computer with Intel CPU with iGPU you can specify the following configuration:

detectors:
  ov_0:
    type: openvino
    device: GPU
  ov_1:
    type: openvino
    device: GPU

It will then use both iGPU (ov_0, fast one) and CPU (ov_1, slow one). As you can see is is interesing speed-wise (87ms vs 493ms). CPU utilization of course in case of CPU detector will be higher as CPU usage for iGPU is only for coordination. Both components show similar memory usage, which is still the RAM memory as iGPU shares it with CPU. Mine its Intel Core m3-8100y, 4 cores at 1.1GHz. It has Intel UHD 615 with 192 shader cores. It outputs 691 GFLOPS (less than 1 TFLOPS to be clear) with FP16.

You can see utilization in Frigate:

Conclusion

It is very important to utilize already available hardware and it is great thing that there is such framework like OpenVINO. There are tons of Intel Core processors with Intel HD and UHD integrated GPUs on the market. For such a use case scenario like Frigate object detection it is a perfect solution to offload detection from CPU to CPUs integrated GPU. It is much more convenient than Coral TPU USB module both in terms of installation as well as costs. You already have this GPU integrated present in your computer.

Invoke ollama/moondream:1.8b using cURL

Given this image:

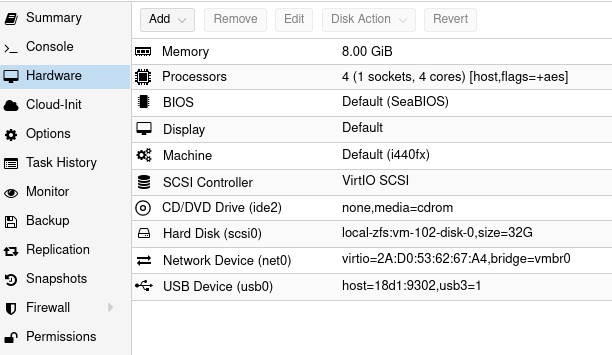
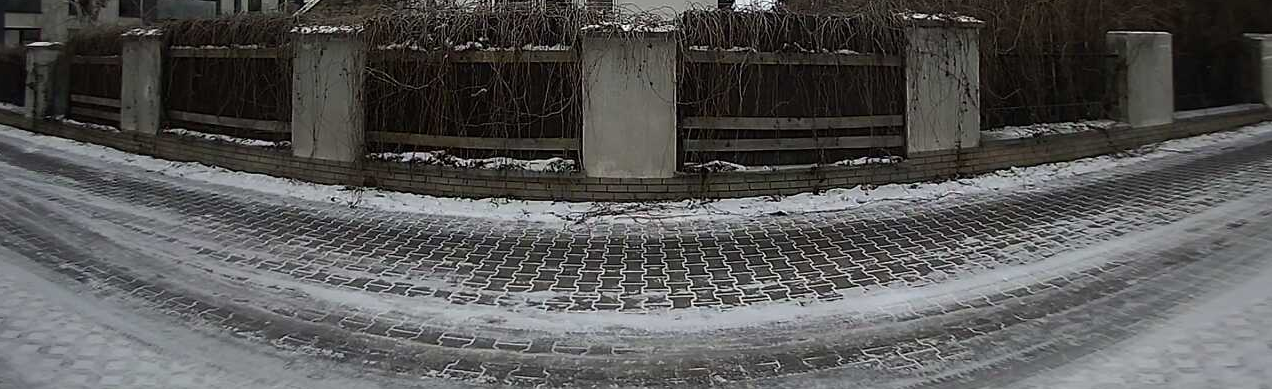
You would like to describe it using Ollama and moondream:1.8b model you can try cURL.

First encode image in base64:

base64 -w 0 snapshot.png > image.txt

Then prepare request:

echo '{   "model": "moondream:1.8b",   "prompt": "Describe",   "images": ["'$(cat image.txt)'"] }' > request.json

And finally invoke cURL pointing at your Ollama server running:

curl -X POST https://127.0.1:11434/api/generate -d @request.json

In response you could get somehing like this:

{"model":"moondream:1.8b","created_at":"2025-03-07T12:21:01.859560162Z","response":"\n","done":false}
{"model":"moondream:1.8b","created_at":"2025-03-07T12:21:01.868641283Z","response":"The","done":false}
{"model":"moondream:1.8b","created_at":"2025-03-07T12:21:01.876174776Z","response":" image","done":false}
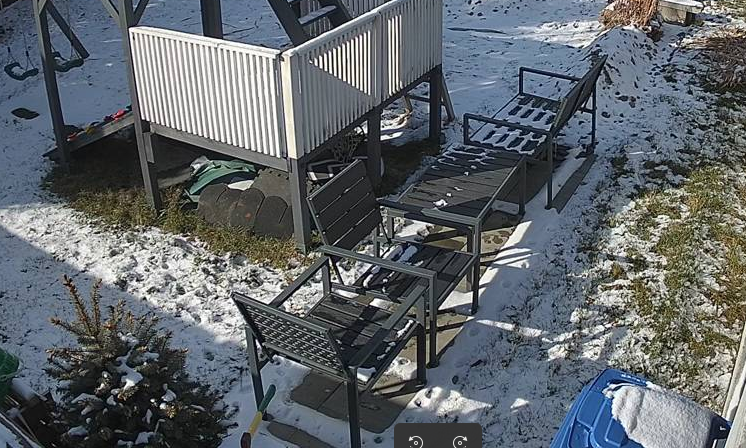
{"model":"moondream:1.8b","created_at":"2025-03-07T12:21:01.88367435Z","response":" shows","done":false}
{"model":"moondream:1.8b","created_at":"2025-03-07T12:21:01.89146478Z","response":" a","done":false}
{"model":"moondream:1.8b","created_at":"2025-03-07T12:21:01.899594387Z","response":" backyard","done":false}
{"model":"moondream:1.8b","created_at":"2025-03-07T12:21:01.907526884Z","response":" scene","done":false}
{"model":"moondream:1.8b","created_at":"2025-03-07T12:21:01.914964805Z","response":" with","done":false}
{"model":"moondream:1.8b","created_at":"2025-03-07T12:21:01.922397395Z","response":" snow","done":false}
{"model":"moondream:1.8b","created_at":"2025-03-07T12:21:01.929796541Z","response":" covering","done":false}
{"model":"moondream:1.8b","created_at":"2025-03-07T12:21:01.937309637Z","response":" the","done":false}
{"model":"moondream:1.8b","created_at":"2025-03-07T12:21:01.944999728Z","response":" ground","done":false}
{"model":"moondream:1.8b","created_at":"2025-03-07T12:21:01.952626946Z","response":".","done":false}
{"model":"moondream:1.8b","created_at":"2025-03-07T12:21:01.960825233Z","response":" There","done":false}
{"model":"moondream:1.8b","created_at":"2025-03-07T12:21:01.968386276Z","response":" are","done":false}
{"model":"moondream:1.8b","created_at":"2025-03-07T12:21:01.975957591Z","response":" two","done":false}
{"model":"moondream:1.8b","created_at":"2025-03-07T12:21:01.983498832Z","response":" sets","done":false}
{"model":"moondream:1.8b","created_at":"2025-03-07T12:21:01.991128609Z","response":" of","done":false}
{"model":"moondream:1.8b","created_at":"2025-03-07T12:21:01.99872868Z","response":" chairs","done":false}
{"model":"moondream:1.8b","created_at":"2025-03-07T12:21:02.006291841Z","response":" and","done":false}
{"model":"moondream:1.8b","created_at":"2025-03-07T12:21:02.013746222Z","response":" benches","done":false}
{"model":"moondream:1.8b","created_at":"2025-03-07T12:21:02.021306533Z","response":" in","done":false}
{"model":"moondream:1.8b","created_at":"2025-03-07T12:21:02.028828964Z","response":" the","done":false}
{"model":"moondream:1.8b","created_at":"2025-03-07T12:21:02.036355269Z","response":" yard","done":false}
{"model":"moondream:1.8b","created_at":"2025-03-07T12:21:02.044167426Z","response":",","done":false}
{"model":"moondream:1.8b","created_at":"2025-03-07T12:21:02.052942866Z","response":" one","done":false}
{"model":"moondream:1.8b","created_at":"2025-03-07T12:21:02.061490474Z","response":" set","done":false}
{"model":"moondream:1.8b","created_at":"2025-03-07T12:21:02.069933296Z","response":" located","done":false}
{"model":"moondream:1.8b","created_at":"2025-03-07T12:21:02.077562662Z","response":" near","done":false}
{"model":"moondream:1.8b","created_at":"2025-03-07T12:21:02.087034194Z","response":" the","done":false}
{"model":"moondream:1.8b","created_at":"2025-03-07T12:21:02.094671298Z","response":" center","done":false}
{"model":"moondream:1.8b","created_at":"2025-03-07T12:21:02.102449099Z","response":"-","done":false}
{"model":"moondream:1.8b","created_at":"2025-03-07T12:21:02.110213167Z","response":"left","done":false}
{"model":"moondream:1.8b","created_at":"2025-03-07T12:21:02.118013956Z","response":" side","done":false}
{"model":"moondream:1.8b","created_at":"2025-03-07T12:21:02.125782415Z","response":" of","done":false}
{"model":"moondream:1.8b","created_at":"2025-03-07T12:21:02.133744283Z","response":" the","done":false}
{"model":"moondream:1.8b","created_at":"2025-03-07T12:21:02.141543102Z","response":" frame","done":false}
{"model":"moondream:1.8b","created_at":"2025-03-07T12:21:02.149604519Z","response":" and","done":false}
{"model":"moondream:1.8b","created_at":"2025-03-07T12:21:02.157338891Z","response":" another","done":false}
{"model":"moondream:1.8b","created_at":"2025-03-07T12:21:02.165317974Z","response":" set","done":false}
{"model":"moondream:1.8b","created_at":"2025-03-07T12:21:02.173592206Z","response":" situated","done":false}
{"model":"moondream:1.8b","created_at":"2025-03-07T12:21:02.18192298Z","response":" towards","done":false}
{"model":"moondream:1.8b","created_at":"2025-03-07T12:21:02.189629925Z","response":" the","done":false}
{"model":"moondream:1.8b","created_at":"2025-03-07T12:21:02.197264121Z","response":" right","done":false}
{"model":"moondream:1.8b","created_at":"2025-03-07T12:21:02.204874696Z","response":" side","done":false}
{"model":"moondream:1.8b","created_at":"2025-03-07T12:21:02.212457215Z","response":".","done":false}
{"model":"moondream:1.8b","created_at":"2025-03-07T12:21:02.220122564Z","response":" The","done":false}
{"model":"moondream:1.8b","created_at":"2025-03-07T12:21:02.227777943Z","response":" chairs","done":false}
{"model":"moondream:1.8b","created_at":"2025-03-07T12:21:02.235415009Z","response":" appear","done":false}
{"model":"moondream:1.8b","created_at":"2025-03-07T12:21:02.243121933Z","response":" to","done":false}
{"model":"moondream:1.8b","created_at":"2025-03-07T12:21:02.250735614Z","response":" be","done":false}
{"model":"moondream:1.8b","created_at":"2025-03-07T12:21:02.258662805Z","response":" made","done":false}
{"model":"moondream:1.8b","created_at":"2025-03-07T12:21:02.266973244Z","response":" of","done":false}
{"model":"moondream:1.8b","created_at":"2025-03-07T12:21:02.27468176Z","response":" wood","done":false}
{"model":"moondream:1.8b","created_at":"2025-03-07T12:21:02.282282895Z","response":" or","done":false}
{"model":"moondream:1.8b","created_at":"2025-03-07T12:21:02.289846955Z","response":" metal","done":false}
{"model":"moondream:1.8b","created_at":"2025-03-07T12:21:02.297592391Z","response":",","done":false}
{"model":"moondream:1.8b","created_at":"2025-03-07T12:21:02.305465971Z","response":" while","done":false}
{"model":"moondream:1.8b","created_at":"2025-03-07T12:21:02.313191208Z","response":" the","done":false}
{"model":"moondream:1.8b","created_at":"2025-03-07T12:21:02.321349494Z","response":" benches","done":false}
{"model":"moondream:1.8b","created_at":"2025-03-07T12:21:02.329920293Z","response":" have","done":false}
{"model":"moondream:1.8b","created_at":"2025-03-07T12:21:02.340090732Z","response":" a","done":false}
{"model":"moondream:1.8b","created_at":"2025-03-07T12:21:02.34802664Z","response":" similar","done":false}
{"model":"moondream:1.8b","created_at":"2025-03-07T12:21:02.355866217Z","response":" design","done":false}
{"model":"moondream:1.8b","created_at":"2025-03-07T12:21:02.363689099Z","response":".","done":false}
{"model":"moondream:1.8b","created_at":"2025-03-07T12:21:02.3714811Z","response":" A","done":false}
{"model":"moondream:1.8b","created_at":"2025-03-07T12:21:02.379121817Z","response":" p","done":false}
{"model":"moondream:1.8b","created_at":"2025-03-07T12:21:02.3867409Z","response":"otted","done":false}
{"model":"moondream:1.8b","created_at":"2025-03-07T12:21:02.394364121Z","response":" plant","done":false}
{"model":"moondream:1.8b","created_at":"2025-03-07T12:21:02.402002067Z","response":" can","done":false}
{"model":"moondream:1.8b","created_at":"2025-03-07T12:21:02.409639127Z","response":" also","done":false}
{"model":"moondream:1.8b","created_at":"2025-03-07T12:21:02.417480073Z","response":" be","done":false}
{"model":"moondream:1.8b","created_at":"2025-03-07T12:21:02.425250071Z","response":" seen","done":false}
{"model":"moondream:1.8b","created_at":"2025-03-07T12:21:02.434030379Z","response":" on","done":false}
{"model":"moondream:1.8b","created_at":"2025-03-07T12:21:02.441586322Z","response":" the","done":false}
{"model":"moondream:1.8b","created_at":"2025-03-07T12:21:02.44953472Z","response":" left","done":false}
{"model":"moondream:1.8b","created_at":"2025-03-07T12:21:02.457934826Z","response":" side","done":false}
{"model":"moondream:1.8b","created_at":"2025-03-07T12:21:02.466621776Z","response":" of","done":false}
{"model":"moondream:1.8b","created_at":"2025-03-07T12:21:02.474522367Z","response":" the","done":false}
{"model":"moondream:1.8b","created_at":"2025-03-07T12:21:02.482164977Z","response":" image","done":false}
{"model":"moondream:1.8b","created_at":"2025-03-07T12:21:02.489806331Z","response":",","done":false}
{"model":"moondream:1.8b","created_at":"2025-03-07T12:21:02.497422616Z","response":" adding","done":false}
{"model":"moondream:1.8b","created_at":"2025-03-07T12:21:02.505029007Z","response":" some","done":false}
{"model":"moondream:1.8b","created_at":"2025-03-07T12:21:02.512655886Z","response":" gre","done":false}
{"model":"moondream:1.8b","created_at":"2025-03-07T12:21:02.520270742Z","response":"enery","done":false}
{"model":"moondream:1.8b","created_at":"2025-03-07T12:21:02.527950115Z","response":" to","done":false}
{"model":"moondream:1.8b","created_at":"2025-03-07T12:21:02.535610963Z","response":" the","done":false}
{"model":"moondream:1.8b","created_at":"2025-03-07T12:21:02.543517032Z","response":" snowy","done":false}
{"model":"moondream:1.8b","created_at":"2025-03-07T12:21:02.551320555Z","response":" landscape","done":false}
{"model":"moondream:1.8b","created_at":"2025-03-07T12:21:02.559147856Z","response":".","done":false}
{"model":"moondream:1.8b","created_at":"2025-03-07T12:21:02.566976927Z","response":"","done":true,"done_reason":"stop","context":[18233,25,220,58,9600,12,15,60,198,198,24564,4892,628,23998,25,220,198,464,2939,2523,257,24296,3715,351,6729,9505,262,2323,13,1318,389,734,5621,286,18791,290,43183,287,262,12699,11,530,900,5140,1474,262,3641,12,9464,1735,286,262,5739,290,1194,900,22765,3371,262,826,1735,13,383,18791,1656,284,307,925,286,4898,393,6147,11,981,262,43183,423,257,2092,1486,13,317,279,8426,4618,460,635,307,1775,319,262,1364,1735,286,262,2939,11,4375,617,10536,24156,284,262,46742,10747,13],"total_duration":1117786111,"load_duration":20986309,"prompt_eval_count":740,"prompt_eval_duration":369000000,"eval_count":91,"eval_duration":717000000}

Google Coral TPU and TensorRT (Frigate + NVIDIA GPU/TensorRT)

These are two majors which allow to run object detection models. Google Coral TPU is a physical module which can be in a form of USB stick. TensorRT is a feature of GPU runtime. Both allows to run detection models on them.

Coral TPU:

And TensorRT:

Compute Capabilities requirements

CC 5.0 is required to run DeepStack and TensorRT, but 7.0 to run Ollama moondream:1.8b. Even having GPU with CC 5.0 which is minimum required to run for instance TensorRT might be not enough due to some minor differences in implementation. It is better to run on GPU with higher CC. Moreover running on CC 5.0 means that GPU is older one which leads to performance degradation even as low as having 2 or 3 camera feeds for analysis.

Running TensorRT detection models (popular ones) requires little VRAM memory, 300 – 500 MB but it requires plenty of GPU cores and supplemental physical components to be present in such GPU, with high working clocks. In other words, you can fit those models in older GPUs but it will not perform well.

Other side of the story is to run Ollama which is GenAI requiring CC 7.0 and higher. Ollama with moondream:1.8b which is the smallest available detection model still requires little more than 3GB of VRAM.

TensorRT on Geforce MX940

You can run TensorRT object detector from Frigate on NVIDIA Geforce 940MX with CC 5.0, but it will get hot at the same time you launch it. It run on driver 550 with CUDA 12.4 as follows on only one camera RTSP feed:

So this is not an option as we may burn this laptop GPU quickly. Configuration for TensorRT:

detectors:
  tensorrt:
    type: tensorrt
    device: 0

model:
  path: /config/model_cache/tensorrt/yolov7-320.trt
  input_tensor: nchw
  input_pixel_format: rgb
  width: 320
  height: 320

To start Docker container you need to pass YOLO_MODELS environment variable:

docker run -d \
  --name frigate \
  --restart=unless-stopped \
  --stop-timeout 30 \
  --mount type=tmpfs,target=/tmp/cache,tmpfs-size=1000000000 \
  --shm-size=1024m \
  --device /dev/bus/usb:/dev/bus/usb \
  --device /dev/dri/renderD128 \
  -v ./frigate-media:/media/frigate \
  -v ./frigate-config:/config \
  -v /etc/localtime:/etc/localtime:ro \
  -e FRIGATE_RTSP_PASSWORD='password' \
  -e YOLO_MODELS=yolov7x-640 \
  -p 8971:8971 \
  -p 8554:8554 \
  -p 8555:8555/tcp \
  -p 8555:8555/udp \
  --gpus all \
  ghcr.io/blakeblackshear/frigate:stable-tensorrt

Pleas notice that Docker image is different if you want to run use GPU with TensorRT than without it. It is also not possible to run hardware accelerated decoder using FFMPEG with 940MX so disable it by passing empty array:

cameras:
  myname:
    enabled: true
    ffmpeg:
      inputs:
        - path: rtsp://user:pass@addr:port/main
          roles:
            - detect
            - record
      hwaccel_args: []

However if you would like to try hardware decoder with different GPU or CPU the play with this values:

preset-vaapi
present-nvidia

TensorRT on “modern” GPU

It is the best to run TensorRT on modern GPU with highest possible CC feature set. It will run detection fast, it will not get hot as quickly. Moreover it will have hardware support for video decoding. And even more you could run GenAI on the same machine.

So the minimum for object detection with GenAI descriptions is to have 4 GB VRAM. In my case it is NVIDIA RTX 3050 Ti Mobile which runs 25% at most with 4 – 5 camera feeds.

Google Coral TPU USB module

To run Coral detector:

detectors:
  coral:
    type: edgetpu
    device: usb

But first you need to install and configure it:

sudo apt install python3-pip python3-dev python3-venv libusb-1.0-0
echo "deb https://packages.cloud.google.com/apt coral-edgetpu-stable main" | sudo tee /etc/apt/sources.list.d/coral-edgetpu.list
curl https://packages.cloud.google.com/apt/doc/apt-key.gpg | sudo apt-key add -
sudo apt update
sudo apt install libedgetpu1-std

You can also run TPU in high power mode:

sudo apt install libedgetpu1-max

And finally configure USB:

echo 'SUBSYSTEM=="usb", ATTR{idVendor}=="1a6e", GROUP="plugdev", MODE="0666"' | sudo tee /etc/udev/rules.d/99-edgetpu-accelerator.rules
sudo udevadm control --reload-rules && sudo udevadm trigger

Remember to run Coral via USB 3.0 as running it via USB 2.0 will cause performance drop by a factor of 2 or even 3 times. Second thing, to run Coral, first plug it in. Wait until it is recognized by the system:

lsusb

At first you will see not Google, but 1a6e Global Unichip. After TPU is initialized you will see 1da1 Google Inc:

You can pass Coral TPU via Proxmox USB device, but after each Proxmox restart you need to take care of TPU initialization:

AI video surveillance with DeepStack, Python and ZoneMinder

For those using ZoneMinder and trying to figure out how to detect objects, there is deepquestai/deepstack AI model and builtin HTTP server. You can grab video frames by using ZoneMinder API or UI API:

https://ADDR/zm/cgi-bin/nph-zms?scale=100&mode=single&maxfps=30&monitor=X&user=XXX&pass=XXX

You need to specify address, monitor ID, user, password. You can also specify single frame (mode=single) or motion (mode=jpeg). Zoneminder uses internally /usr/lib/zoneminder/cgi-bin/nph-zms program binary to grab frame from configured IP ONVIF RTSP camera. It is probably to the most quickest option, but it is convenient one. Using OpenCV in Python you could also access RTSP stream and grab frames manually. However for sake of simplicity I stay with ZoneMinder nph-zms.

So lets say I have such video frame from camera:

It is simple view of street with concrete fence with some wooden boards across. Now lets say I would like to detect passing objects. First we need to install drivers, runtime and start server.

NVIDIA drivers

In my testing setup I have RTX 3050 Ti with 4GB of VRAM running Ubuntu 22 LTS desktop. By default there will not be CUDA 12.8+ drivers available. You can get up to version 550. Starting from 525 you can get CUDA 12.x. This video card has Ampere architecture with Compute Capabilities of 8.6 which translates with CUDA 11.5 – 11.7.1. However you can install drivers 570.86.16 with consists of CUDA 12.8 SDK.

sudo add-apt-repository ppa:graphics-drivers/ppa
sudo apt update
sudo apt install nvidia-driver-570

To check if it is already loaded:

lsmod | grep nvidia

Docker GPU support

Native, default Docker installation does not support direct GPU usage. According to DeepStack you should run the following commands in order to configure Docker NVIDIA runtime. However ChatGPT suggests to install nvidia-container-toolkit. You can find proper explanation of differences here. At first glace it seems that those packages are correlated.

curl -s -L https://nvidia.github.io/nvidia-docker/gpgkey | \
sudo apt-key add -
distribution=$(. /etc/os-release;echo $ID$VERSION_ID)
curl -s -L https://nvidia.github.io/nvidia-docker/$distribution/nvidia-docker.list | \
sudo tee /etc/apt/sources.list.d/nvidia-docker.list
sudo apt-get update
sudo apt-get install -y nvidia-docker2
sudo pkill -SIGHUP dockerd

As we installed new driver and reconfigured Docker it is good to fire reboot. After rebooting machine, check if nvidia-smi reports proper driver and CUDA SDK versions:

sudo docker run --gpus '"device=0"' nvidia/cuda:12.8.0-cudnn-devel-ubuntu22.04 nvidia-smi

This should report output of nvidia-smi run from Docker container called nvidia/cuda. Please note that this image may differ a little bit as it changes over time. You can adjust –gpus flag in case you got more than one NVIDIA supported video card in your system.

deepquestai DeepStack

In order to run DeepStack model and API server utilizing GPU just give gpu tag and set –gpus all flag. There is also environment variable VISION-DETECTION set to True. Probably you can configure other things such as face detection, but for now I will just stick with only this one:

sudo docker run --rm --gpus all -e VISION-DETECTION=True -v localstorage:/datastore -p 80:5000 deepquestai/deepstack:gpu

Now you have running DeepStack Docker container with GPU support. Let’s check program code now.

My Vision AI source code

import requests
from PIL import Image
import urllib3
from io import BytesIO
import time
urllib3.disable_warnings(urllib3.exceptions.InsecureRequestWarning)

prefix = "data-xxx/xxx"
zmuser = "readonly"
zmpass = "readonly"
zmaddr = "x.x.x.x"
zmmoid = x
deepstackaddr = "localhost:80"

#
# DOWNLOAD AND SAVE ZONEMINDER VIDEO FRAME
#
timestamp = int(time.time() * 1000)  
url = "https://{}/zm/cgi-bin/nph-zms?scale=100&mode=single&maxfps=30&monitor={}&user={}&pass={}".format(zmaddr, zmmoid, zmuser, zmpass)
output_path = "{}_{}.jpg".format(prefix, timestamp)
response = requests.get(url, verify=False)
if response.status_code == 200:
    with open(output_path, "wb") as file:
        file.write(response.content) 
    print(f"Downloaded: {output_path}")
else:
    print("Unable to download video frame")

#
# AI ANALYSE VIDEO FRAME
#
image_data = open(output_path,"rb").read()
image = Image.open(output_path).convert("RGB")
response = requests.post("http://{}/v1/vision/detection".format(deepstackaddr),files={"image":image_data},data={"min_confidence":0.65}).json()

#
# PRINT RECOGNIZED AND PREDICTED OBJECTS
#
for object in response["predictions"]:
    print(object["label"])
print(response)

#
# CROP OBJECTS AND SAVE TO FILES
#
i = 0
for object in response["predictions"]:
    label = object["label"]
    y_max = int(object["y_max"])
    y_min = int(object["y_min"])
    x_max = int(object["x_max"])
    x_min = int(object["x_min"])
    cropped = image.crop((x_min,y_min,x_max,y_max))
    cropped.save("{}_{}_{}_{}_found.jpg".format(prefix, timestamp, i, label))
    i += 1

With this code we grab ZoneMinder video frame, save it locally, pass to DeepStack API server for model vision detection and finally we take predicted detections with text output as well as cropped images showing only detected artifacts. For instance, the whole frame was as following:

And automatically program detected and cropped the following region:

There are several, few tens I think, types/classes of object which can be detected by this AI model. It is already pretrained and I think it is closed in terms of learning and correcting detections. I will further investigate that matter of course. Maybe registration plates OCR?

Hetzner Cloud with pfSense gateway

Instead of using dedicated Hetzner servers you can use their cloud solutions for less demanding use case scenarios. The idea is to have one server for pfSense and the other one for regular private use, hidden behind gateway. It will be little bit cheaper than renting dedicated server as CX22 costs around 3 – 4 Euro per month comparing to 50 Euro at least for dedicated server. You can have up to 10 virtual cloud server in a price of single dedicated server. Choose cloud for “simple” (or rather straightforward) solutions, dedicated servers for much complicated setups with much more demand for CPU and RAM usage.

Asssuming you use locally Ubuntu 22 or 24.

Initial setup

First install brew. In case of missing python packages, install it with system packages with python- prefix.

/bin/bash -c "$(curl -fsSL https://raw.githubusercontent.com/Homebrew/install/HEAD/install.sh)"

Install shell configuration:

echo 'eval "$(/home/linuxbrew/.linuxbrew/bin/brew shellenv)"' >> /home/USER/.bashrc
eval "$(/home/linuxbrew/.linuxbrew/bin/brew shellenv)"

Then install hcloud:

brew install hcloud

hcloud is used to manage Hetzner configuration from command line. In order to use it, create user token and create context.

Create cloud servers and networks

Create servers:

hcloud server create --name router --type cx22 --image ubuntu-24.04
hcloud server create --name private-client --type cx22 --image ubuntu-24.04

Create private network:

hcloud network create --name nat-network --ip-range 10.0.0.0/16
hcloud network add-subnet nat-network --network-zone eu-central --type server --ip-range 10.0.0.0/24

And attach servers to this network:

hcloud server attach-to-network router --network nat-network --ip 10.0.0.2
hcloud server attach-to-network private-client --network nat-network

Now important thing. In order to route private network traffic you need to add special 0.0.0.0/0 route to gateway. Now it seems that it can be only done using hcloud as web UI do not allow it:

hcloud network add-route nat-network --destination 0.0.0.0/0 --gateway 10.0.0.2

pfSense installation

This is second thing which is little complicated if you want to do it via web UI. It is highly recommended to do this via hcloud. Download pfSense packge, decompress it and pass ISO image as parameter:

hcloud server attach-iso router pfSense-CE-2.7.2-RELEASE-amd64.iso
hcloud server reset router

Now do regular pfSense installation and detach ISO:

hcloud server detach-iso router
hcloud server reset router

After rebooting pfSense:

  • configure WAN as vtnet0
  • configure LAN as vtnet1
  • uncheck Block bogon networks
  • set LAN as DHCP
  • set LAN System – Routing – Static routes from 10.0.0.0/16 to 10.0.0.1
  • disable hardware checksum offload in System – Advanced – Networking
  • set NAT outbound to hybrid mode
  • set WAN NAT outbound from 10.0.0.0/16 to any addressing WAN address
  • change LAN firewall catch all rule as from any instead of LAN subnets

Routing traffic

Once you have your pfSense router setup you need to pass traffic from private-client server to 10.0.0.1, which is Hetzner’s default gateway in every private network. We defined earlier that we want to pass all traffic via router (10.0.0.2), but it will be done in Hetzner router which will pass traffic from private-client to router and then to final destination. So we do not pass traffic directly to pfSense gateway n such configuration.

It is important to uncheck blocking bogon networks as our router will be passing private traffic in WAN interface. Setting WAN NAT outbonud is also critical in order to have this routing working. Finally, pfSense adds default LAN catch all rule, which needs to be modifyed to apply all sources and not only LAN, which allows routing traffic via Hetzner gateway.

Beforementioned aspects are outside of regular pfSense configuration as in dedicated servers, because here we have private managed network which runs with different rules, so you need to follow those rule if you want to have pfSense acting as gateway.

Afterwords

Be sure of course to setup you own desired network addressing and naming conventions. If something is unclear, refer to official Hetzner documentation which can found here. After configuring private-client you can disable public networking. Switch it off and then unlink public IP address and power if on again. Now to access private-client either use Hetzner Cloud console or setup OpenVPN in your fresh pfSense installation.

Design and 3D-print wall switch in OpenSCAD

So we decided to try Zigbee wall switches and many of available brands work with Fibaro. But not all of them and not in all configurations. Even if some switch or module works it may only work with Tuya gateway and application and not with Fibaro gateway. So there are some blanks in this concept. We left with double frame with electronic switch and one blank for shutters as there is no compatible switch or module at this time. So I thought: maybe I just 3D-print it…

OpenSCAD code:

cube(size=[4.9, 4.9, 0.2]);

translate([1.9, 1.9, 0.2]) 
   cylinder(h=0.65, r=0.24 ,$fn=100);
translate([3.0, 1.9, 0.2]) 
   cylinder(h=0.65, r=0.24 ,$fn=100);
   
translate([1.9, 3.0, 0.2]) 
   cylinder(h=0.65, r=0.24 ,$fn=100);
translate([3.0, 3.0, 0.2]) 
   cylinder(h=0.65, r=0.24 ,$fn=100);

Few test desigs:

Let’s print them:

And here we go!

Now it looks just fine.