Then after few seconds, press special key (aka Windows key) and type your “application” name. You can grab and paste it onto application panel to be shown as a shortcut.
If you happen to have MacBookPro3,1 with Intel Core 2 Duo 2.2Hz DDR2 SDRAM with MacOS 10.8.5 on board then you probably wonder if there is a chance to access internet with modern browser. Yes, now you can with chromium downloader for chromium-legacy.
However there are reported some issues with NVIDIA GeForce 8600M GT 128MB GPU and I can confirm it also. If you download the latest, as for now 121, Chromium will be installed but no visible window content could be seen. Instead I downloaded stable 114 version which run just fine. Probably you could run more recent version but put some additional settings regarding GPU.
Few words about Chromium 114 itself. It run just fine, but it makes MacBook struggle a little bit, it gets extremely hot. I even wonder if it would get on fire 🙂
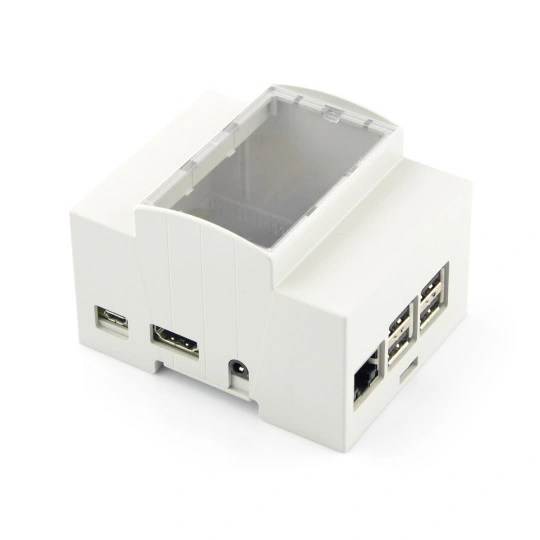
If you would like to control some electrical devices by switching them on and off then one possiblity is to use Rasberry Pi relay hat. It is from Waveshare/Botland and it fits on top of your Raspberry Pi. It contains 3 relays controllers with screw connectors.
Once you wire your devices you can even put it within DIN box like this one below. Be sure to be careful inserting micro SD card as this box fits tight and you can easily break card apart like I once did.
In order to control relay connectors first you export pins:
You can change logic settings on board using jumpers. I have tested this setup 12V wiring but it is possible to have lower or even higher voltages. Also many devices require only to close loop without any current draw.
To expose your Raspberry Pi to network (for further control from OpenHAB for instance) you can set up simple HTTP server using Ruby and Sinatra library.
require 'sinatra'
set :bind, '0.0.0.0'
get '/open' do
	system("echo 0 > /sys/class/gpio/gpio21/value")
	sleep 28
	system("echo 1 > /sys/class/gpio/gpio21/value")
	return 'Opened & Closed'
end
I tried to compile my c++ code with c++11 features on GCC 4.2.1 which is default on my MacBookPro3,1 with MacOS 10.8.5. I used random library, so I needed newer version of GCC, 4.7 at least to be more precise. I already have MacPorts on this machine (installation guide can be found here). So:
/opt/local/bin/port install gcc5
No I can compile:
/opt/local/bin/g++-mp-5 -std=c++11 main.cpp
Even that you use GCC 5.5.0 you need to pass flag to enable c++11.
If someone thinks that this was too easy, then lets try to do this on MacOS 10.4.11 on PowerBook3,4. First thing is to install XCode 2.5 which suppose to be the last one for 10.4 operating system. You can grab it from xcodereleases.com after signing in with your Apple ID. Install XCode and then download MacPorts 2.8.0. Next, install GCC 5 using same command as previously. This time it will take forever to build it as it has way less powerful hardware than newer MacBookPro3,1. During that time it got so hot so I could not even touch keyboard. Iit was around 50 degrees Celcius while being cooled and over 65 degrees without cooling.
Unfortunately GCC 5 is not supported and you need to install GCC 4.8 or at least 4.7. Prepare one day for building libgcc6, another day for libgcc7, one more for GCC itself and half a day for other stuff.
To bring and old MacBookPro up to date you can use MacPorts. First you should download and install MacPorts package from macports.org. There is a pkg file to use specifically for Mountain Lion. That’s the easy one. A little harder would be to grab working XCode with command line tools. You need to have Apple ID, not quite sure if there is different one to access developer.apple.com but mine works just fine.
Go and download XCode 5.1.1 and command line tools, file names are as follows:
XCode requires accepting licence with the following command:
xcodebuild -licence
As you will install command line tools manually, then there is no need to go to XCode’s preferences – Downloads section. Still it would not probably work as Apple ID now requires 2FA which is not present in such and old operating system.
MacPorts itself require update:
sudo /opt/local/bin/port selfupdate
After that you can install various packages. Without updating you are going to have troubles installing things as there will be missing package dependencies. For instance, to install wget type:
I have this nice MacBook Pro (3,1) from 2007. It has Intel’s Core 2 Duo running 2.2 GHz. Unfortunately the battery is dead or electronics reponsible for charging it. It arrived fully charged and was working for like 2 hours or so. In case the battery runs our of any kind of charge and it is not recognized by the system, then the computer will not start at all. This was like a shock to me, but it’s the Apple hardware.
To start MacBook without the battery you need to:
press and hold power button for 10 seconds with power cord unplugged
without releasing power button, but with power cord plugged in, keep power button for another 10 seconds
release power button for a second
press power button one more time
computer should start
Then buy new battery or replace charging electronics.
Recently I got Lenovo ThinkPad T61 in working conditions. It has Intel Core 2 Duo T7100 @1.8 GHz, 4 GB of DDR2. At its maximum it can have up to 8 GB of RAM and C2D T9500, altough I’m not quite sure if changing CPU would be straightforward operation – it seems to be socketed, not BGA. I purchased it because of NVIDIA NVS 140M dicrete GPU onboard and unconventionally high screen resolution of 1680×1050. This comes as a benefit but makes few things difficult.
Windows 10 works just fine. But if you want to have Ubuntu on it… it will not be easy. I have tried Ubuntu 18, 20, 21, 22 and none of it worked out of the box. The only one working flawlessly was Ubuntu 16. It is however too old not to be consider as a obsolete experience. Even after upgrading from 16 do 18 and so on, there are GPU locks and freezes.
There is a out of the box distro called XUbuntu, which is based on regular Ubuntu with lightweight window manager Xfce. It has lower memory requirements. First I have tried with the latest XUbuntu which is 22, however the only available NVIDIA driver was 510 which is not compatible with NVS 140M. Nouveau drivers do not work either. Finally I have tried XUbuntu 18 and it works just fine. By default it offers NVIDIA 340 driver at Software & Updates section.
In other works, if you have ThinkPad T61 and would like to have decent working experience, go for XUbuntu 16. It even has ability to install as a dual boot with Windows and recognizes previous Ubuntu installations offering understandable messages what will happen during installation.