Use Microsoft Azure AI Services to analyze images, voice, documents. No AI/ML or coding skills required. Responsible AI applies by EU AI act. Formerly Cognitive Services.
Course of Action
Create AI Services multi-account in Azure
Run computer vision OCR on image
What is Microsoft Azure?
It is Microsoft’s public cloud platform offering broad range of products and services, including virtual machines, managed containers, databases, analytics platforms as well as AI Services. Major competitors of Azure are Amazon AWS and Google’s GCP.
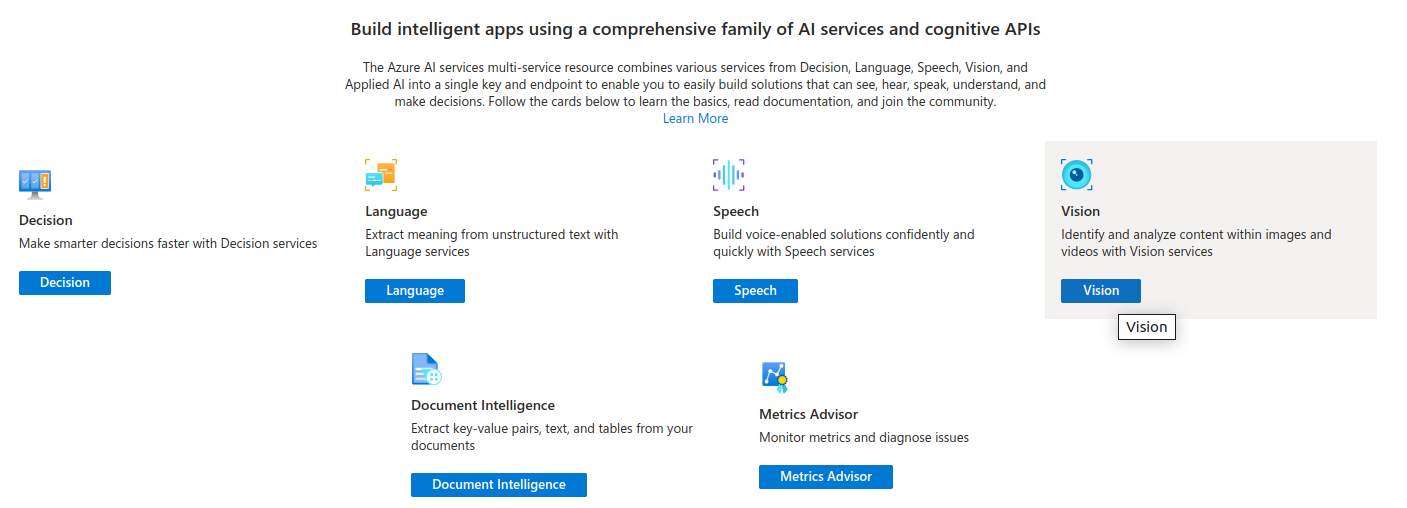
What are AI Services (formerly Cognitive Services)?
It is a set of various services concerning recognition and analysis procedures based on already trained ML models (or even traditional programming techniques). You can use it to describe documents, run OCR tasks, face recognition etc. Actually, those services tend to be categorized under Cognitive Services section, which concerns recognition which is a synonym of cognitive. Name change process which happend in July 2023 was more-or-less rebranding and provided non breaking changes only as a part of marketing. It is obvious that AI services would sell better than Cognitive Services.
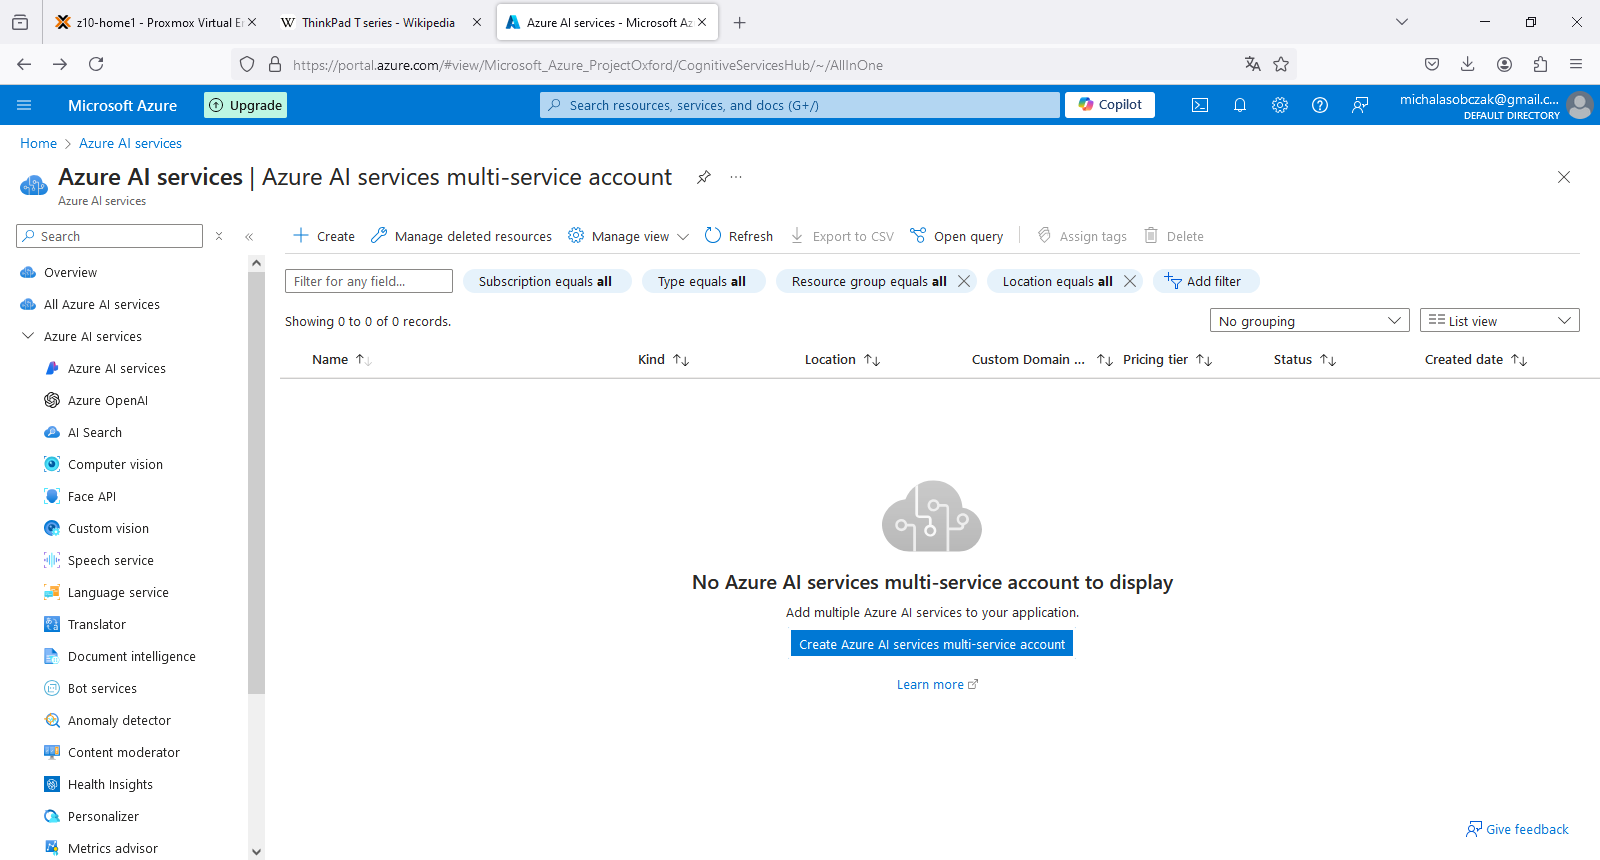
Create AI multi-service account in Azure portal
In order to create Microsoft Azure AI Services multi-service account you need to have valid Azure subscription, either Free Trial or regular account. Type “AI” in search field in portal.azure.com and you will find this service thru service catalog.
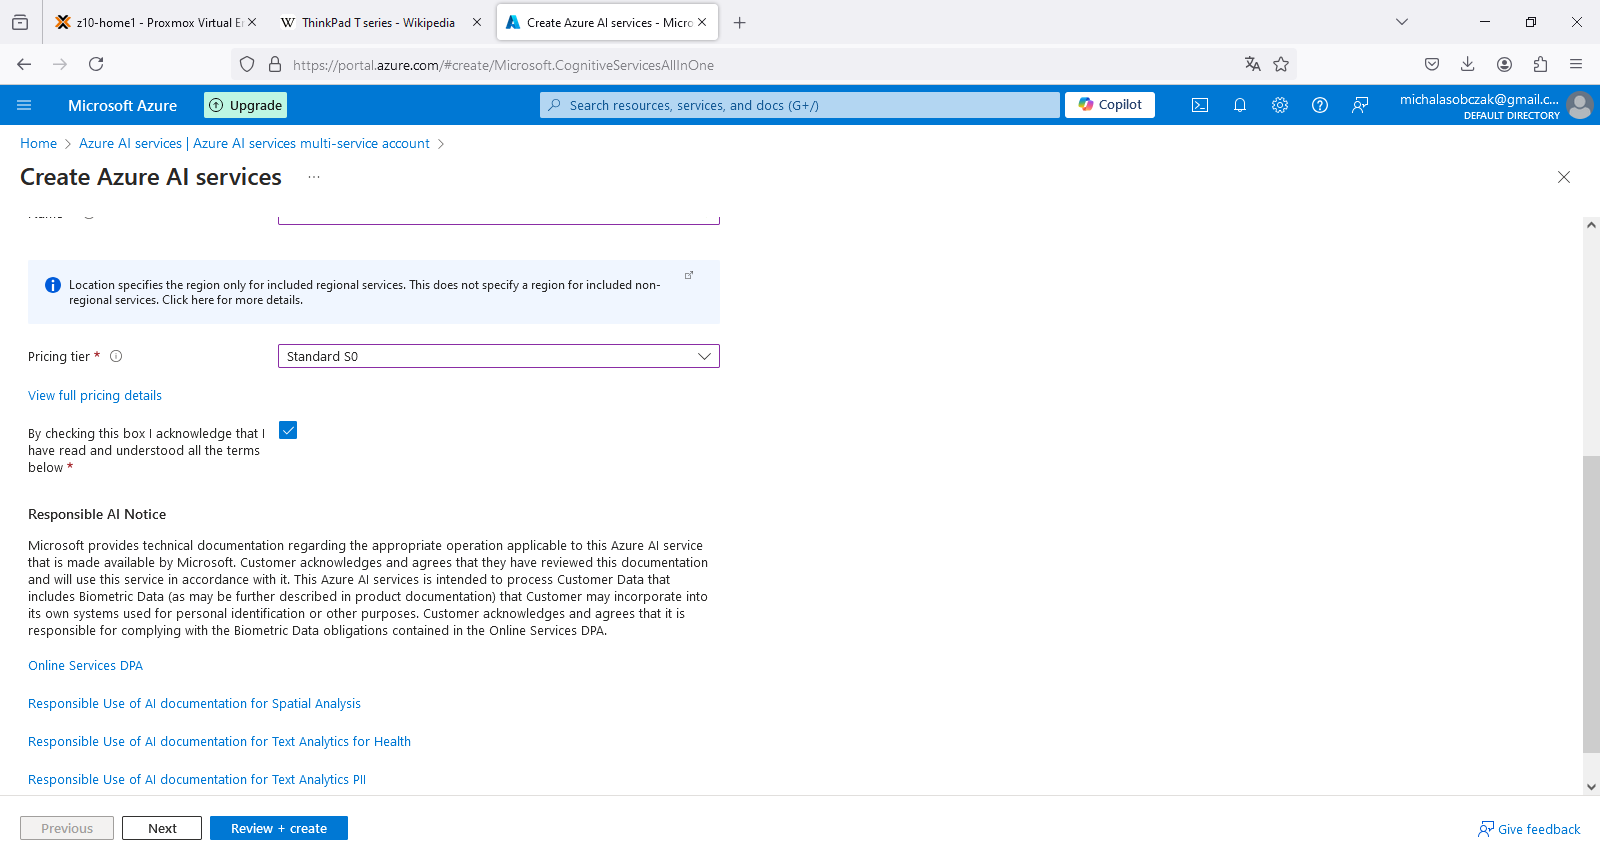
It is worth menitioning that you get “Responsible AI Notice” which relates to AI Act which includes European Union, USA and UK. It defines what AI/ML models can do and what should not allow. Accoring to KPMG source it covers among others: social scoring, recruitment and deep-fake disclosure as the most crucial areas which require regulations. What about the rest of the world? Well, it might be same as with CO2 emissions or plastic garbage recycling. situation.
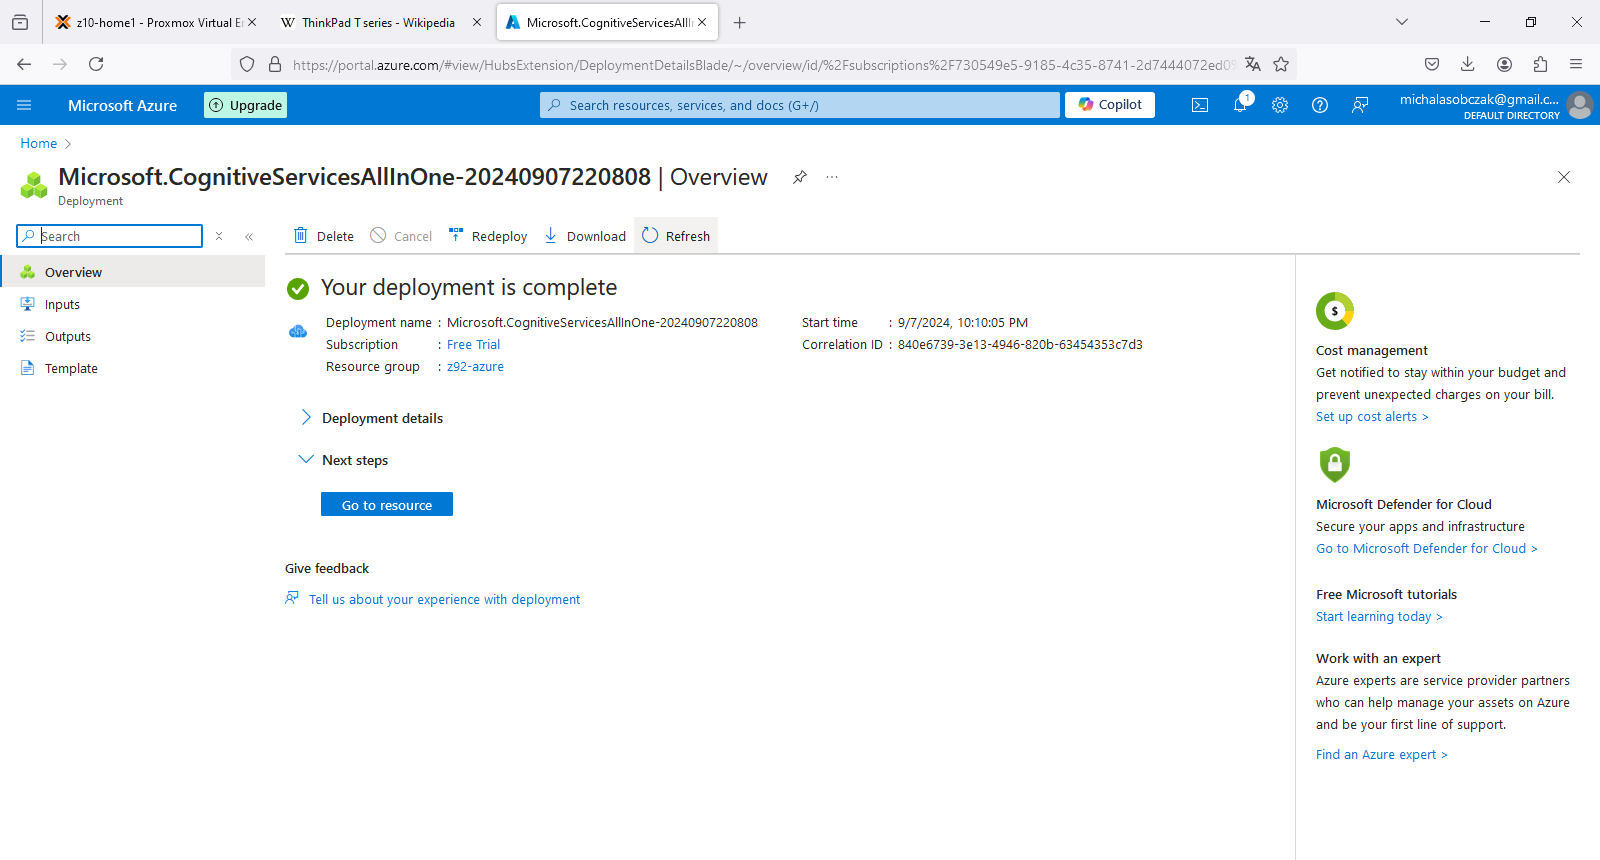
Deployment process in Azure is especially meaningful when speaking about configurable assets with data. However in terms of deploying services it is a matter of linking them to our account, so the deployment process of AI Services finishes within seconds.
AI Services account overview
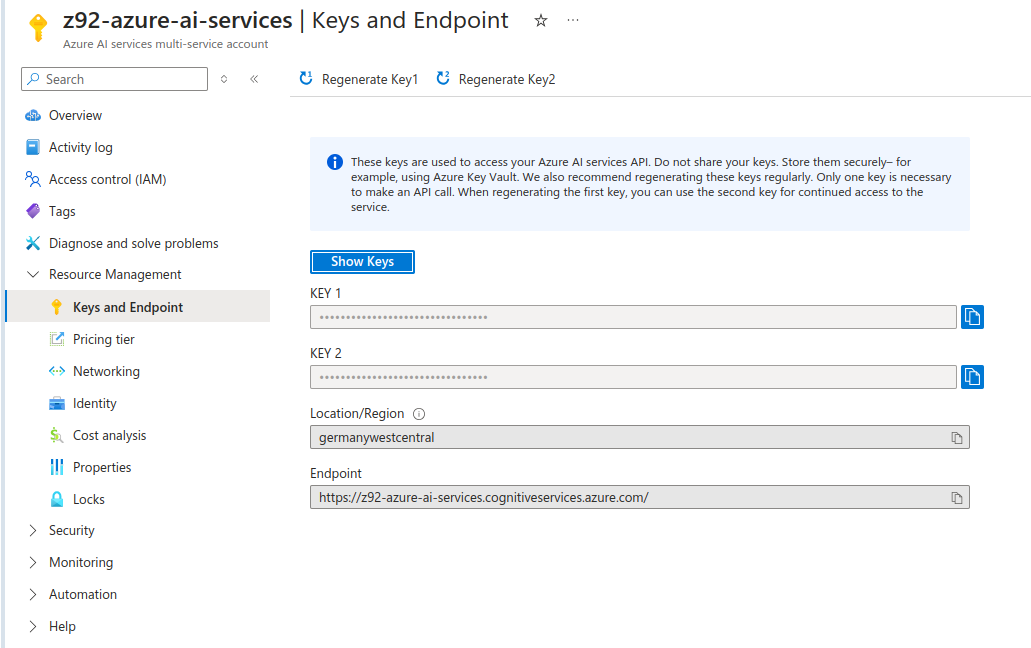
To use Azure AI services you need to go to Resource Management, Keys and Endpoint. You will know to which Endpoint you should send your API calls/requests and what is the access key. This key is then mapped to “Ocp-Apim-Subscription-Key” header which should be passed during HTTP call.
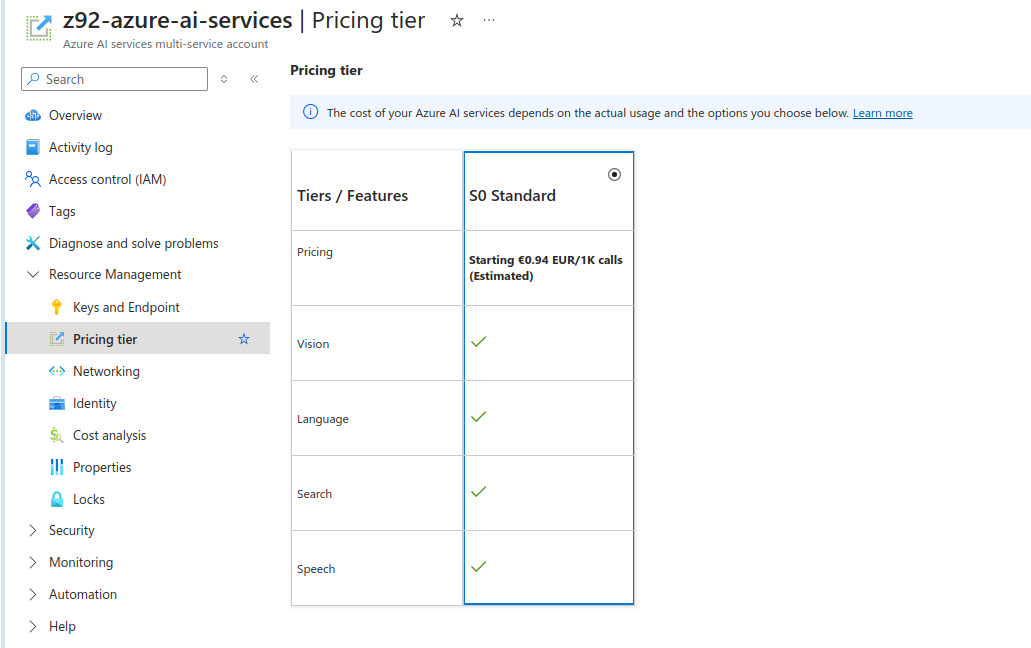
As for S0 standad pricing tier on Free Tier subscription, estimate 1 000 calls to API (requests made) would cost less than 1 Euro. It might be “cheap” however it is starting point of pricing and I suspect that it might be actually a different value in real production use case scenario especially when speaking about decision making (still could be ML based only) services and not only those services which could be replaced by traditional programming techniques, which is notabene OCR processes which are present on the market for few decades already.
Run example recognition task
Instead of programming (aka coding) in various SDKs for AI Services (Python, JavaScript etc) you can also invoke such services within HTTP request using curl utility. As far as I know every Windows 10 and 11 should have curl present. As for Linux distributions you most probably have curl already installed.
So, in order to invoke recognition task, pass subscription key (here replaced by xxx), point at specific Endpoint URL and pass url parameter which should be some publicly available image on which recognition service will run over. I found out that not every feature is available in every Endpoint. In that case, you would need to modify “features” parameter:
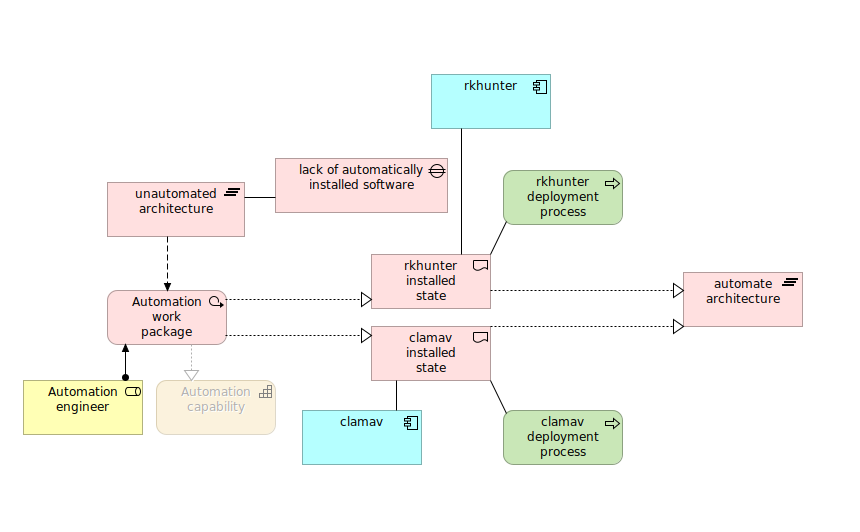
I passed this image for analysis, which contains dozen of rectangular boxes with text inside. It should should be straighforward to get proper results as text is not rotated, it is written in machine font and color contrast at proper value.
In return we receive the following JSON formatted output. We can see that it properly detected word “rkhunter” as well as “process”. However we need to provide additional layer of processing in order to merge those adjacent words in separate lines to make them phrases instead of just separate words.
I think that price-wise this AI Service, formerly known as Cognitive Services, it is reasonable way of running recognition tasks in online environment. We could include such recognition into our applications for further automation, in, for instance ERP FI invoice processing.
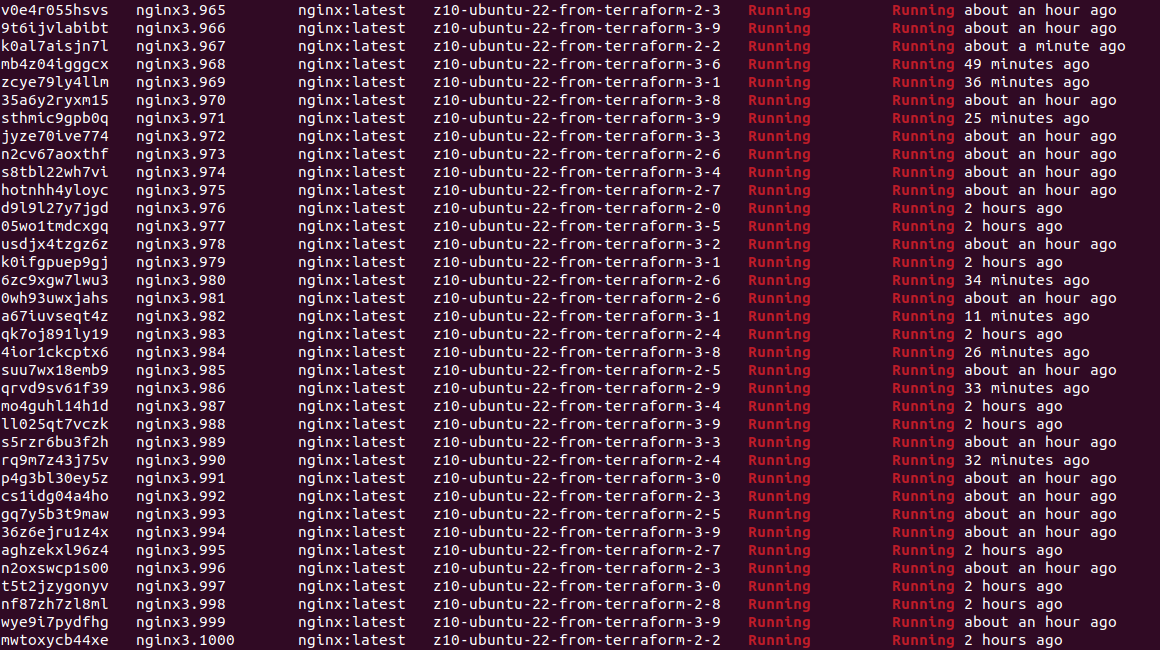
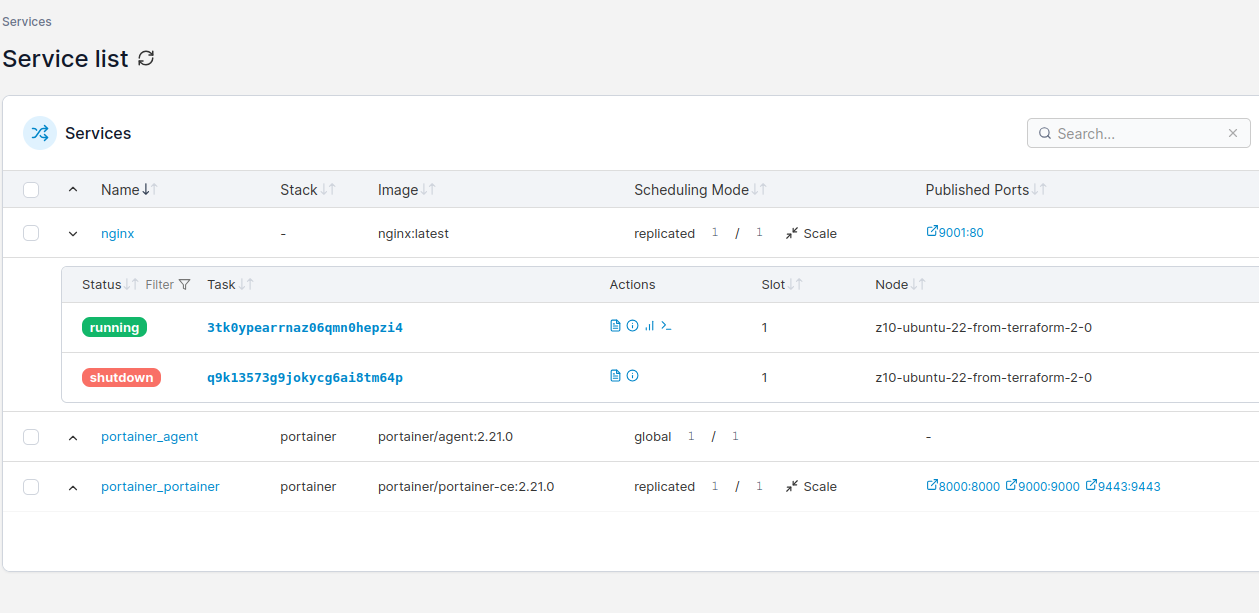
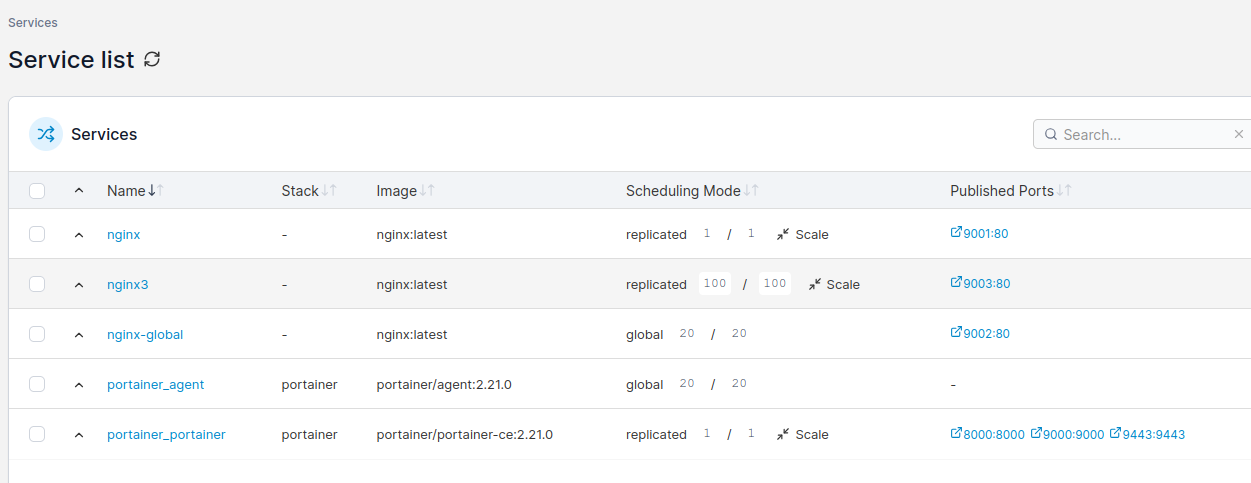
I defined Docker Swarm cluster with 20 nodes and created service using Nginx HTTP server Docker image. I scaled it to 1000 container instances, which took a while on my demo hardware. Containers are up and running but to get such statistics from Portainer CE UI is quite difficult, so I suggest using CLI in such a case:
docker service ps nginx3 | grep Running | wc -l
I got exacly 1000 containers on my service named “nginx3”.
Hardware is not so much utilized, combined 2 servers RAM usage oscillates around 50GB, load stays low as there is not much happening, so even using 20 VM and Docker containers, we do not get too much overhead of using both virtualization and containers. What about trying to spin 2000 or even 10 000 containers… Well, actually without putting load on those containers, measuring it will not be too much useful. We can scale even up to 1 000 000 containers, but what for?
If you wonder how to automatically deploy 20 nodes of Docker Swarm and run 100 Docker containers in it, then continue reading. I will show how to achieve this by using Terraform, Ansible and Portainer.
Course of action
Terraform 20 x Ubuntu virtual machines
Install Docker Swarm using Ansible
Install Portainer
Deploy 100 containers across Swarm cluster
What is Docker Swarm and why I need to have 20 of these?
Docker is containers toolkit utilizing cgroups, namespaces which allows to control and share resources of the CPU and operating system. Docker Swarm its a special kind of runtime mode, which allows to run multiple clustered nodes which can be separate physical computers or virtual machines. It gives us scalability and resource separation yet keeping it all within same management utitlities. You can make work much easier by installing Portainer CE, which is management UI for containers orchestration (de facto operations management).
So back to the question, why 20 of these? You can have single Docker Swarm node being both manager and worker and put loads of resources that you have, like CPU and RAM. But for sake of better maintanane, equal resources utilization and securing resources, you use clustered mode such as Docker Swarm with more than one node.
What is Terraform and Ansible and the whole automation thing?
Terraform is automation tool for automating construction of systems, for instance provisioning virtual machines. You can do it also with Ansible, but its role here is more like to manage already provisioned systems instead of provisioning themself. So both tool could be used possible for all the tasks, however Terraform which Telmate Proxmox plugin do it the easiest way. I use Ansible to automate tasks across resources created with Terraform. This is my way, your might be different.
Why to deploy 100 containers of the same application?
If your application perfectly handles errors and tools outages and it’s capable of running multiple processes with multiple threads and you know that will never be redeployed, then stick with 1 container. But in any of these cases, having muliple containers, instances, of the same application will be beneficial. You increate your fault-tolerance, make software releases easier. You need not bother that much about application server configuration, etc, because all of these is mitigated by deploying in N > 1 instances.
You can have 2 containers for frontend application, 2 containers for backend application, 1 application for background processing and many other composites of your single or multiple repositories. You could have 50 frontends and 50 backends, it depends on a case. You could introduce auto-scaling, which by the way is present in OKD, OpenShift, Kubernetes, but Docker Swarm and Portainer lack of such feature. It is unfortunate, but still you can do it yourself or plan and monitor your resources usage. In case of dedicated hardware it is not so important to have autoscaling, just overallocate for future peaks. In case of public cloud providers, when you pay for what you use it will be important to develop auto-scaling feature.
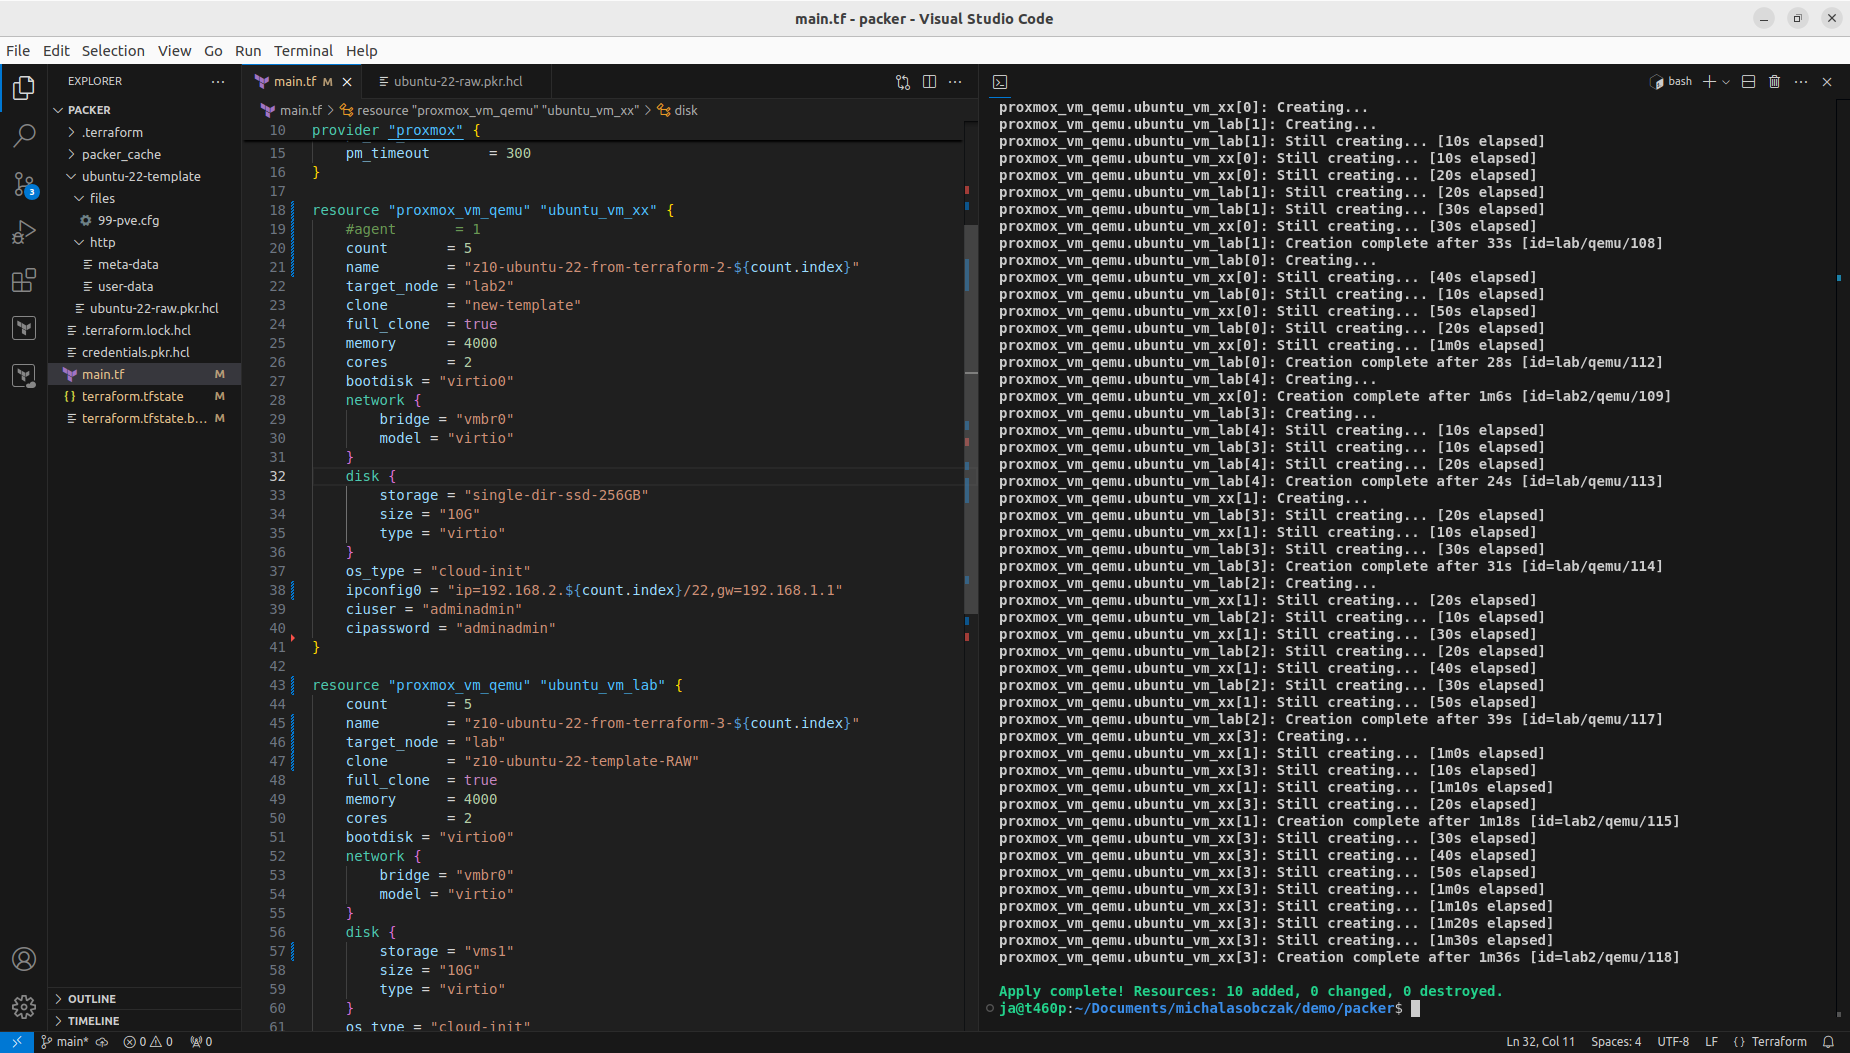
Terraform 20 Ubuntu VM
So in order to deploy more than one VM using Terraform and Telmate Proxmox provider plugin you need to either copy resource section multiple times or use count notation. I defined terraform and provider sections as well as two resource sections each for different target Proxmox server. By using count, you get ability to interpolate ${count.index} for each consecutive execution of resource. I used it for name and network IP address. Target server is differentiated using target_node. Be sure to use appropriate clone name and disk storage name at which your VMs will be placed.
With above notation you will create 10+10 Ubuntu VM. You can run it with:
terraform apply -parallelism=1
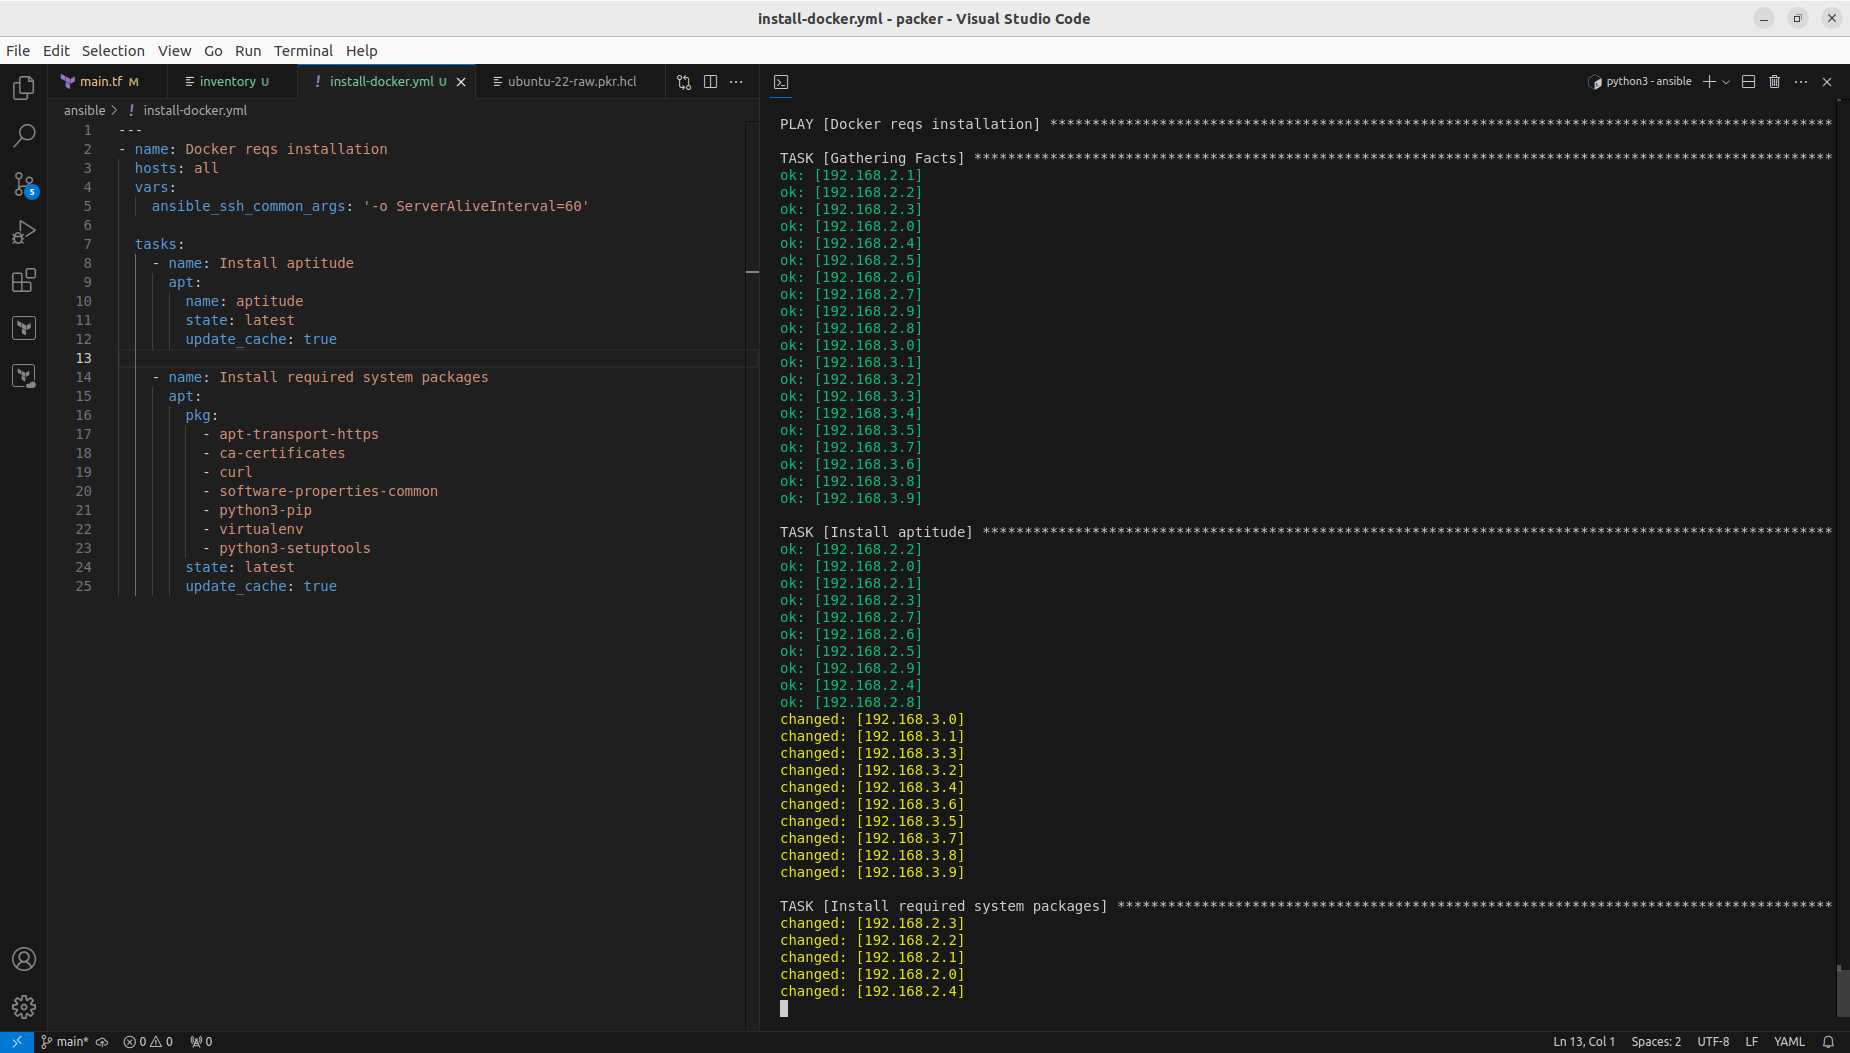
After VM are created you need to wait until cloud-init finshes its job. If you are not sure if its running or then, then reboot this VM so you will not get any stuck processes which could collide with the next step which is installing Docker with Ansible.
We could include those steps into Packer configuration and that way Docker with its requirements would be included by default. However it is good to know not only Packer and Terraform, but also how to run it from Ansible.
Configure Docker Swarm and join cluster
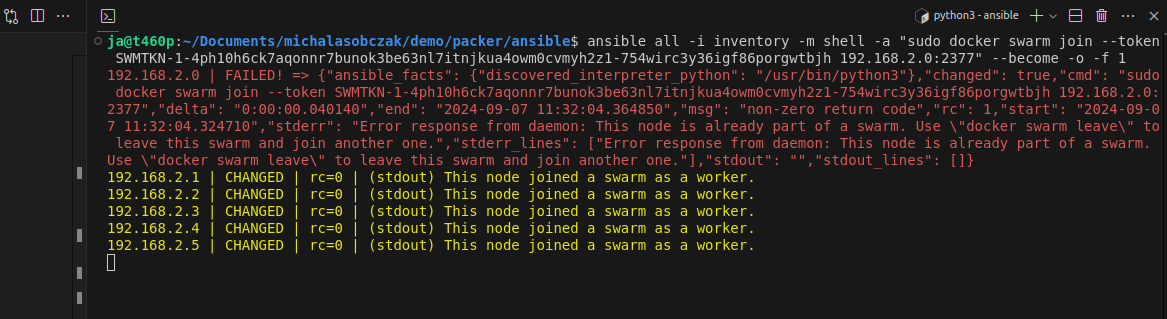
I decided to configure single manager with Portainer, so I picked 192.168.2.0 for this job:
Now we have Docker Swarm initialized, installed Portainer stack. After initializing Swarm mode you get a token for nodes inclusion. You can join more manager nodes, but for simple installation demo you can stick with single one and join additional 19 worker nodes, by using Ansible command:
ansible all -i inventory -m shell -a "sudo docker swarm join --token SWMTKN-1-4ph10h6ck7aqonnr7bunok3be63nl7itnjkua4owm0cvmyh2z1-754wirc3y36igf86porgwtbjh 192.168.2.0:2377" --become -o -f 1
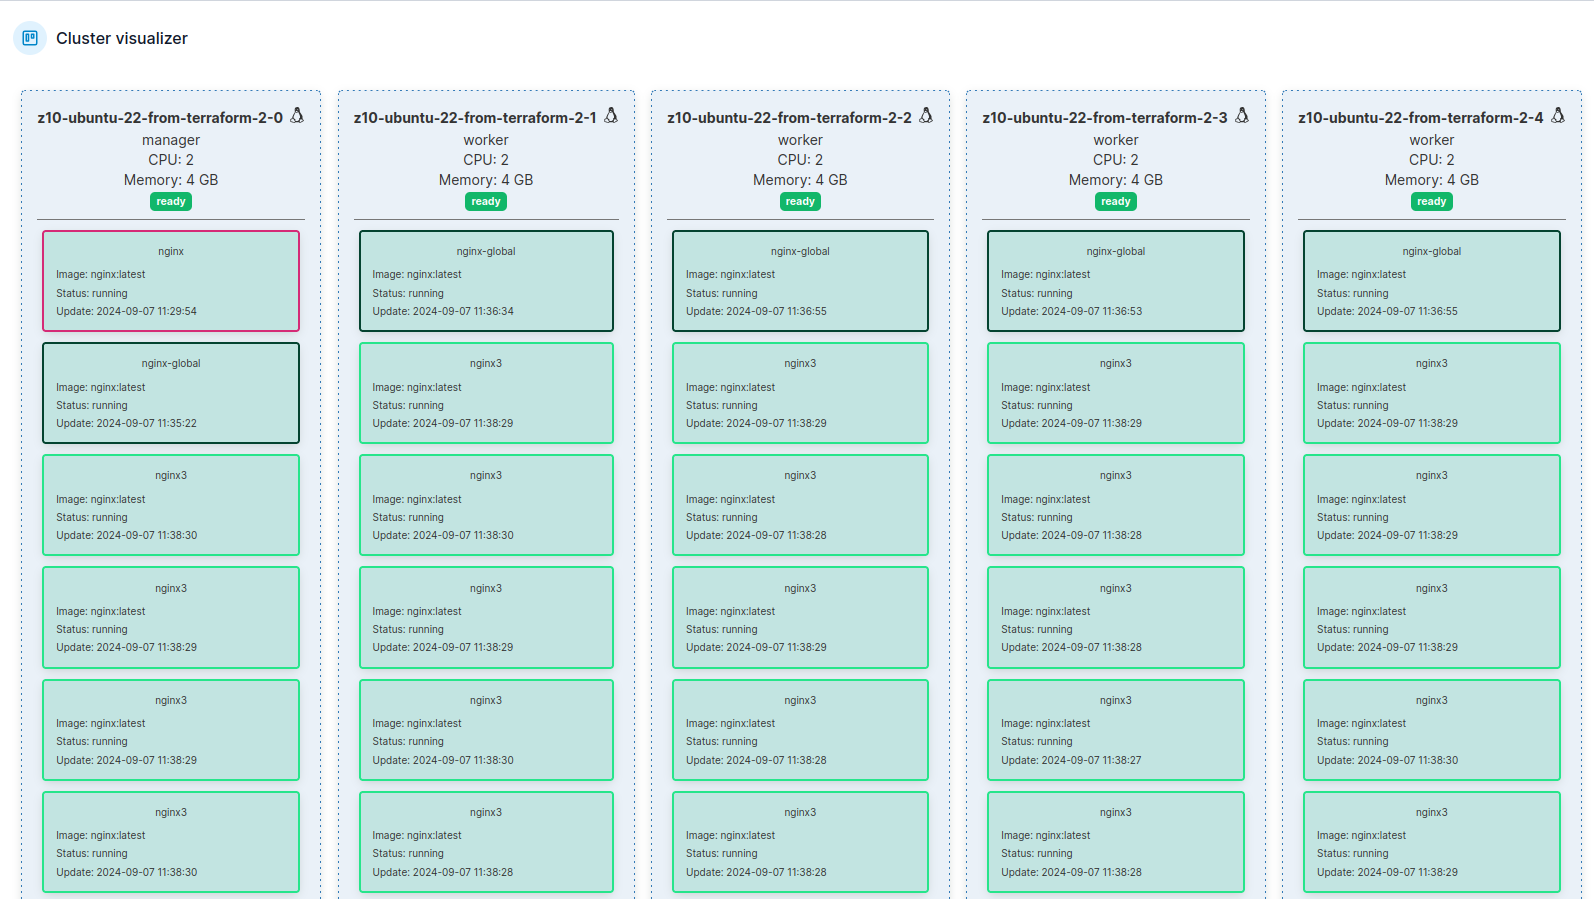
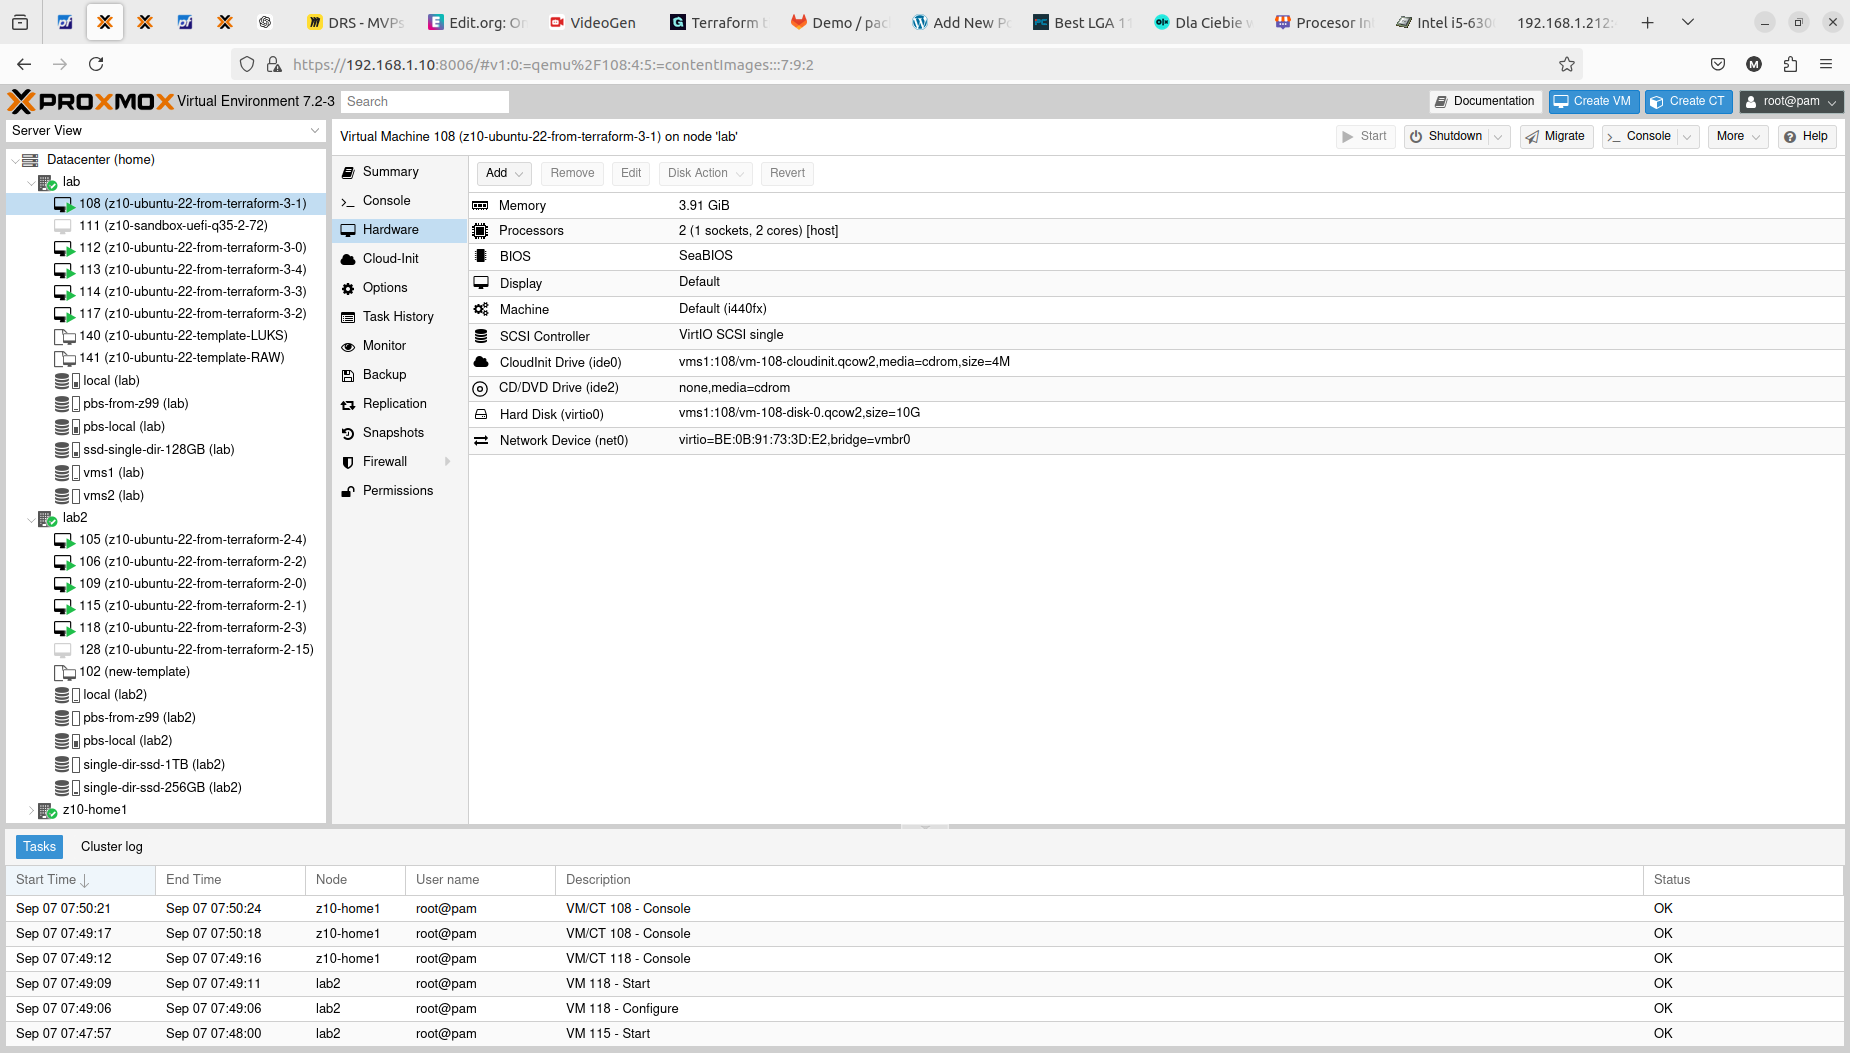
In portainer there is cluster visualizer, where you see all nodes and what is inside of them:
Running containers workloads
Using Portainer CE you can scale service instances, ie containers by just entering number of Docker container ro run. You can either run replicated mode, where you explicitly define how many container you would like to start, or you can use global mode, where number of containers will automatically equal number of nodes in your Docker Swarm cluster.
Docker Swarm scheduler will try to place containers equally according to service definiotion and hardware capabilities. You can try gradually increase number of instances and monitor hardware resources usage. There is whole separate topic regarding deployment webhooks, deployment strategies etc.
Performance comparison scenario
Installation is initialized by terraform init -parallel=1 command. On older hardware I suggest go for one-by-one strategy, instead of high parallel leve which could lead to some unexpected behavior like disk clone timeout or other issues.
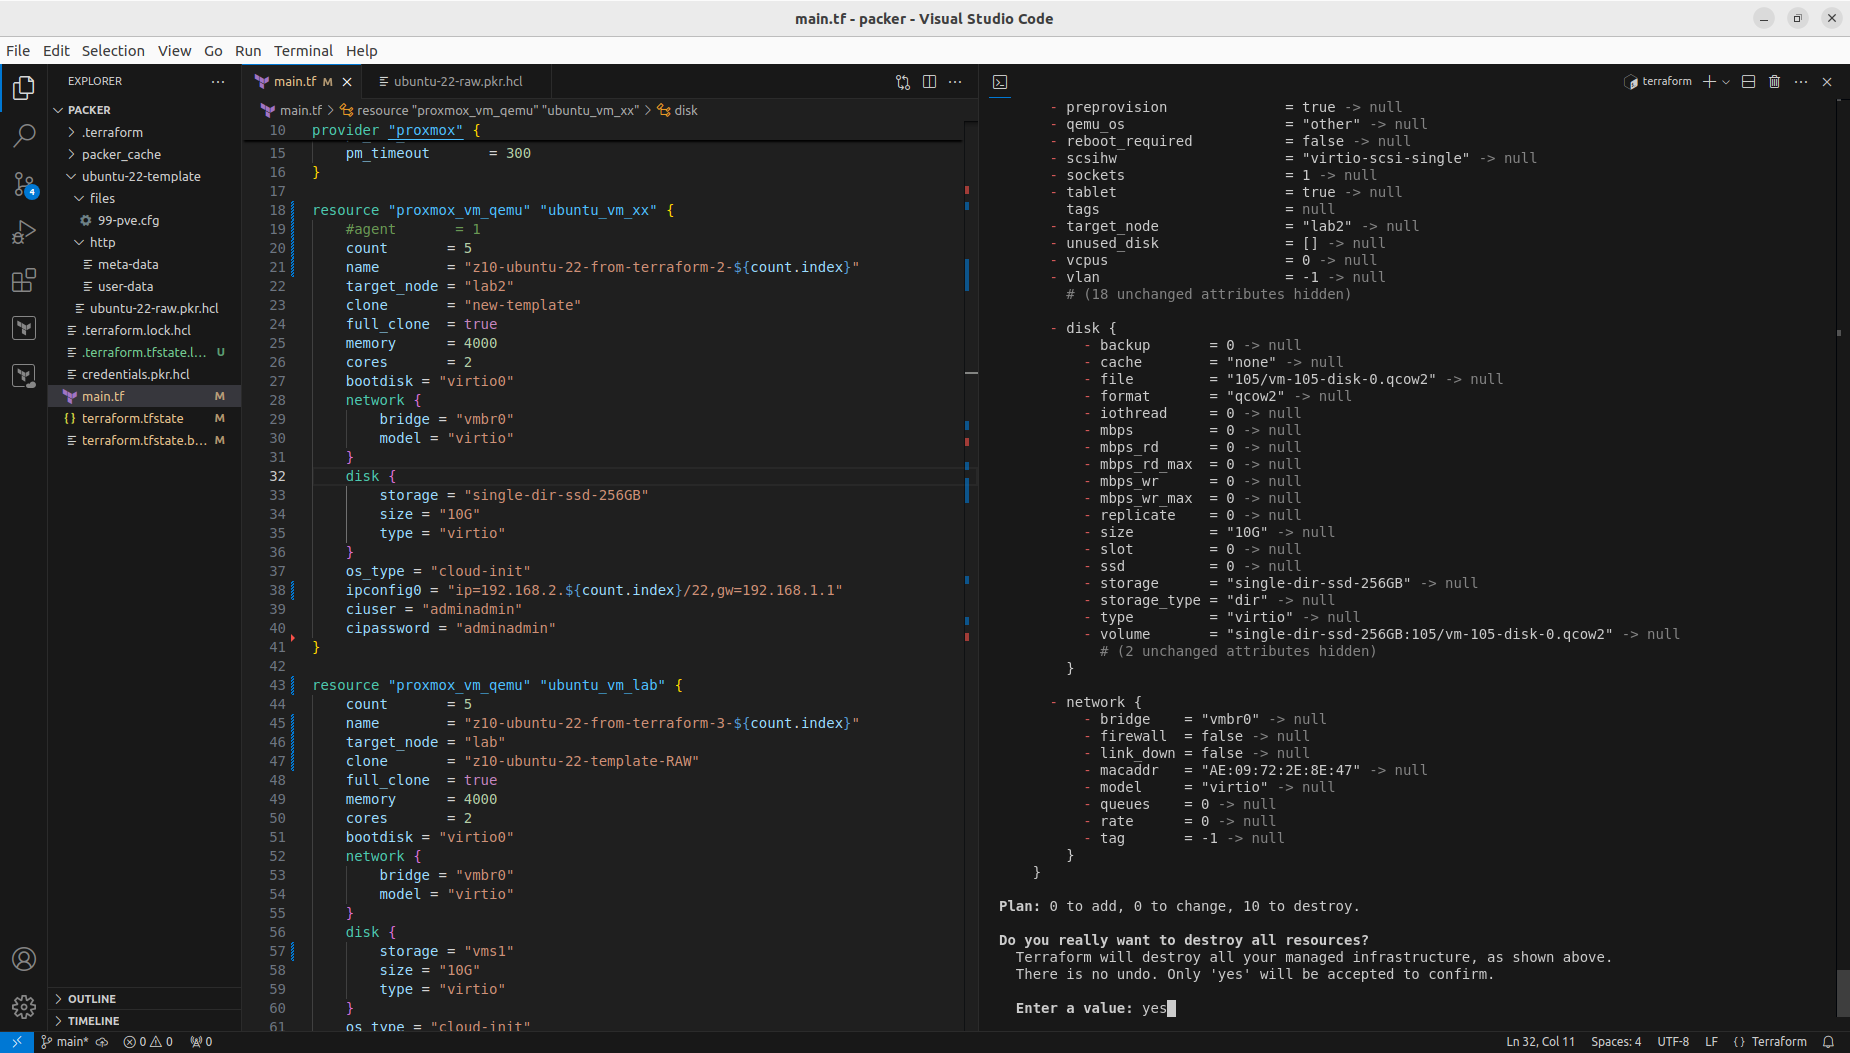
With that step done we can see how those two Terraform resource sections transformed into 5+5 virtual machines on two Proxmox nodes. Terraform keeps track of the baseline/state of your deloyment, however, it is not 100% safe to rely on it only. It is good to double check the results. In my tests I experienced situation when Terraform said that it destroyed all the content, but it did not actually. Same with resources creation, even if you are told here that everything is done be sure check it out. The problem may lay within at least 4 places, which are Terraform itself, Telmate Proxmox provider, Proxmox golang APIa and finally Proxmox itself with its hardware and software.
Both with apply and destroy you will be shown the proposed changes based on your configuration, you can then review what is going to happen and if this fits your needs:
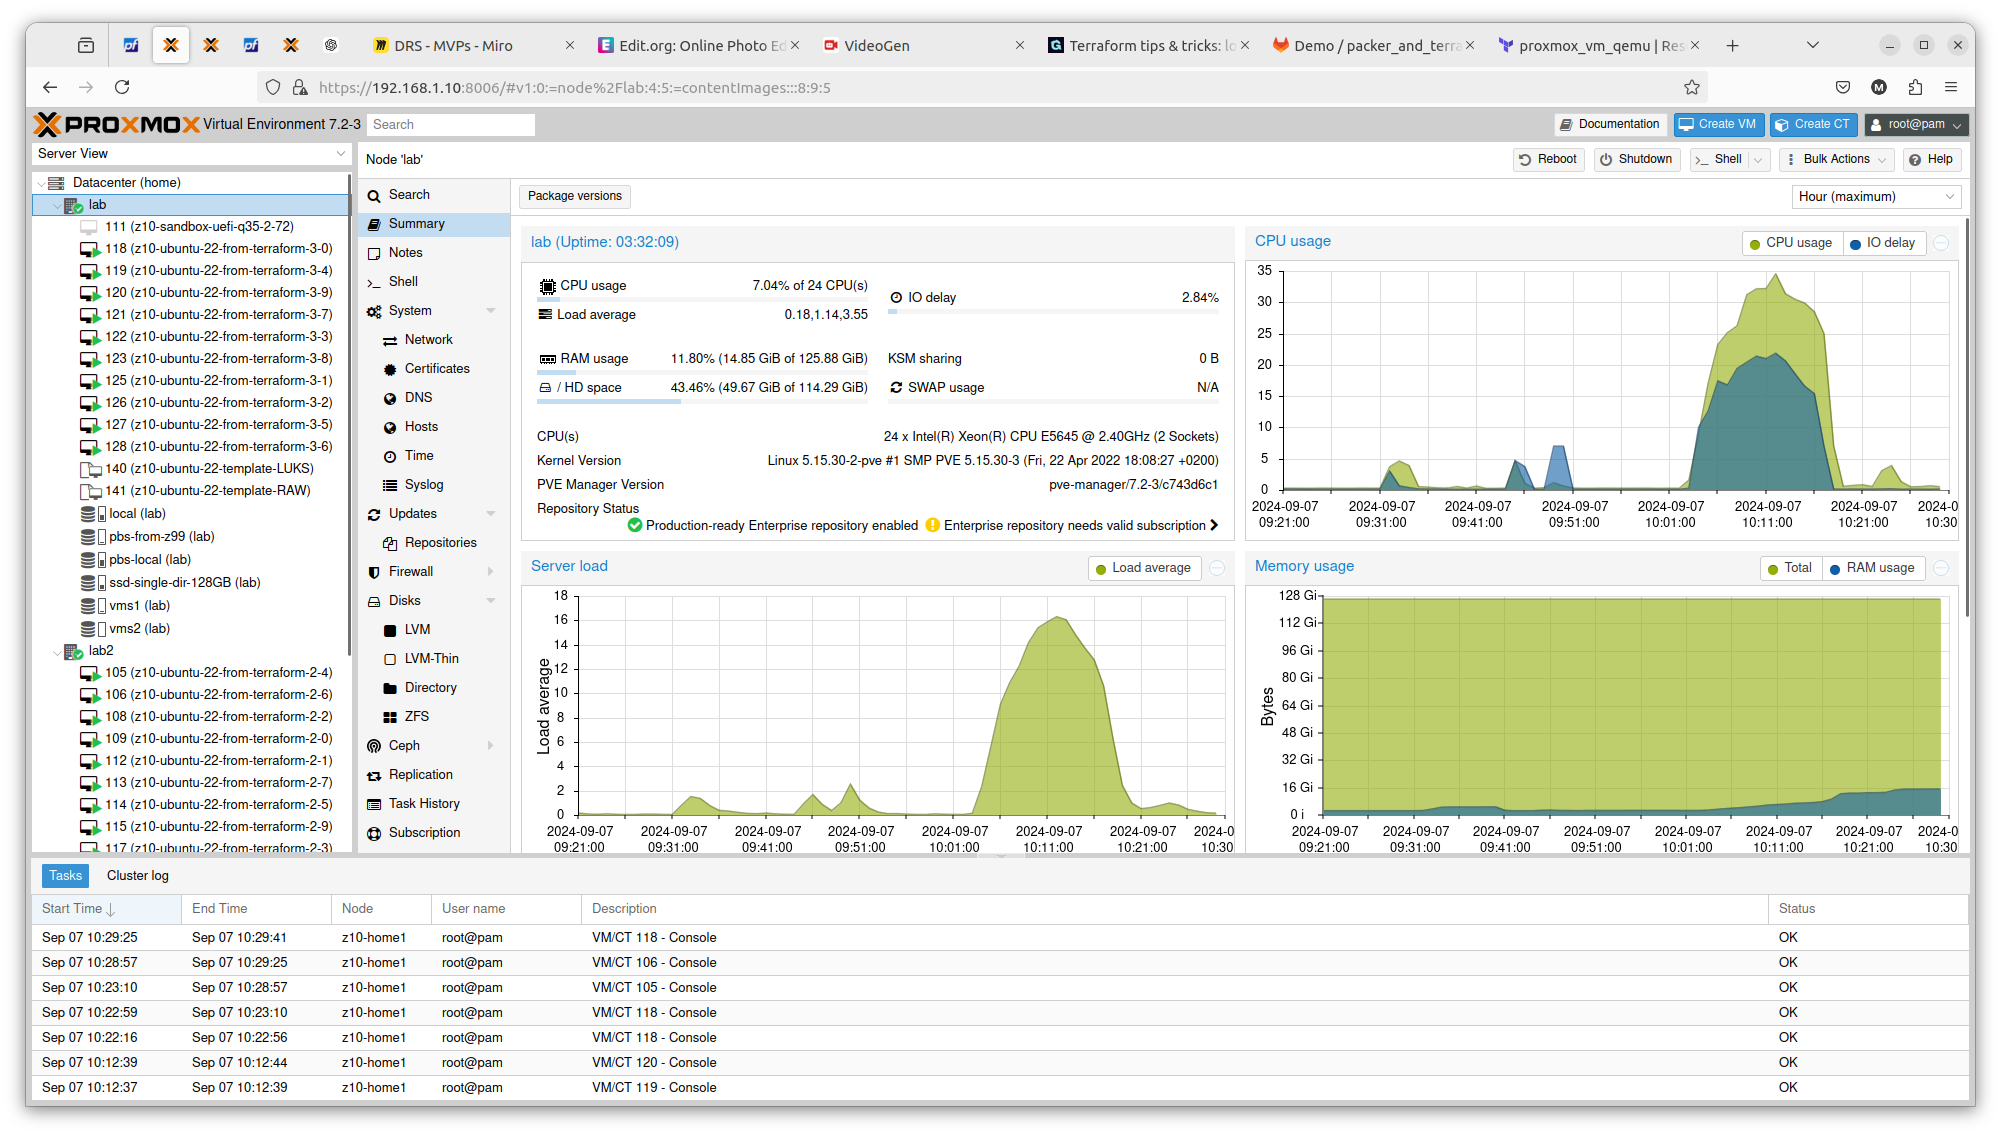
It is crucial to know on what hardware you are working on. At least from performance perspective. In case of Proxmox VE and bare-metal hardware what you see is what you get. But this strategy can be also applied on many other platform providers, yo can what brings the specific AWS or Azure virtual machines. So to illustrate it, I compared Server load between 2 Proxmox nodes within the same cluster. Here is one with 2 x Intel Xeon X5560:
And here you have 2 x Intel Xeon E5645:
You can see exactly that difference in terms on CPU theoretical performance is confirmed in real scenario. The first server gets load up to 14 and the second one up to 16. There is also difference in terms of RAM usage. Same goes with drives performance. All those factors can be important if running plenty of Ansible or Terraform tasks concurrently.
Conclusion
With Terraform, Ansible and even Packer, you easily deploy multiple virtual resources and scale your applications deployment.
If you wonder how to automate Ubuntu virtual machine creation and then deploy it to Proxmox in multple copies, then you are looking for Packer and Terraform.
Side note: going for virtual machines in Proxmox is the proper way. I tried for several days to have LXC containers working, however finally I will say that it is not the best option with lot of things going bad like cgroups, AppArmor, nesting, FUSE, ingress networking etc. There is literally too much to handle with LXC and with VM there is no such problem, so discussion end here in favour of Proxmox Qemu. Keep LXC contrainers for simple things.
Why to automate?
Because we can.
Because it is a better way of using our time.
Because it scales better.
Because it provides some form of self-documentation.
Why to use Proxmox and Ubuntu VM?
Ubuntu is a leading Linux distribution without licensing issues with 34% of Linux market share. It has strong user base. It is my personal preference also. It gives us ability to subscribe to Ubuntu Pro which comes with several compliance utilities.
And Proxmox/Qemu started being an enterprise class virtualization software package few years back and it is also a open source leading solutions in its field. In contains clustering features (including failover) as well as support for various storage types. Depending on a source it has around 1% of virtualization software market share.
Installation of Packer and Terraform
It is important to have both Packer and Terraform at its proper versions coming from official repositories. Moreover it is important that the exact way of building specific version of operating system differs from vesion to version, that is way the title of this article says 22.04-4 and not 22.04-3, because there might be some differences.
Install valid version of Packer. The version which come from Ubuntu packages it invalid and it does not contain ability to manage plugins, so be sure to install Packer with official repository.
Important note regarding Terraform and its plugin for Proxmox. This plugin as well as Proxmox golang API is provided by a single company which Telmate LLC. This plugin has some compability issues and at the moment for Proxmox 7 I recommend using Telmate/proxmox version 2.9.0. The latest version which is 2.9.14 has some difficulties with handling cloud-init which leads to 50% chance of VM that requires manual drives reconfiguration. As for 2024/09/06 there is no stable 3.0.1 release.
If you happen to have the latest one and would like downgrade, then remove .terraform and .terraform.lock.hcl and then initialize once again with the following command:
terraform init
Generate Ubuntu 22.04-4 template for Proxmox with Packer
Starting from few versions back the Ubuntu project changed its way of automating installations. Instead of seeding you now have a autoinstall feature. Packer project structure contains few files, and I will start with ubuntu-22-template/http/user-data containing cloud-config:
In order to turn LUKS on, uncomment storage.layout.password field and set desired password. users.passwd can be generated with mkpasswd using SHA-512. Next is ubuntu-22-template/files/99-pve.cfg:
datasource_list: [ConfigDrive, NoCloud]
Credentials get its own file (./credentials.pkr.hcl). You can of course place it directly into your file, however if you SCM those files it will be permament and shared with others, that is why you should separate this file and even do not include it into your commits:
proxmox_api_url = "https://192.168.2.10:8006/api2/json"
proxmox_api_token_id = "root@pam!root-token"
proxmox_api_token_secret = "your Proxmox token"
my_ssh_password = "your new VM SSH password"
Finally, there is ubuntu-22-template/ubuntu-22-raw.pkr.hcl file, where you define variables, source and build. We source ISO image and define Proxmox VE Qemu VM parameters. The most crucial and cryptic things is to provide valid boot_command. http* sections refers to your machine serving files over HTTP, ssh* section on the other hand refers to configuration relate to the remote machine (newly created VM on Proxmox). Our local machine acts as shell commands provider over HTTP which then being passed to remote machine are executed during system installation.
The installation process is automated and you do not see usual configuration screens. Instead we provide autoinstall configuration and leave few options to be setup later during cloud-init, which is user details and network configuration details. This way we can achieve automation of deployments of such system, which will be show in a moment in Terraform section of this article.
A full overview of project structure is as follows:
After successful Ubuntu installation system will reboot and convert itself into template so it can be later used as a base for further systems, either as linked clone or full clone. If you prefer having great elasticity then opt for full clone, because you will not have any constraints and limitations concerning VM usage and migration.
Deploy multiple Ubuntu VMs with Terraform
To use Proxmox VM template and create new VM upon it you can do it manually from Proxmox UI. However in case of creating 100 VMs it could take a while. So there is this Terraform utility, which with help of some plugins is able to connect to Proxmox and automate this process for you.
Define Terraform file (.tf) with terraform, provider and resource sections. Terraform section tell Terraform which plugins you are going to use. Provider section tells how to access Proxmox virtualization environment. Finally, resource section where you put all the configuration related to your Ubuntu 22.04-4 backed up with cloud-init. So we start with terraform and required provider plugins. It depends on Proxmox version whever it is 7 or 8 you will be need to give different resource configuration:
terraform {
    required_providers {
        proxmox = {
            source  = "telmate/proxmox"
            version = "2.9.0" # this version has the greatest compatibility
        }
    }
}
Next you place Proxmox provider. It is also possible to define all sensitive data as variables:
First you need to initialize Terraform “backend” and install plugins. You can do this with terraform and provider sections only if you would want. You can also do it after you complete your full spec of tf file.
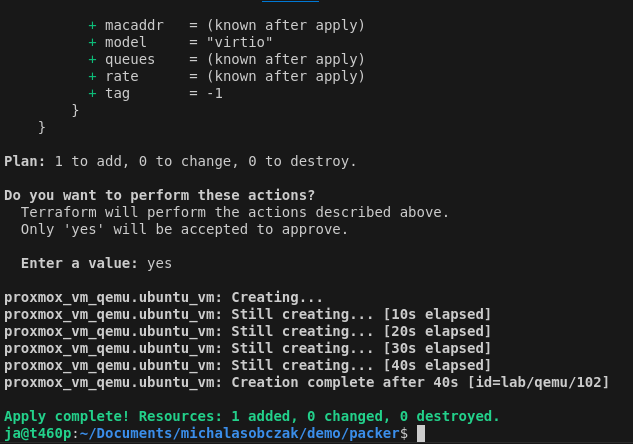
To run this terraform script you first check it with plan command and execute with apply command:
terraform plan
terraform apply
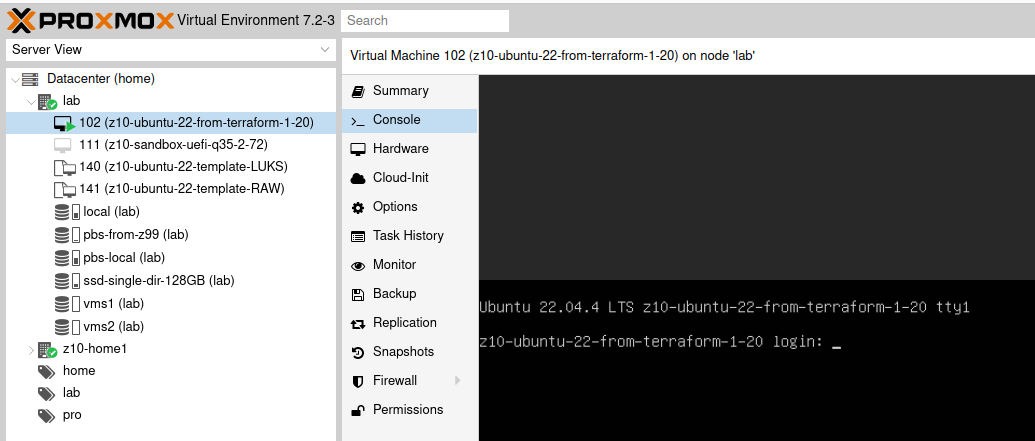
With that, this mechanism is going to fully clone template as new virtual machine with given cloud-init definitions concering user and network configuration.
I prepared two sample templates, one with LUKS disk encryption and the other one without LUKS encryption. For demo purposes it is enough to use unencrypted drive however for production use it should be your default way of installating operating systems.
Checkpoint: we have created Ubuntu template with Packer and use this template to create new VM using Terraform.
On fresh installation of Ubuntu 22, using Opera for video playback can be an issue. So even after installing all things that you may think it could help – it does not work. The solution is to install chromium-ffmpeg and copy its libffmpeg.so library into Opera installation folder.
sudo snap install chromium-ffmpeg
cd /snap/chromium-ffmpeg/xx/chromium-ffmpeg-yyyyyy/chromium-ffmpeg
sudo cp libffmpeg.so /usr/lib/x86_64-linux-gnu/opera/libffmpeg.so
Be aware that snap installation path differs in few places so check your installation. After copying ffmpeg library, just restart Opera and the video, previously not loading in LinkedIn, will work.
If you run digital services platform or critical infrastructure then most probably you are covered by NIS 2 and its requirements including those concerning information security. Even if you are not covered by NIS 2, then still you may benefit from its regulations which seem to be similar with those coming from ISO 27001. In this article I show how to automatically deploy anti-rootkit and anti-virus software for your Linux workstations and servers.
TLDR
By using rkhunter anti-rootkit and ClamAV anti-virus you are closer to NIS 2 and ISO 27001 and farther away from threats like cryptocurrency miners and ransomware. You can automate deployment with Ansible.
Course of action
Prepare Proxmox virtualization host server
Create 200 LXC containers
Start and configure containers
Install rkhunter and scan systems
Install ClamAV and scan systems
What is NIS 2?
The NIS 2 Directive (Directive (EU) 2022/2555) is a legislative act that aims to achieve a high common level of cybersecurity across the European Union. Member States must ensure that essential and important entities take appropriate and proportionate technical, operational and organisational measures to manage the risks posed to the security of network and information systems, and to prevent or minimise the impact of incidents on recipients of their services and on other services. The measures must be based on an all-hazards approach.
Aside from being a EU legislation regulation, NIS 2 can be benefication from security point of view. However, not complying with NIS 2 regulations will cause significant damages to organization budget.
Non-compliance with NIS2 can lead to significant penalties. Essential entities may face fines of up to €10 million or 2% of global turnover, while important entities could incur fines of up to €7 million or 1.4%. There’s also a provision that holds corporate management personally liable for cybersecurity negligence.
To implement NIS 2 you will need to cover various topics concernig technology and its operations, such as:
Conduct risk assesment
Implement security measures
Set up supply chain security
Create incident response plan
Perform regular cybersecurity awareness and training
Perform regular monitoring and reporting
Plan and perform regular audits
Document processes (including DRS, BCP etc)
Maintain compliance by review & improve to achieve completeness
Who should be interested?
As NIS 2 requirements implementation impacts on businesses as whole, the point of interest should be in organizations in various departments, not only IT but technology in general as well as business and operations. From employees perspective they will be required to participate in trainings concerning cybersecurity awareness. In other words, NIS 2 impacts on whole organization.
How to define workstation and server security
We can define workstation as a desktop or laptop computer which is physically available to its user. On the other hand we can define a server as a computing entity which is intended to offload workstation tasks as well as provide multi-user capabilities. So can describe a server also as a virtual machine or system container instance (such as LXC).
The security concepts within both workstations and servers are basically the same as they do share many similarities. They both run some operating system with some kind of kernel inside. They both run system level software along with user level software. They are both vulnerable to malicious traffic, software and incoming data especially in form of websites. There is major difference however impacting workstation users the most. It is the higher level of variability of tasks done on computer. However, even with less variable characteristics of server tasks, a hidden nature of server instances could lead lack of visibility of obvious threats.
So, both workstation and server should run either EDR (Endpoint Detection and Response), or antivirus as well as anti-rootkit software. Computer drives should be encrypted with LUKS (or BitLocker in case of Windows). Users should run on least-privileged accounts not connecting to unknown wireless networks and not inserting unknown devices to computer input ports (like USB devices which could be keyloggers for instance).
Prepare 200 LXC containers on Proxmox box
Find how to install 200 LXC containers for testing purposes and then, using Ansible, how to install and execute anti-rootkit and anti-virus software, rkhunter and ClamAV respecitvely. Why to test on that many containers you may ask? In case of automation it is necessary to verify performance ability on remote hosts as well as how we identify automation results on our side. In our case those 200 containers will be placed on single Proxmox node so it is critically important to check if it is going to handle that many of them.
Ansible software package gives us ability to automate work by defining “playbooks” which are group of tasks using various integration components. Aside from running playbooks you can also run commands without file-based definitions. You can use shell module for instance and send commands to remote hosts. There is wide variety of Ansible extensions available.
System preparation
In order to start using Ansible with Proxmox you need to install “proxmoxer” Python package. To do this Python PIP is required.
Then in /etc/ansible/ansible.cfg set the following setting which skips host key check during SSH connection.
[defaults]
host_key_checking = False
Containers creation
Next define playbook for containers installation. You need to pass Proxmox API details, your network configuration, disk storage and pass the name of OS template of your choice. I have used Ubuntu 22.04 which is placed on storage named “local”. My choice for target container storage is “vms1” with 1GB of storage for each container. I loop thru from 20 to 221.
The inventory for this one should contain only the Proxmox box on which we are going to install 200 LXC containers.
For demo pursposes only: next, you enable root user SSH login as it is our only user so far and it cannot login. In a daily manner you should use unprivileged user. Use shell loop and “pct” command:
for i in `pct list | grep -v "VMID" | cut -d " " -f1 `;
do
  pct exec $i -- sed -i 's/#PermitRootLogin prohibit-password/PermitRootLogin yes/g' /etc/ssh/sshd_config;
  echo $i;
done

for i in `pct list | grep -v "VMID" | cut -d " " -f1 `;
do
  pct exec $i -- service ssh restart;
  echo $i;
done
Checkpoint: So far we have created, started and configured 200 LXC containers to run further software intallation.
rkhunter: anti-rootkit software deployment
You may ask if this anti-rootkit is real world use case? Definitely it is. From my personal experience I can say that even using (or especially, rather) well known brands for you systems layer like public cloud operators you can face with risk of having open vulnerabilites. Cloud operators or any other digital services providers often rely on content from third party providers. So effectively quality and security level is as good as those third parties provided. You can expect to possibly receive outdated and unpatched software or open user accounts etc. This can lead to system breaches which then could lead to data steal, ransomware, spyware or cryptocurrency mining and many more.
There are similarities between anti-rootkit and anti-virus software. rkhunter is much more target at specific use cases so instead of checking hundred thousands of virus signatures it looks for well known hundreds of signs of having rootkits present in your system. You can then say that is a specialized form of anti-virus software.
Installation of anti-rootkit
First install rkhunter with the following playbook:
If you do not have proper procedure, then follow the basic escalation path within your engineering team. Before isolating the possibly infected system, first check if it is not a false-positive alert. There are plenty of situations when tools like rkhunter will detect something unusual. It can be Zabbix Proxy process with some memory alignment or script replacement for some basic system utilities such as wget. However if rkhunter finds well known rootkit then you should start shutting system down or isolate it at least. Or take any other planned action for such situations.
If you found single infection within your environment then there is high chance that other systems might be infected also, and you should be ready to scan all accessible things over there, especially if you have password-less connection between your servers. For more about possible scenarios look for MITRE ATT&CK knowledge base and framework.
ClamAV: anti-virus deployment
What is the purpose of having anti-virus in your systems? Similar to anti-rootkit software, a anti-virus utility keep our system safe and away from common threats like malware, adware, keyloggers etc. However it has got much more signatures and scans everything, so the complete scan takes lot longer than in case of anti-rootkit software.
Installation of anti-virus
First, install ClamAV with the following playbook:
With each host containing ClamAV there is clamav-freshclam service which is tool for updating virus signatures databases locally. There are rate limits. It is suggested to set up a private mirror by using “cvdupdate” tool. If you leave as it is, there might be a problem when all hosts ask at the same time resulting in race condition. You will be blocked for some period of time. If your infrastructure consists of various providers, then you should go for multiple private mirrors.
Scanning systems with anti-virus
You can either scan particular directory or complete filesystem. You could either run scan from playbook, but you can run it promply using ansible command without writing playbook. If seems that ClamAV anti-virus, contrary to rkhunter, returns less warnings and thus it is much easier to manually interpret results without relying on return codes.
ansible all -i hosts.txt -m shell -a "clamscan --infected -r /usr | grep Infected" -v -f 24 -u root -o
You can also run ClamAV skipping /proc and /sys folders which hold virtual filesystem of a hardware/software communication.
There is possiblity to install ClamAV as a system service (daemon), however it will be much harder to accomplish as there might be difficulties with AppArmor (or similar solution) and file permissions. It will randomly put load on your systems, which is not exactly what we would like to experience. You may prefer to put scans in cron schedule instead.
Please note: I will not try to tell you to disable AppArmor as it will be conflicting with NIS 2. Even more, I will encourage you to learn how to deal with AppArmor and SELinux as they are required by various standards like DISA STIG.
To run ClamAV daemon it is requied to have main virus database present in your system. Missing this one prevents this service from startup and it is directly linked with freshclam service.
○ clamav-daemon.service - Clam AntiVirus userspace daemon
     Loaded: loaded (/lib/systemd/system/clamav-daemon.service; enabled; vendor preset: enabled)
    Drop-In: /etc/systemd/system/clamav-daemon.service.d
             └─extend.conf
     Active: inactive (dead)
  Condition: start condition failed at Mon 2024-09-02 15:24:40 CEST; 1s ago
             └─ ConditionPathExistsGlob=/var/lib/clamav/main.{c[vl]d,inc} was not met
       Docs: man:clamd(8)
             man:clamd.conf(5)
             https://docs.clamav.net/
Results interpretation and reaction
Running clamscan will give us this sample results:
As it is a manual scan, it will be straightforward to identify possible threats. In case of automatic scan or integration with Zabbix you will need to learn what clamscan could possibly output, same as with rkhunter output.
Conclusion
Automation in the form of Ansible can greatly help in anti-rootkit and anti-virus software deployment, rkhunter and ClamAV respectively. These tools will for sure increase the level of security in your environment if will cover all the systems up and running. Having automation itself is not required by NIS 2 directly, however in positively impacts for future use.