I have done over 500 training sessions using Qwen2.5, Qwen3, Gemma and plenty other LLM publicly available to inject domain specific knowledge into the model’s low rank adapters (LORA). However, instead of giving you tons of unimportant facts I will just stick to the most important things. Starting with the fact that I have used MLX on my Mac Studio M2 Ultra as well as on MacBook Pro M1 Pro. Both fit well to this task in terms of BF16 speed as well as unified memory capacity and speed (up to 800GB/s).
Memory speed is the most important factor comparing GPU hardware withing similar generations of technological process. That is why M2/M3 Ultra with higher memory speeds beats M4 with lower overall memory bandwidth.
LORA and MLX
What is LORA? With this type of training you take only portion of large model and train only small part of parameters, like 0.5 or 1%, which in most of models gives us 100k up to 50M parameters available for training. What is MLX? it is Apple’s array computation framework which boosts machine learning tasks.
How MLX and LORA relates to different frameworks on different hardware? MLX uses slightly different weights organization and different way of achieving the same thing as other frameworks do, but with Apple Silicon speed-up. It is pricey in terms of purchase and power consumption to run modern powerful NVIDIA RTX based training, and it is much more affordable to do this on Mac Studio with lets say 64GB of RAM. Please notice that for ML (GPU related things generally speaking) tasks you get like 75% of your RAM capacity, so on 64GB Mac Studio I get around 45 – 46GB available. Now go online and look for some RTXs with similar amount of VRAM 😉
Configuration
So…
Here you have sample training configuration using Qwen2.5 rather big model which is 14B, pre-trained for Instruct type usage, storing weights in BF16 which is faster to run up to 50% than similar 16 bit floats or even 8 bits weights. I got “only” 64GB and 32GB of memory respectively so I use lower batch_size and higher gradient_accumulation which effectively gives me 4 x 8 batch size.
data: "data"
adapter_path: "adapters"

train: true
fine_tune_type: lora
optimizer: adamw
seed: 0
val_batches: 50
max_seq_length: 1024
grad_checkpoint: true
steps_per_report: 10
steps_per_eval: 50
save_every: 50

model: "mlx-community/Qwen2.5-14B-Instruct-bf16"
num_layers: 24
batch_size: 4
gradient_accumulation: 8
weight_decay: 0.001
grad_clip: 1.0
iters: 1000
learning_rate: 3.6e-5
lora_parameters:
  keys: ["self_attn.q_proj", "self_attn.k_proj", "self_attn.v_proj", "self_attn.o_proj", "mlp.down_proj","mlp.up_proj","mlp.gate_proj"]
  rank: 24
  scale: 6
  dropout: 0.1
lr_schedule:
  name: cosine_decay
  warmup: 200
  warmup_init: 1e-6
  arguments: [3.6e-5, 1000, 1e-6]
early_stopping_patience: 4
The most important parameters in terms of training are:
- number of layers which relates to the number of parameters available for training
- weight_decay in terms of generalization
- grad_clip is where we defined how small/big is a hole by which we pull gradients, in order to not let them explode which means going higher and higher by sudden
- learning_rate is how fast we order model to be trained with our data
- lora_parameters/keys we either stick only to self_attn.* or we extend training to cover also mlp.*
- rank is to define space to the training
- scale also called alpha is the influence factor
- dropout is a random removal/correction factor
Now, at different points/phases of training those parameters should and will take different values depending on our use case. Every parameters is somehow related to the other. Like for example learning rate correlates indirectly with WD, GC, rank, scale and d/o. If you change number of layers or rank then you need to adjust the other parameters also. Key factors for changing your parameters:
- number of QA in datasets
- number of training data vs validation data
- data structure and quality
- model parameters size
- number of iterations/epochs (how many times model sees your data in training)
- where you want to either generalize or specialize your data and model interaction
Training
You can run training as follows including W&B reporting for better analysis.
python -m mlx_lm lora -c train-config.yaml --wandb your-project

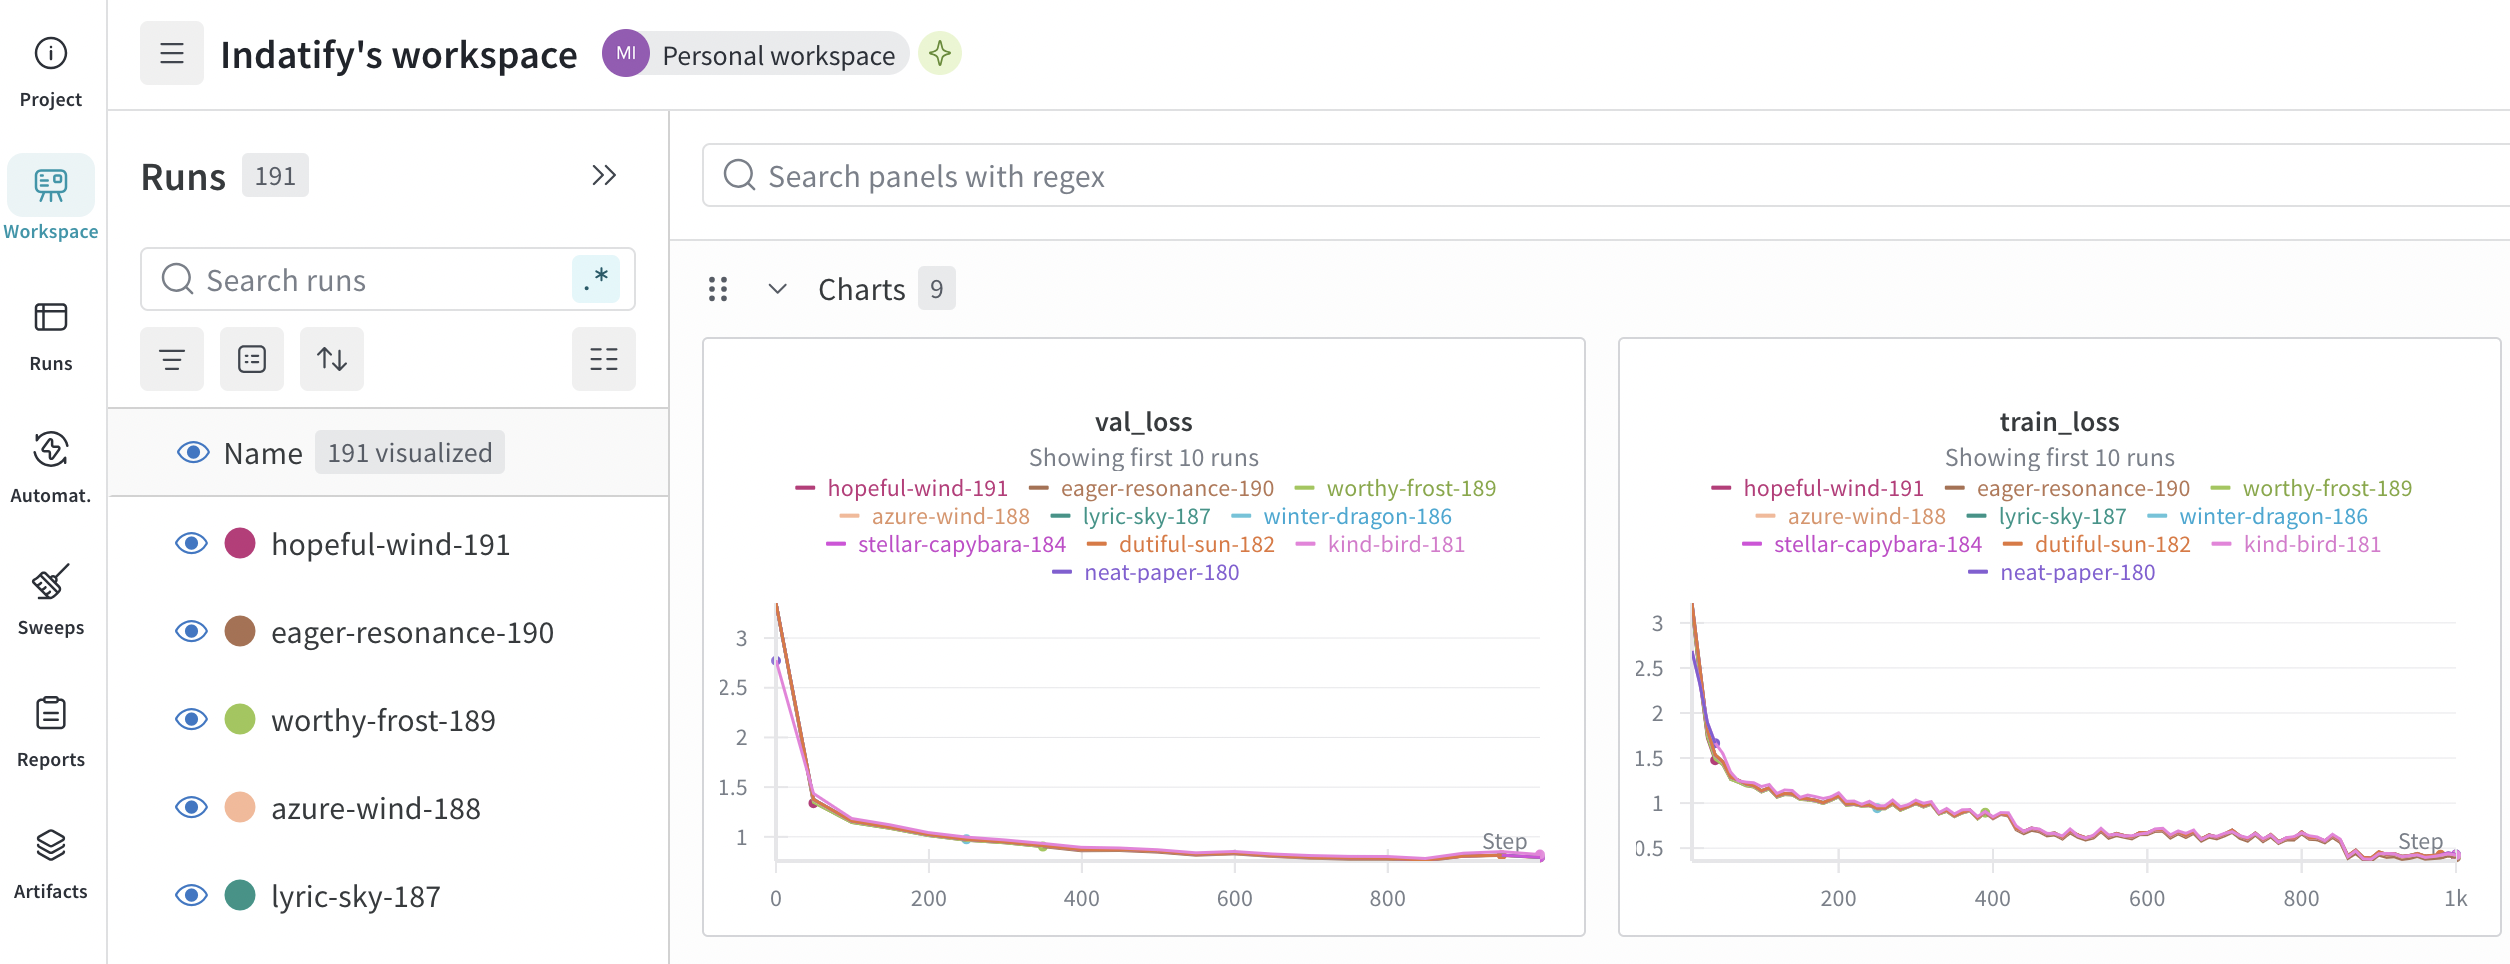
You can monitor your training either in console or oin W&B. Rule of a thumb is that validation loss should go down and should go down together with training loss. Training loss should not be much lower than validation loss which could mean overfitting data which degrades model’s ability to generalize things. Ideal configuratino is go as low as possible, both both validation and training loss.
Iter 850: Val loss 0.757, Val took 99.444s
Iter 850: Train loss 0.564, Learning Rate 1.065e-05, It/sec 0.255, Tokens/sec 177.088, Trained Tokens 581033, Peak mem 33.410 GB
Iter 850: Saved adapter weights to adapters-drs2/adapters.safetensors and adapters-drs2/0000850_adapters.safetensors.
...
Iter 900: Val loss 0.805, Val took 99.701s
Iter 900: Train loss 0.422, Learning Rate 8.303e-06, It/sec 0.248, Tokens/sec 173.218, Trained Tokens 615120, Peak mem 33.410 GB
Iter 900: Saved adapter weights to adapters-drs2/adapters.safetensors and adapters-drs2/0000900_adapters.safetensors.
...
Iter 1000: Val loss 0.791, Val took 99.140s
Iter 1000: Train loss 0.396, Learning Rate 4.407e-06, It/sec 0.248, Tokens/sec 172.078, Trained Tokens 683991, Peak mem 33.410 GB
Iter 1000: Saved adapter weights to adapters-drs2/adapters.safetensors and adapters-drs2/0001000_adapters.safetensors.
Saved final weights to adapters-drs2/adapters.safetensors.
Fusing LORA and exporting GGUF
Once you are ready and done with your traing you can either use LORA adapter in generation of just fuse this LORA adapter it into base model which is more handy as it can be also copied into LMStudio model directory for much more user friendly use and your newly trained model evaluation.
python -m mlx_lm.fuse --model $1 --adapter-path adapters --save-path model/$2
cp -r model/$2 /Users/your-user/.lmstudio/models/your-space/
Where $1 is HuggingFace base model path, $2 is model name in output path. You can also fuse into GGUF format by using --export-gguf and you can also convert HF model into GGUF using llama.cpp (https://github.com/ggml-org/llama.cpp.git). Please note that converting it into GGUF or converting it into Ollama “format” will possibly cause quality issues. Cause for this might be because of weights formatting, number representation or other graph difrerences which are by now not idientifed on my side.
python convert_hf_to_gguf.py ~/.lmstudio/models/your-space/your-model-folder --outtype q8_0 --outfile ./out.gguf
Data
You need data to start training. It is whole separate concept aside from properly parametrizing your training process. It is not only data itself but whole augumentation process including paraphrases, synonyms, negative examples, step-by-step etc.
Available formats are as follows:
{"messages": [{"role": "user", "content": "What is AI?"}, {"role": "assistant", "content": "AI is..."}]}
{"prompt": "Explain quantum computing", "completion": "Quantum computing uses..."}
{"text": "Complete text for language modeling"}
Tried all of them and the most applealing seems to be prompt/completion one.