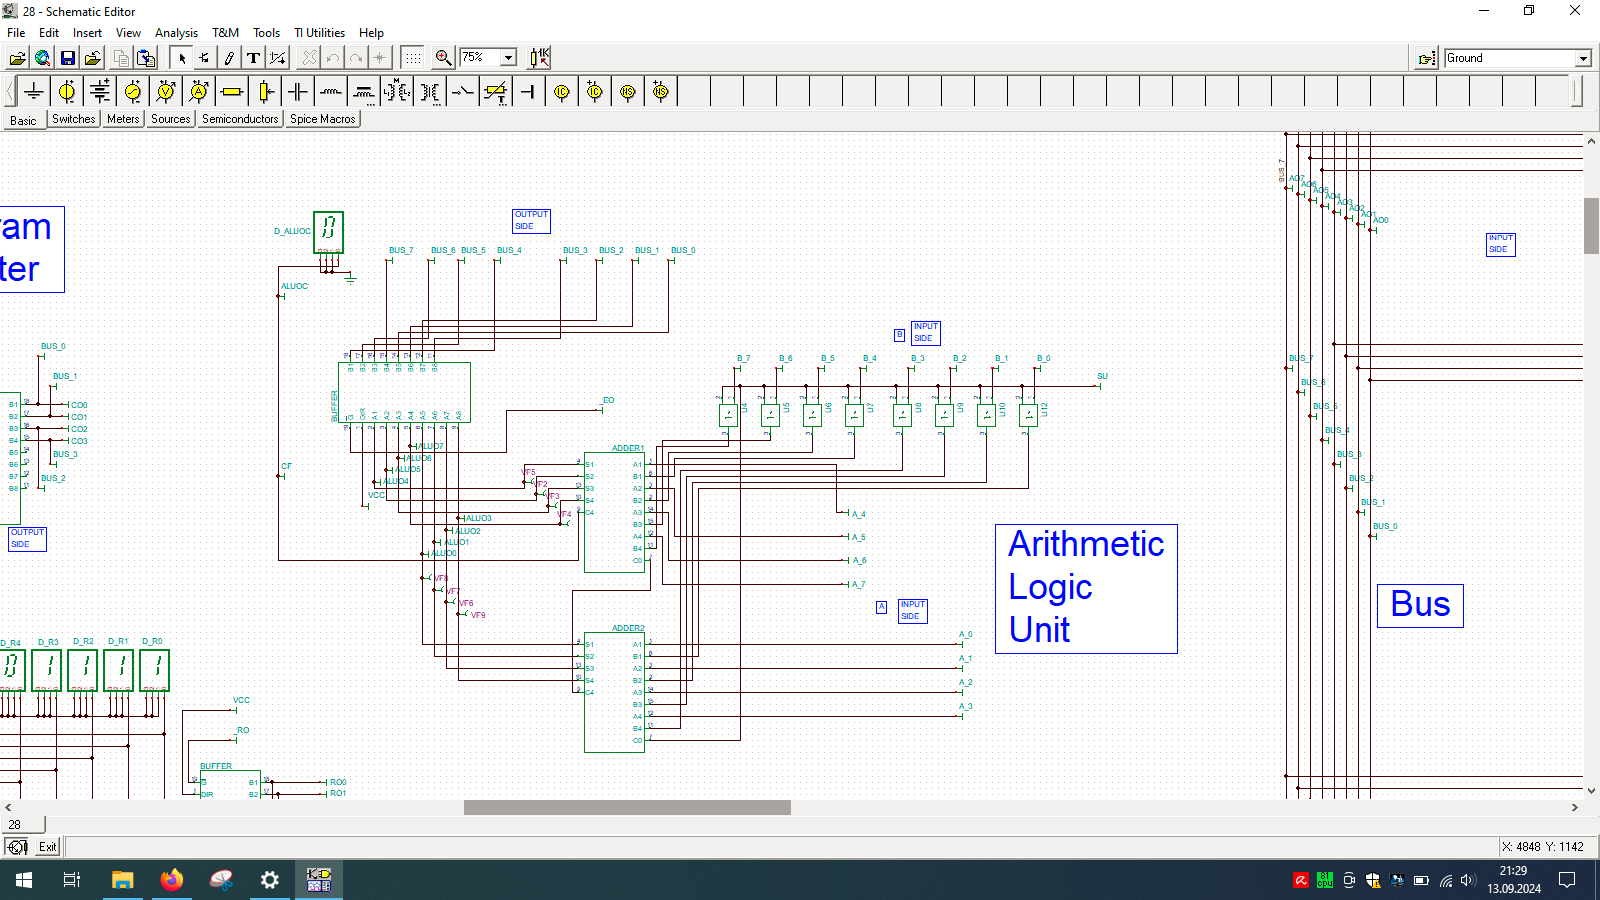
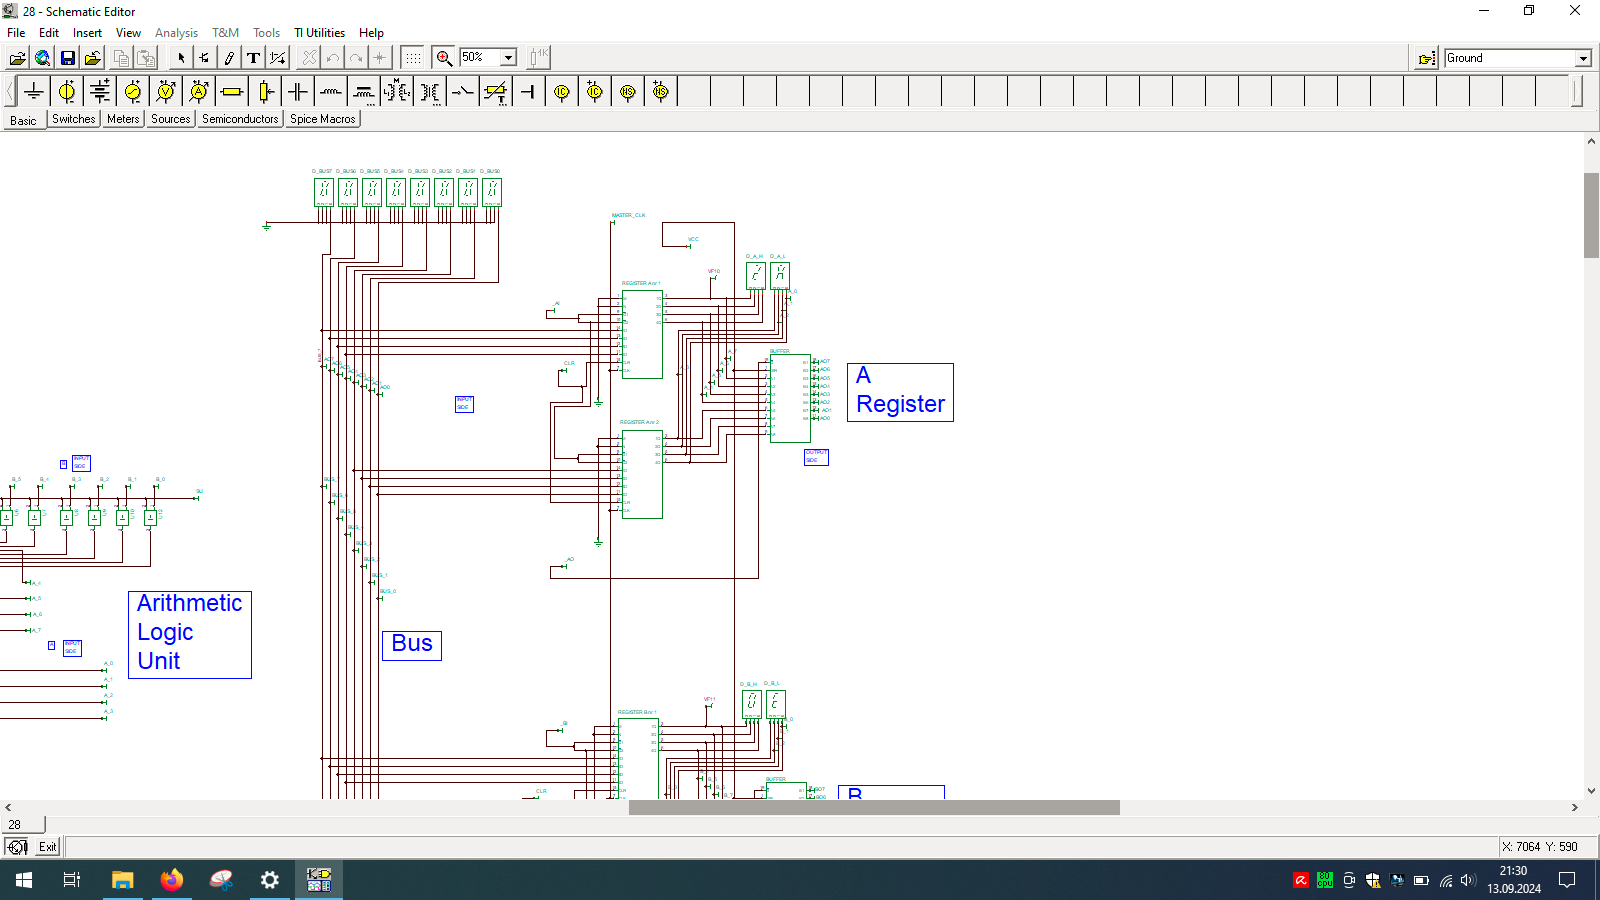
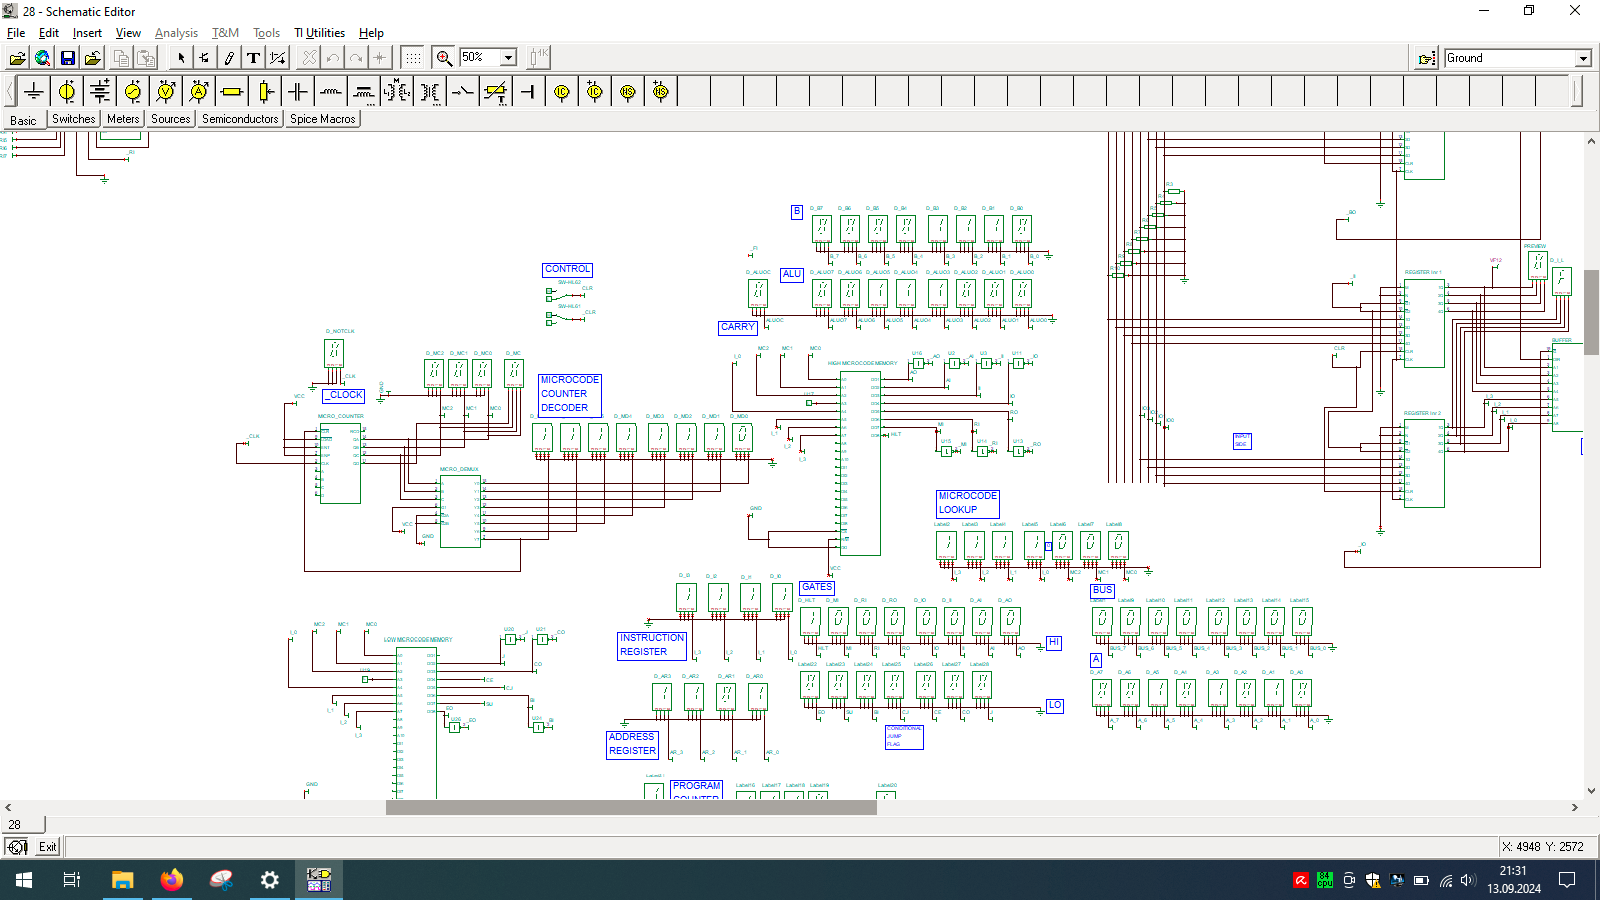
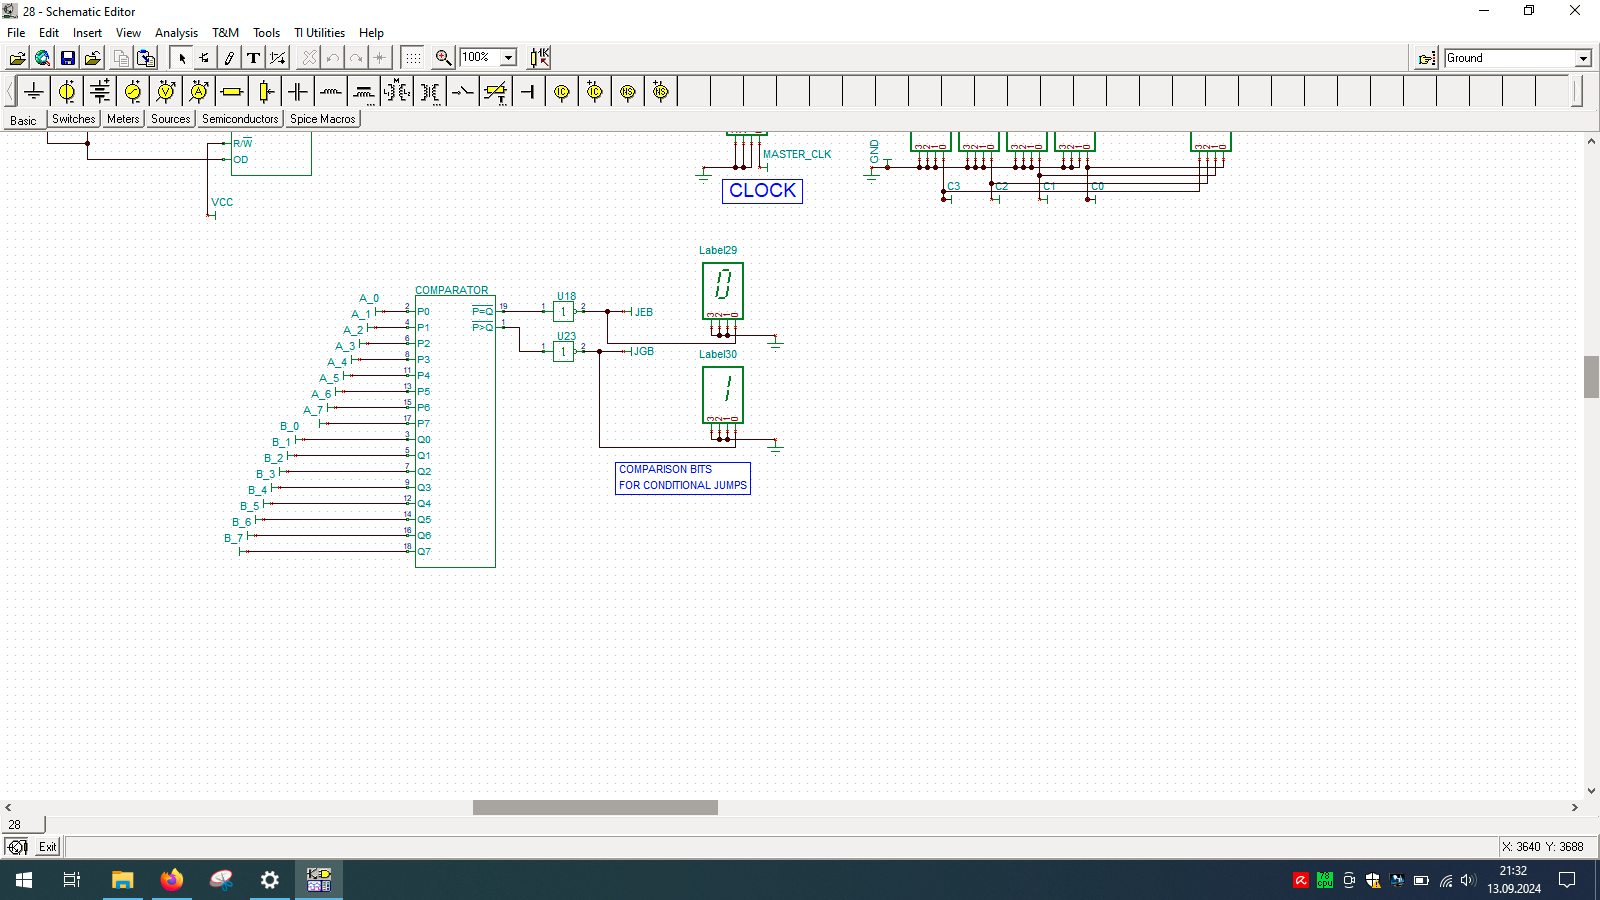
Even wondered how computer is built? And no, I’m not talking about unscrewing your laptop… but exactly how the things happen inside the CPU. If so, then check out TINA from Texas Instruments and open my custom-made all-in-one computer.
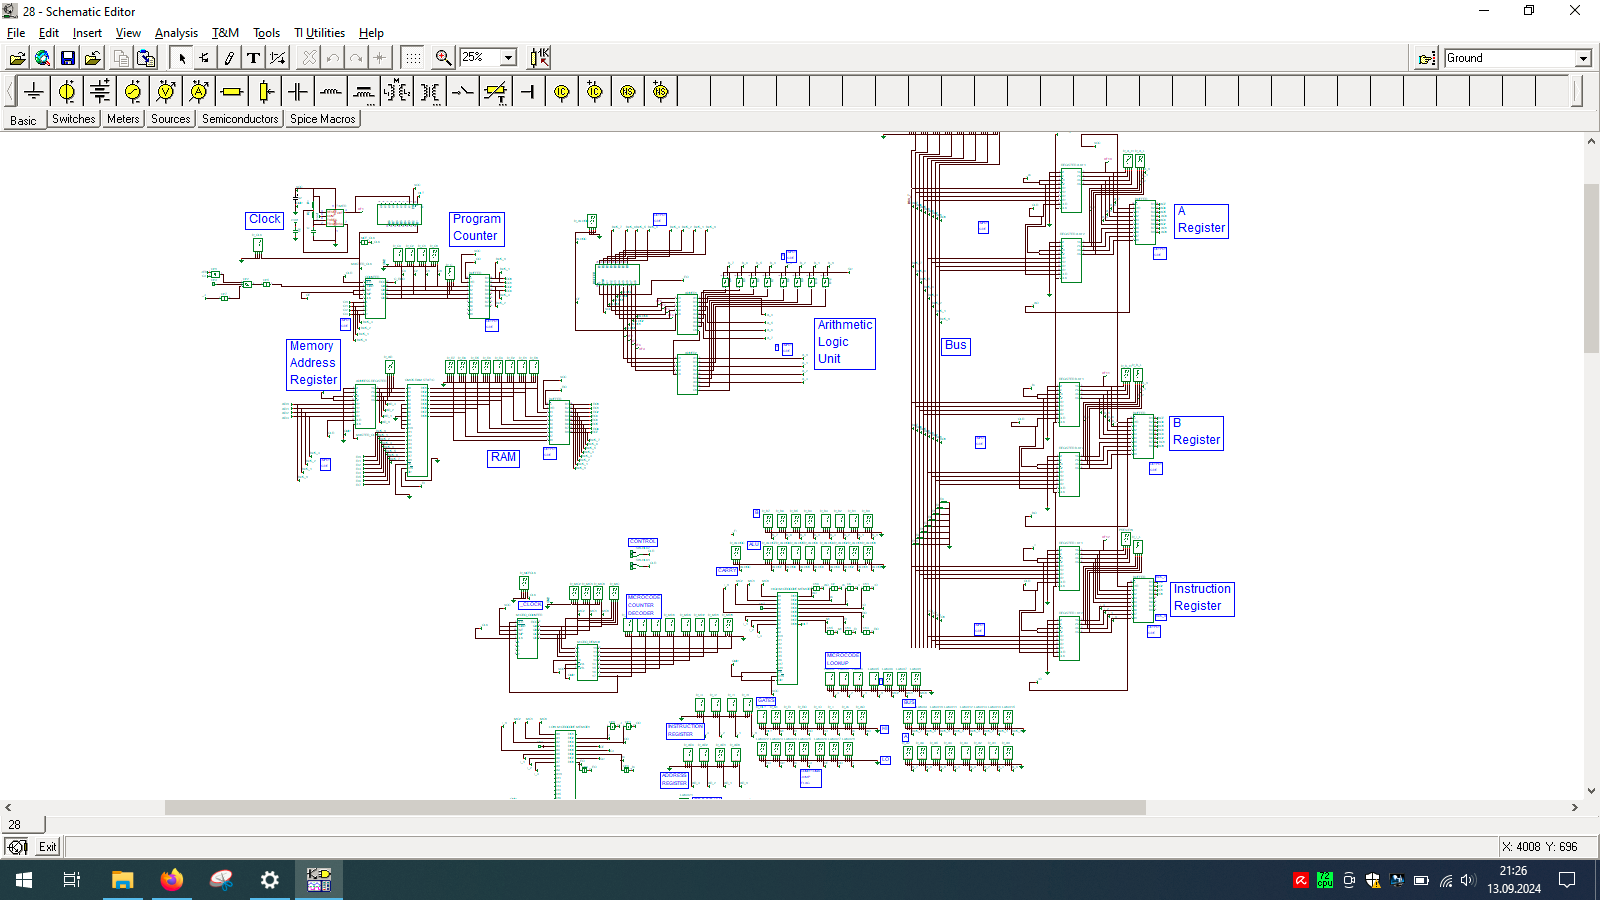
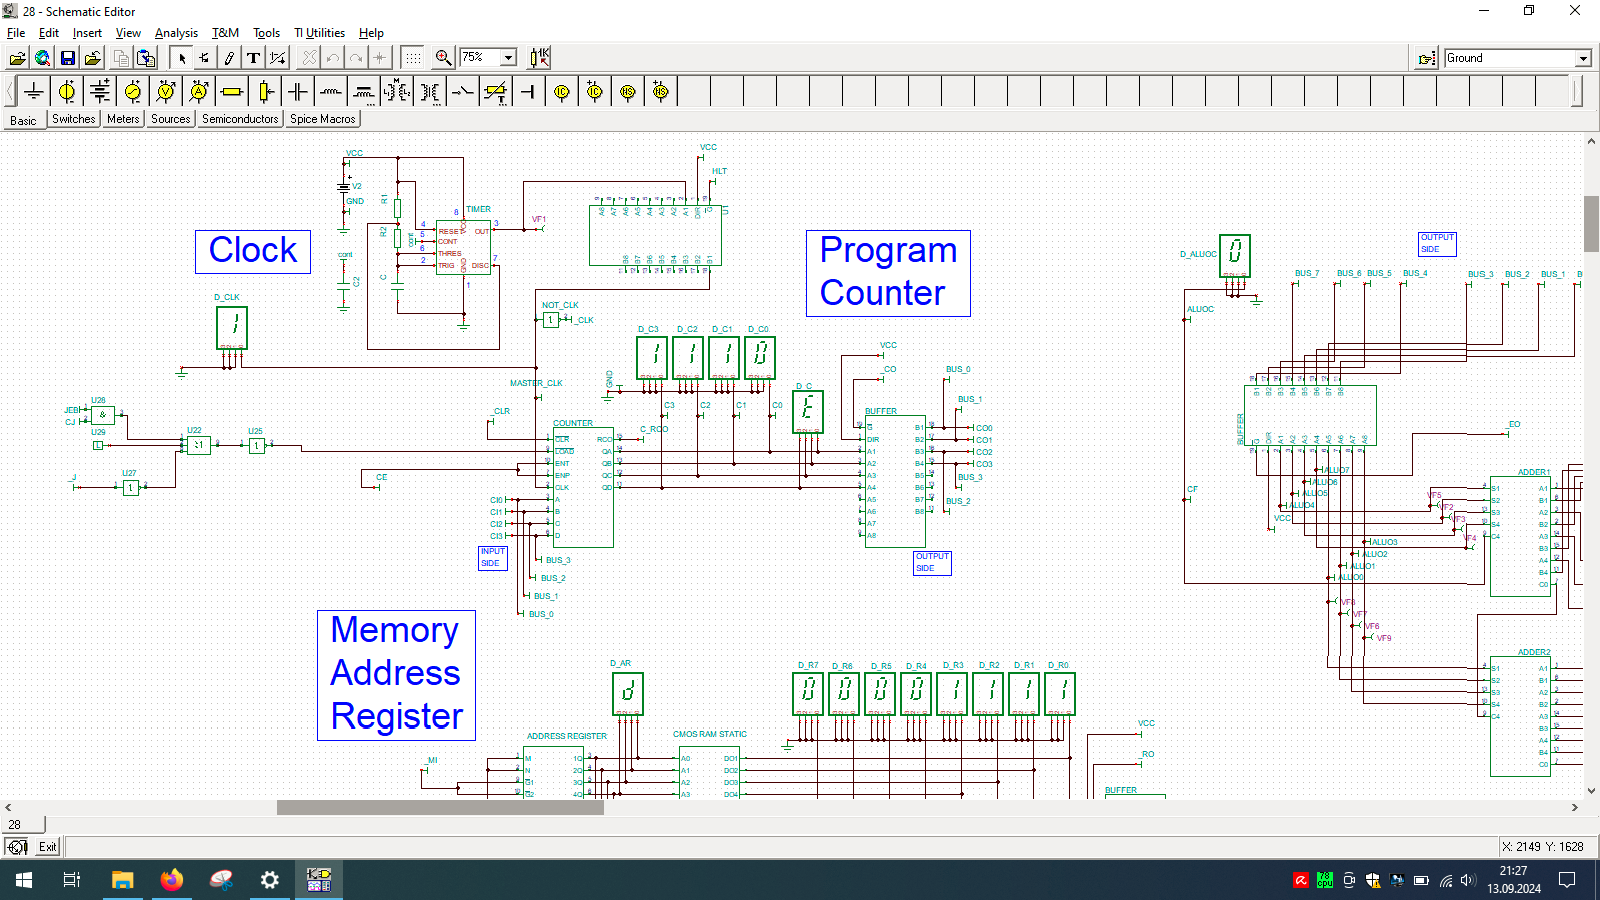
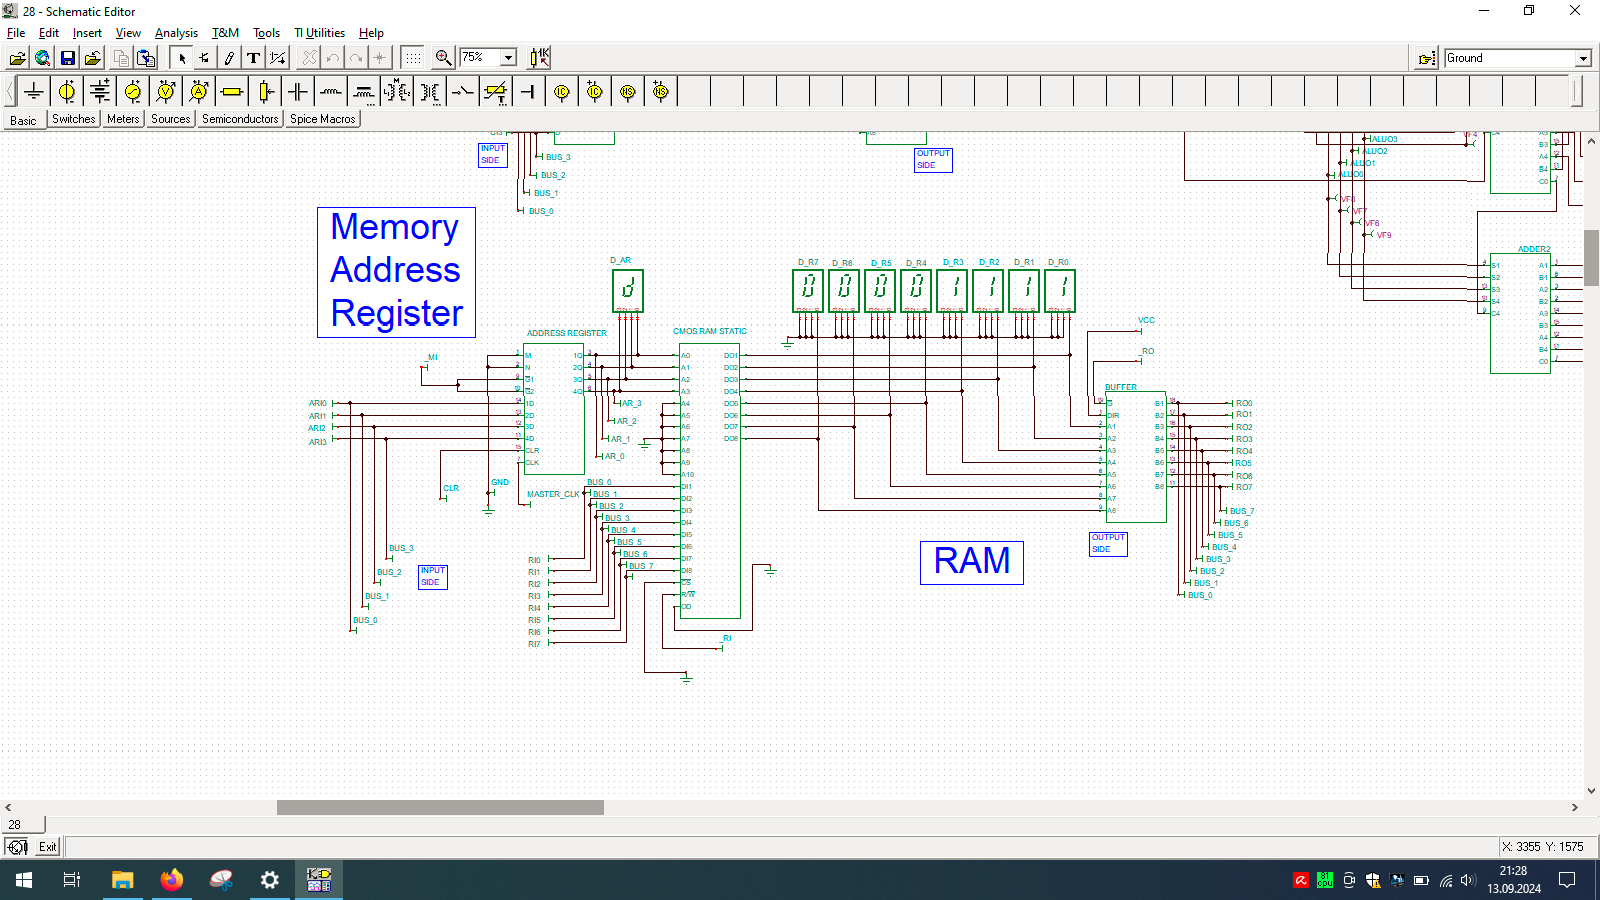
I spend few weeks preparing this schematic. It contains clock, program counter, memory address register, RAM, ALU, A&B registers, instruction register, microcode decoder, instruction register, address register and program counter. Well that’s a lot ot stuff you need to build 8-bit data and 4-bit address computer, even in simulator.
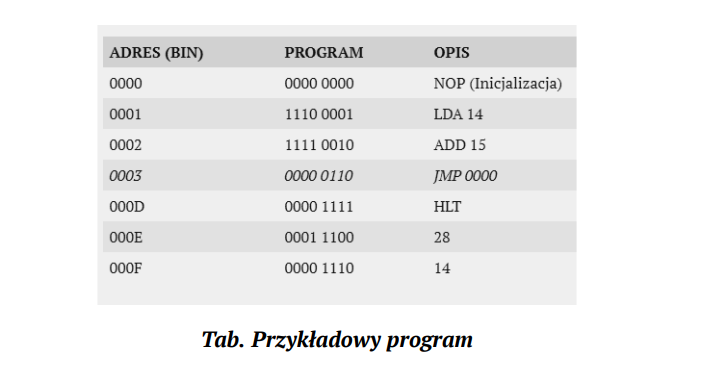
Sample program in my assembly + binary representation, which needs to be manually enter into memory in the simulator as there is input and output device designed for this machine. You need to program directly into memory and read its results also directly from the same memory but in different region.
Among various computing devices I have there is one that stands out it is NVIDIA Quadro NVS 140M because it supports only FP32 (float) operations, but not FP64 (double). It is generally too old. In OpenCL we have both pow function which takes double and float parameters. The latter is called pown. I use first one to actually benchmark double precision computation.
Model
Year
Core
Unit
Clk
Perf
1k
10k
100k
NVS 4200M
2011
48
1
1480
156/12
13
116
1163
Tesla K20xm
2012
2688
14
732
3935/1312
2
3
24
Intel i7 2640M
2011
2
4
2800
n/a
3
27
281
RTX 3050 Ti Mobile
2021
2560
20
1695
5299/83
2
10
90
Intel UHD 10200H
2020
192
12
1050
422/?
4
19
192
NVS 140M (FP32)
2007
16
2
800
25/-
47
445
4453
The fastest in this comparison is Tesla K20xm which I find a little surprising because it is from 2012 and it wins over RTX 3050 Ti Mobile from 2021. However if we take into consideration that FP64 performance of Tesla is 15 times greater (only 4 x in actual time) than RTX then it should be obvious why it wins.
I have no need to use double to be honest (integer should be just fine here), but it is a great chance to see performance differences between various devices. Using FP32 would be quite difficult to get such a broad range of timings. Using pown(float, integer) changes above table a little bit as we start using FP32 computations (at 100k elements):
Tesla K20xm: 12ms
RTX 3050 Ti Mobile: 3ms
NVS 4200m: 352ms
NVS140M: 4453ms
Now I look at those timings from theoretical performance measured in GFLOPS. Comparing NVS 4200M and NVS 140M we have relation of approx. 6 times (156 vs 25), but timing relation is only just close to 4. So other factors come to play here also. Comparing RTX 3050 Ti and Tesla K20xm we have 1.34 (5299 vs 3935), but timing relation is 4. So actual performance gain is much higher than I would expect comparing GFLOPS measurements.
Getting Tesla K20xm is a steal in terms of FP64 computations as it is on similar level as RTX 4090.
You can put your #GPU in #Proxmox server box and pass thru computational power to virtual machines… just in case you would like to run your AI/ML things alongside your virtualized NAS 😀
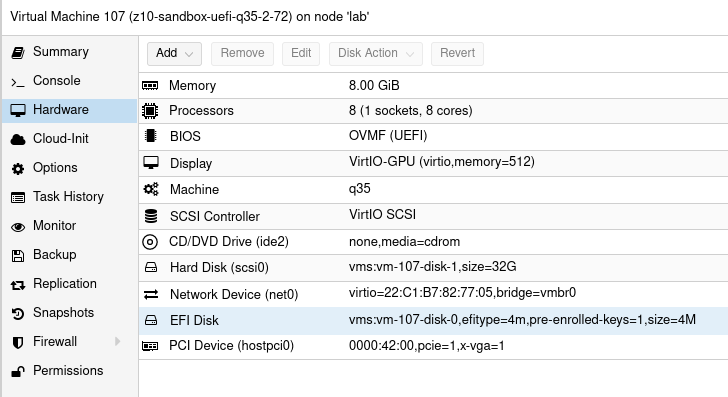
Finally I got it working. I think so. This Proxmox installation is simple one, just single node for experiments which is half part. The other part is VM configuration. You may ask, what exactly for do I need GPU in VM? I may need because the hardware is capable of running several additional GPUs and I can use all of them at once in different configurations and even in different operation systems. Just like people do in cloud environments and this setup mimics such thing running server-like computer with datacenter-like GPUs on board. During this test I used NVIDIA GTX 650 Ti which is consumer grade card, but now I confirm to have it working so I will put there my other cards, like NVIDIA Tesla K20xm or FX 5800 with lot more shaders/cores which can be used in OpenCL applications for AI/ML. And you will see how easy is to cross the temperature maximum of a GPU.
I have Intel Xeon E5645 so in my options I put intel_iommu. In case you have AMD or something else, then it should be adjusted. Blacklisting modules, I prefer to keep all of these as you may want to put different cards in your setup. Without this, Debian (on which Proxmox is run atop) will try to load modules/drivers and put your black console screen in higher resolution. If you blacklist these modules, then you will get low resolution output. That is want you should see here at this moment. Totally variable part is vfio-pci.ids (which can be obtained using lspci command). First one is for video adapter and the second one is for audio device. I put both however I will for sure use only the first one.
Other configurations
Second thing to modify:
root@lab:~# cat /etc/modprobe.d/blacklist.conf
blacklist nouveau
blacklist nvidia
Same here, I think that you can have it either here or in GRUB section.
Then, the modules list which should be enabled:
root@lab:~# cat /etc/modules
# /etc/modules: kernel modules to load at boot time.
#
# This file contains the names of kernel modules that should be loaded
# at boot time, one per line. Lines beginning with "#" are ignored.
vfio
vfio_iommu_type1
vfio_pci
vfio_virqfd
Next thing is to apply GRUB options with either of those commands:
update-grub
proxmox-boot-tool refresh
I am little confused as the official documentation (found here) states that you should do the first one, but actually running this command tells us that we should run the second one intead.
To verify it all of above changed anything at all, reboot your system and then:
dmesg | grep -e DMAR -e IOMMU
If you see message saying “IOMMU enabled” then you are good to go further, otherwise some different configuration should be applied. In my case I got some issue saying that my Intel chipset is unstable with IOMMU remapping so the thing is going to be disabled. So there is need to have this “allow_unsafe_interrupts” option I guess. To verify if you have working IOMMU groups:
find /sys/kernel/iommu_groups/ -type l
You should see some entries here.
Virtual Machine
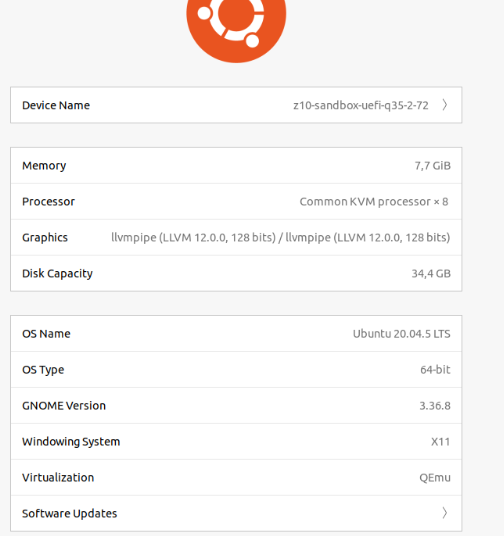
This time I tried 3 VM configurations which is Ubuntu 20 LTS Desktop. There are two main factors you should consider. Different variations may work but it is not fully predictable as you take multiple factors into consideration.
Q35 & UEFI
First one is to use Q35 instead of i440fx. This way you should be able to use PCI-E. I tried it on i440fx and it shows GPU but it is not accessible. Verification process involves the following:
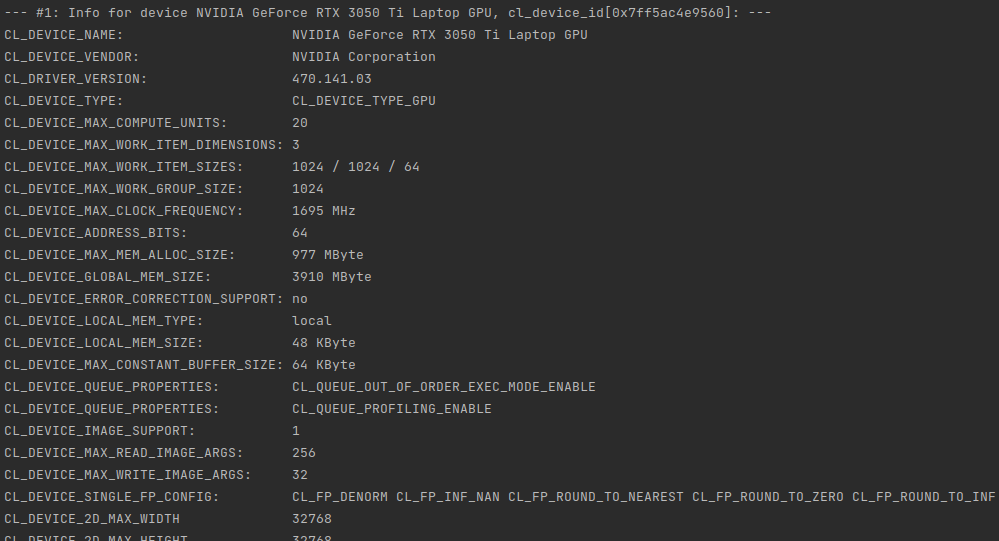
clinfo showing positive number of platforms
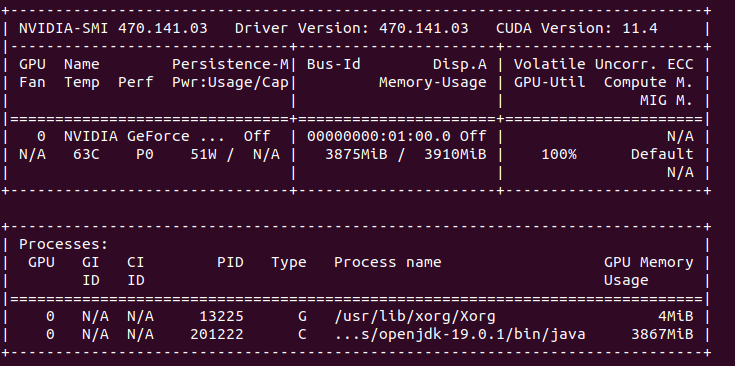
nvidia-smi showing process list using dedicated GPU
Ubuntu about page saying that we use particular NVIDIA driver (however it is debatable…)
Second thing is using UEFI instead of default BIOS setup, but it requires you to check if your GPU actually supports UEFI. So I tried Q35 and UEFI and this combination allows us to have all of these somehow working. Regarding UEFI I disabled secure boot in VM UEFI/BIOS.
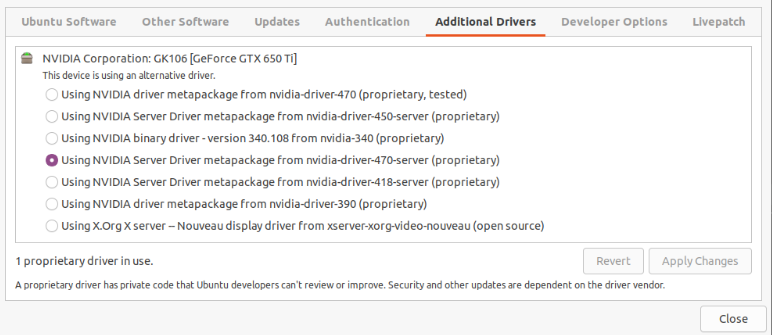
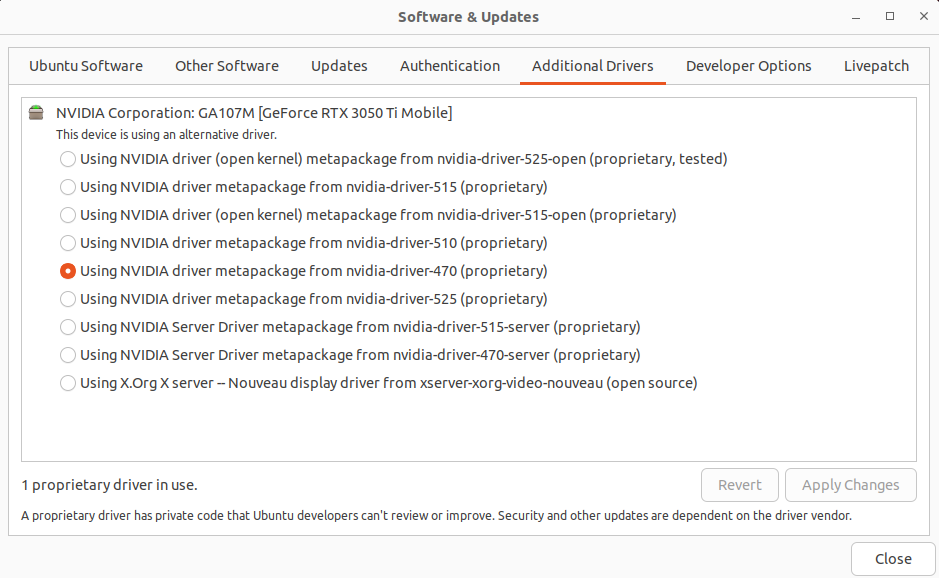
Concerning the driver (NVIDIA in my case) I use nvidia-driver-470-server but other also seems to work. It is weird that Ubuntu about page shows llvmpipe instead of this driver, but the drivers page says that the system uses NVIDIA driver. Not sure who is right here.
The drivers list:
Device resetting
The last thing which prevents this setup from working is to “remove” the devices at boot time (/root/fix_gpu_pass.sh):
Where ID is PCI-E device ID at VM level which can be checked using lspci -n command. Add it to crontab at reboot time (crontab -e):
@reboot /root/fix_gpu_pass.sh
OpenCL verification
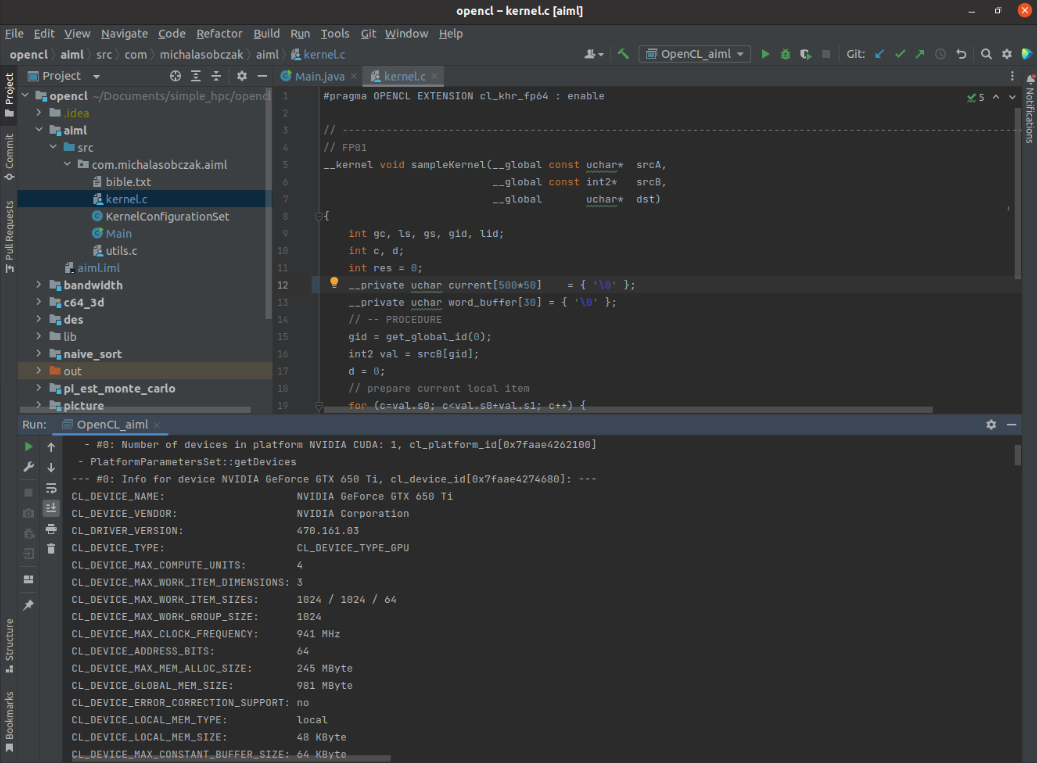
So, if you can see VNC console in Proxmox, your VM is booting and you are able to login, you can install driver, lspci/nvidia-smi/clinfo show proper values then it is now time for a grand last check which is to clone Git repository with my code and try to run it.
cd ~/Documents
git clone https://github.com/michalasobczak/simple_hpc
Then install openjdk-19 and create Application configuration for aiml module having opencl module in your classpath. You may require to rebuild opencl module also. Finally if you are able to see platforms here then you are in the correct place.
I have NVIDIA GeForce GTX 650 Ti placed in my HP z800 as a secondary GPU and the system recognizesit properly and the code runs well. Performance wise I should say that it seems to be fine. I quickly compared NVS 4200M with this card:
NVS 4200M (CL2.0 configuration profile): 30 – 40 ms
GTX 650 Ti (CL3.0 configuration profile): 4 – 5 ms
There is one culprit regarding diagnostics as nvidia-smi does not show GPU utilization and process list, but it shows memory consumption. Increasing local variables size (arrays) has direct relation on memory utilization increase that is why I assume it still works somehow! Maybe even not that bad.
Burning Tesla K20xm
As mentioned earlier after successful setup with consumer GPU it is now time to try a datacenter one. I have this Tesla K20xm which is quite powerful even in today standard. It has plenty of memory (6GB) and tons of cores (2688), even more than my RTX 3050 Ti (2560). Of cource being a previous generation hardware it will be less efficient and will drain more power. And there it is the problem. This GPU can draw up to 235W. I have over 1000W power supply but there is certain limitation on PCI-E gen 2 power output. So the maximum I’ve seen on this GPU during passtru tests was 135W. After few minutes temperature rises from 70 up to 100 degrees Celcius cauing system to switch it off… running nvidia-smi gives me such a error message, asking me nicely to reboot:
So there it is, I forgot totally that this GPU belongs to proper server case with extremely loud fans which I lack actually in PCI-e area in HP z800. This computer has plenty of various fans, even on memory modules, but this area is not covered at all. After computer reboot GPU comes back to life. Besides the problem with the temperature itself, there is efficiency drop after cross somewhere near 90 degrees, it slows down few times and near 100 degress is switches off completely.
OpenCL is excellent in the field of numbers, but not that much into text processing. It lacks even basic functions available in regular C99. So the question is if it is worth trying to process some text in it.
In my OpenCL base project (which can be found here) I’ve added “aiml” module. It loads over 31k lines of text with over 4 mln characters. The text itself is in the first buffer of uchar array. Second buffer holds pointers and lenghts of consecutive lines being work-items, so there are over 31k of such work-items. Third buffer is a result array when I can store a outcome of kernel processing.
Java base code
First read text file and generate pointers and lenghts:
    public void readFile() {
        System.out.println(" - Read file");
        File file = new File("aiml/src/com/michalasobczak/aiml/bible.txt");
        try {
            BufferedReader br = new BufferedReader(new FileReader(file));
            String st = null;
            while ((st = br.readLine()) != null) {
                allstring.append(st);
                vector.add(st);
                line_sizes.add(pointer);
                pointer = pointer + st.length();
                counter++;
            }
        } catch (IOException e) {
            throw new RuntimeException(e);
        }
        System.out.println("Read no of lines: " + counter);
        System.out.println("sample line: " + vector.get(100));
        System.out.println("sample line size in chars: " + line_sizes.get(5));
        n = counter;
    }
And then copy source text, pointers and lenghts to thebuffers:
As I have already mentioned, OpenCL C99 lacks of several basic text processing features. I think that is because it is not meant to be used with texts and secondly because you cannot do recursion and I suspect that some of those functions might use it. So I decided to prepare some basic functions as follows:
#define MAX_STRING_SIZE 256

int get_string_size(uchar string[]) {
    int size;
    int c;
    int counter = 0;
    for (c=0; c<MAX_STRING_SIZE; c++) {
        if (string[c] == NULL) {
            break;
        }
        counter++;
    }
    return counter;
}


void print_string(uchar stringa[]) {
    int size = get_string_size(stringa);
    int c;
    for (c=0; c<size; c++) {
        printf("%c", stringa[c]);
    }
    printf("\n");
}


void set_string(uchar wb[], uchar tmp[]) {
    int c;
    int size = get_string_size(tmp);
    for (c=0; c<size; c++) {
        wb[c] = tmp[c];
    }
}

void set_string_and_print(uchar wb[], uchar tmp[]) {
    set_string(wb, tmp);
    print_string(wb);
}

int find_string_in_string(uchar source[], uchar looking_for[]) {
    int s_size = get_string_size(source);
    int lf_size = get_string_size(looking_for);
    int c, d;
    for (c=0; c<s_size; c++) {
        for (d=0; d<lf_size; d++) {
            if (source[c+d] == looking_for[d]) {
                ;
            }
            else {
                break;
            }
            if (d == lf_size-1) {
                return 1;
            }
        }
    }
    return 0;
}
Few words of explanation. String size function relies on NULL terminated characters array. String setter function does not puts that NULL in the end, so you need to do it yourself if needed. Finding string in string returns only first hit.
Now, the kernel:
__kernel void sampleKernel(__global const uchar* srcA,
                           __global const int2*   srcB,
                           __global       uchar*  dst)
{
    int gc, ls, gs, gid, lid;
    int c, d;
    int res = 0;
    __private uchar current[131*1000]    = { '\0' };
    __private uchar word_buffer[30] = { '\0' };
    // -- PROCEDURE
    gid = get_global_id(0);
    int2 val = srcB[gid];
    d = 0;
    // prepare current local item
    for (c=val.s0; c<val.s0+val.s1; c++) {
        current[d] = srcA[c];
        d++;
    } // for
    uchar tmp[10] = "LORD\0";
    set_string(word_buffer, tmp);
    res = find_string_in_string(current, word_buffer);
    dst[gid] = res;
} // kernel
As shown before in Java base code, there are 3 buffers. First one is for plain uchar array of source text. Second one is for int2 vectors holding pointers and lenghts of consecutive, adjacent lines/verses. Third is for output data, for instance in case of successful search it holds 1, otherwise 0.
I’ve tested this on my NVIDIA GeForce RTX 3050 Ti Mobile with 4 GB of VRAM. Having around 32k elements (work-items) means that we can allocate as much as 131kB of data per single work-item. This way we can fully load all available VRAM memory. Of source not all of given work-items will be run at the same time because there is only 2560 cores in this GPU. So obiously it is the maximum parallel items working at the “same time”. Estimated 13 rounds is required to process all the data, however we need to keep in mind that local-size is set to 32 and there are some specific constraints put on the GPU itself by CC (compute capabilities) specifications.
For CC 8.6 we have maximum of 16 thread blocks per SM (streaming multiprocessor) times 32 work-items of local-work-size it gives us 512 max. RTX 3050 Ti has 20 SM, so the maximum simultaneous (in theory) working items would be 10240, but having only 2560 cores I think that of course it will not reach that far having 100% utilization at much lower values. Still for the latest GPUs, they can have up to 16k cores, so that kind of hardware could better utilize CC 8.6 of higher specification on full load.
I would like to point out one more things regarding private/register memory and a global memory. In case of Ampere GPU architecture:
The register file size is 64K 32-bit registers per SM.
The maximum number of registers per thread is 255.
So, we are limited per work-item to 255 registers and there is also a 64k limit per SM. We can thus estimate or even calculate the maximum data size which will fit locally and beyond that value it will go outside to global memory providing much higher latency. It can be seen on times calculation increasing while we increase uchar current array.
Conclusion
Text processing in OpenCL works just fine with 0 – 1 ms per single search thru over 4 mln characters (31-32k lines). We are constrained by lack of string or memory functions so all string function I’ve made use constant array buffers. I’ve practically tested full VRAM allocation (4GB). Power draw is 51W.
What next? I think that may take step forward and try to do come classification and few other things toward ML or even AI. That can be quite interesting to see…
OpenCL implementation od DES cipher is way faster than regular single-threaded C program. 1 mln encryptions take less than a second on RTX 3050 Ti, but also as much as almost 40 seconds on Intel i5-10200h single-thread application.
Lack of compact and extremely portable SSL/TLS library in pre C++11 project made me think about going for something easy to implement on my own concerning data encryption. I’ve selected DES, which stands for Data Encryption Standard because of my general understanding of such algorithm. It comes from 1975 and has certain limitations including short key length or known weak keys. But if we put our prejudices aside we may see few interesting things and opportunities as well.
It took me several days to accomplish C99 kernel in OpenCL. Before this I tried few third party examples in c++. One major drawback is that all of them use strings, vectors, stringstreams and few other strictly c++ features. Even use of printf is problematic in OpenCL implementations as you may not get it or it may be working differently from implementation to implementation. You will not be able to use some of c99 features like malloc/free. So to get maximum compatibility I went down to the simplest solutions.
I especially admire example in which you use binary as strings (uchar arrays). This way you can easily see what is going on. Of course (really?) it adds complexity and increases instructions count as well as memory consumption but for the first DES implementation it is acceptable. So you will see in various places arrays of 8 byte elements meaning 64 bits of data. Keys and other values as 56 or 48 bits of data and finally halves as 32 bits values (4 byte digits). Both input and output can be displayed as characters. Input will be plain ASCII, but output come over 128 decimal ASCII code so you can see some weird characters in case of printing them instead of presenting only numbers.
OpenCL vs single threaded C
In order to run kernel code outside OpenCL runtime you need to provide few things:
You need to add math library in GCC invocation because by default it is not included:
gcc des.c -lm
Then, kernel main function need to be adjusted, for instance as:
void kernel() {
  // here we have the kernel function body...
}
And finally provide C language main function with iterations already parametrized:
int main() {
    int i;
	for (i=0; i<1024*1024; i++) {
		if (i % 1024 == 0) {
			printf("i: %i ", i);
		}
		kernel();
	}
}
For sake of simplicity I skip uchar8 definition and handling as it do not add than much to overall complexity of the code and the algorithm. Running on different hardware with 1024*1024 iterations. First going to compare CPU execution time:
Hardware
Duration
Dell G15: Intel Core i5 10200H 2.4 GHz
38s
MacBookPro3,1: Intel Core 2 Duo 2.2 GHz
1min 37s
PowerBook G4: PowerPC G4 800 MHz
11 min 22s
Now compare it with OpenCL runtime duration:
Hardware
Cores No
Compute Units (acc. to OpenCL)
Duration
NVIDIA GeForce RTX 3050 Ti Mobile
2560
20
930ms
Intel UHD 10th gen
192
12
2065ms
Java base project
I use OpenCL base project which can be found here. There is one additional module called “des”. Originally I used Java 17, but today I select Java 19. Frankly speaking I cannot point out easily anything that much important between Java 11 and 19. Each version introduces either small language changes or no changes at all. But if you code complex object-oriented applications then those changes might be interesting for you.
So… first I fill source data table with the following function:
    public void generateSampleRandomData() {
        Random rd = new Random();
        for (int i = 0; i <= (n*8) - 1; i++) {
            byte c = (byte)('a' + rd.nextInt(10));
            srcArrayA[i] = c;
        }
    }
This function generates n*8 byte elements within a range of ASCII ‘a’ letter decimal representation and 10 numbers ahead. In other words random characters will be within range from ‘a’ do ‘j’ which in decimal will be from 97 to 106. One word about byte type in Java language – it is always signed so there is direct possibility to use it as unsigned. There is however Byte.toUnsignedInt function which translates negative byte numbers into positives.
Next thing is buffer. As later we will see that kernel function utilizes uchar8 data type, there is need to map such type in Java. I came with idea of using plain byte array (byte[]). Each and every kernel invocation will map consecutive groups of 8 elements from this plain array:
   public void createBuffers() {
        // Allocate the memory objects for the input- and output data
        this.memObjects[0] = clCreateBuffer(this.context, CL_MEM_READ_ONLY | CL_MEM_COPY_HOST_PTR, (long) Sizeof.cl_uchar8 * this.n, KernelConfigurationSet.srcA, null);
        this.memObjects[1] = clCreateBuffer(this.context, CL_MEM_READ_WRITE, (long) Sizeof.cl_uchar8 * this.n, null, null);
    }
Both source and target arrays are type cl_uchar8 which translate into uchar8 in the kernel itself. To print results coming back from kernel invocations we will use aforemendtioned Byte.toUnsignedInt function:
public void printResults() {
        System.out.println("Elements: " + dstArray.length);
        int i = 0;
        for (byte tmp : dstArray) {
            System.out.println(String.valueOf(i) + " : " + (Byte.toUnsignedInt(tmp)) );
            i++;
        }
}
And that is basically all regarding Java part of this challange. Use of Java here is a matter of covenience as you may do it also using c or c++. I do not know by now about any discrepancies in JOCL library and some other libraries available.
OpenCL 1.1
In order to run kernel code on some older devices you need to adjust few things. First you need to get rid of printf function invocations or define it by yourself. Second things you need to enable floating point cl_khr_fp64extension in case of using double type:
#pragma OPENCL EXTENSION cl_khr_fp64 : enable
There are options no to use pow function and convert the entire cipher algorithm to use bit selection. For my educational purposes however it is much easier to see what’s going on like that.
C99 kernel
I’ve divided the DES cipher algorithm into 27 functional points from FP00 to FP26. Some of them contains data only and other ones consists procedures.
General section
FP00 – auxilliary functions (lines 1-133)
FP01 – kernel definition
FP02 – data and identification
FP03 – key
FP04 – plain text
FP05 – PC1/PC2 tables data
Generating keys
FP06 – PC1 key permutation
FP07 – key division into two equal halves
FP08 – 16 round keys, for 1, 2, 9 and 16 single left shifts
FP09 – for other iteration double left shifts
FP10 – combining left and right parts
FP11 – PC2 key permutation
Encryption procedure
FP12 – data only, initial permutation and expansion table data
FP13 – data only, substitution boxes 8 boxes, 4 rows, 16 colums each
FP14 – data only, permutation table
FP15 – applying initial permutation
FP16 – dividing result into two equal halves
FP17 – encrypting 16 times, right laft is expanded
FP18 – result XORed with key
FP19 – apply 8 times substitution boxes
FP20 – applying permutation
FP21 – result XORed with left half
FP22 – left and right part of plain text swapped
FP23 – combining left and right part
FP24 – applying inverse permutation
FP25 – preparing final result
FP26 – writing result to the output OpenCL buffer
Summary
In this challange… which source code can be found here I verified possibility to code DES cipher algorithm using OpenCL enabled devices. This 500 lines of code can be run either on OpenCL device or in slightly modified form on any other devices with can compile C language. OpenCL implementation runs 40 times faster on GPU than on single threaded CPU. This was kinda interesing one…
Today I came back to my OpenCL project (can be found here). I have had not tried it on my fresh Ubuntu 22 installation on my Dell g15 with RTX 3050 Ti. Altough I’ve got NVIDIA driver metapackage installed my program reported that there is some problem with shared library:
You can check if the driver is selected in system About window. So there it is in my case, but nvidia-selector command reports that I have nvidia-driver-525 which is weird as drivers tab says I have installed driver 470. On the other hand, running nvidia-smi command says I have enable driver 470. Weird.
I came across some solution which says that I should install libopencl-clang-dev:
sudo apt install libopencl-clang-dev
I restarted IntelliJ IDEA 2022.3 Community Edition and even proceeded with system reboot to no avail, still the same issue. Next thing to check is libOpenCL library symlink looking for missing either symlink itself or target files:
ls -la /usr/lib/x86_64-linux-gnu/ | grep libOpenCL
I have both.
Finally I found a post stating that I should have ocl-icd-opencl-dev:
sudo apt-get purge ocl-icd-opencl-dev
sudo apt-get autoremove # this could be risky however
sudo apt-get install ocl-icd-opencl-dev
And voilà I got it working. However I have only GPU recognized, no CPU on the list of available devices. That is weird but most probably I should install some Intel SDK or at least their libraries to have it working also for CPU. NVIDIA package do not provide runtime for CPU. Now I remember that for book project I have been running it on Windows instead of Linux…
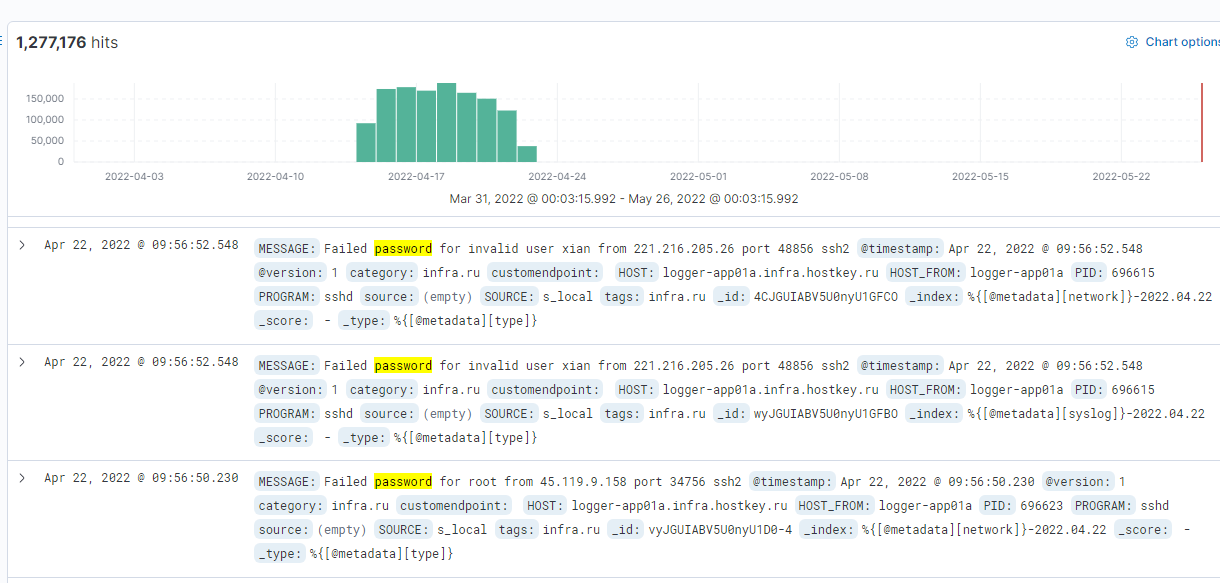
Among 3 million public IP address ranges for the whole world, 68k belongs to the Russian Federation. This translates into 45 million addresses. Scanning the HTTP port on this population took 20 hours. I obtained 630k IP addresses with listening on port 80. Of which 530k gives the correct answer of the HTTP type. Only 340k gives an HTTP 200 response. Over 200k run on NGINX servers, and 100k run on Apache. When analyzing the content, you will find GitLab, Kibana, Zabbix or Grafana installations open for registration and use, but also copies of databases, video surveillance systems, etc. My favorite find, however, is the control panel of the heat plant…
When I bought the HP z800 workstation at the beginning of 2021, I wanted to increase my competences in the field of hardware and software optimization on the one hand, and on the other hand, describe it in the form of a publication in order to consolidate my knowledge sufficiently. Over the course of the following months, the concept changed dramatically, and I needed more information. I decided that I needed to expand my knowledge of hardware construction. The final part of this was the development of the concept of a series of notebooks entitled “Simple High Performance Computing“, or HPC in an edition available basically for everyone in every budget.
6 parts are planned in the series, 2 have already been completed and released
The first part of the series is “Fundamentals of electronics and building a computer in a simulator” published in 2021 (available for download at this address). The second part (number 5 in the series) was “OpenCL, CPU and GPU programming” released in May 2022 (available for download at this address). In addition to these two items, the series also includes parts for the review of computer platforms from the 1980s to now, including MOS 6502, Intel SSE, AltiVec, OpenGL and possibly ESP8266. The last part is “Data Mining & Exploration“, which is the subject of this particular article.
Target group
Using the ip2location database to scan the selected territory
I take a few services as an example for data mining, but I’ll start with the basic ones, HTTP and DNS . I identify the target group using the ip2location database. It is a collection of ranges on the public internet with information about the belonging to a given territory. Today we have 2 975 657 pieces of all IPv4 Internet ranges. Loaded into PostgreSQL 14, they take 405 MB. In the ip2location database, the ip2location_db11 table stores ranges of public IPv4 addresses. It is the broadest free collection containing granularity of locality and approximate location data . There is also a zip code here. Of course, in the case of larger towns and cities, there may be many such codes.
Note: ip2location database is also available in commercial version, where we get additional metadata and geolocation is much more precise. The database has ranges for 242 territories. Interestingly, the World Bank’s WDI database defines 265 territories, and there are 193 members of the United Nations. Both databases try to follow the letter of the law regarding the recognition of individual countries. So even if a territory is dependent on another country, but it is generally recognized, such territory will have separate data, for example, Nothern Mariana Islands. However, we will not find the Republic of Artsakh or Kosovo.
Tools
For exploration, I use zmap, dig and an application written in Ruby
The zmap program is designed for high-performance scanning of network spaces. It is assumed that on properly selected equipment and Internet connection, you can scan the entire IPv4 space within a few hours on a selected TCP port. Of course, this type of mass scans can put your address on the fraud lists and be de facto blocked in many places around the world. There are two strategies to avoid this. The first is to use a separate space for such scanning, e.g. a virtual machine in a public cloud (DigitalOcean, Rackspace, Microsoft Azure, etc.). At the beginning of my adventure with this type of scans, I chose this option myself. After informing the supplier about the scheduled scanning, we should not have any problems, it is only worth mentioning that these are research works. The second strategy I am currently using is scanning at lower bandwidth, clearly defined regions in the world. The downside of this solution is, of course, lower efficiency, resulting from the need to operate on CIDR blocks that are usually not adjacent to the networks so that they can be merged. Not being able to randomize scanning is a major drawback.
As for dig , I use it to test DNS server responses, but also as a reverse IP address to domain name mapping tool for the entire address population. Domain analysis for HTTP services is interesting, but it is more interesting to map domains for all IP addresses, but it requires the use of more DNS servers so as not to be blocked on the most popular ones.
The whole, i.e. both zmap and dig based tasks are merged using an application I called miner, made in Ruby and Ruby on Rails , used for orderly execution such operations step by step. Basically the app only uses ActiveRecord , Rake and HTTParty so it’s a bit exaggerated to say that this is a Rails app. For more demanding operations, I use dedicated modules and methods for HTTP connections, because HTTParty has various limitations and errors that easily come to the surface at such a scale. The same goes for the Parallel library, which is obviously invaluable in the context of concurrent work, removing the need for the user to work directly on threads and processes, but has a number of unresolved bugs and memory leaks.
Note: if I find some free time, I will try to repeat long-distance attempts to reveal memory problems of the libraries, so I will have an evidence to report bugs to their creators .
Hardware
Paradoxically, mass scanning does not require too powerful equipment
As I mentioned in the introduction, I use the HP z800 workstation for this work, which accepts a maximum of 2 CPUs, each with 12 threads, for a total of 24 logical processors per station (Intel Xeon X5660). I used two of such workstations for the test, so I had 48 processors in total. As for the operating memory, the maximum for such a set is 768 GB DDR3, although I only have 180 GB installed. Scanning and the activities around it are not memory-intensive, they require a large amount of CPU and a stable network on the hardware and network software layer. I used my 1 Gbps downlink and 600 Mbps uplink to scan. The network traffic is managed by the installation of pfSense 2.6 on dedicated hardware with the Intel Xeon E3 1230 processor. At the peak of the scan, the number of states on the firewall reached 500,000, which was due to the liberal configuration. With a bit more strict control of states, the number can be significantly smaller, but then we increase the risk of closing good states.
Note: Scanning can generally be performed on any hardware with a decent network card. What is meant by decent? First of all, it should be a minimum 1 Gbps card, and preferably with a speed of 10 Gbps. It should be made by a reputable manufacturer. It should also be a popular model with a current firmware available.
Loading addresses
Translate ranges to proper IPv4 public addresses
The procedure begins with the conversion of IP ranges in CIDR notation to the proper atomic IP addresses. Since ranges are represented numerically, we can use Ruby’s Range class to do this:
The actual task generating addresses from ranges is as below. Originally, this task was adapted to generate addresses from ranges for countries with an allocation of less than 5 million addresses, there are about 200 such territories.
  desc "Generate and insert IP list based on IP2Location IP ranges"
  task :generate_ip_list_from_ip_range => :environment do
    sql = "SELECT country_code, SUM(ip_to-ip_from) AS cnt
            FROM ip2location_db11
            WHERE country_code IN
              (
                SELECT DISTINCT a.country_code
                FROM ip2location_db11 a
                LEFT JOIN servers b ON a.country_code = b.country_code
                WHERE b.country_code IS NULL
              )
              AND country_code = 'RU'
            GROUP BY country_code;"
    res = IpAddress2.connection.execute(sql) # ip2location_db11
    res.each do |r|
      puts r.inspect
      ranges = IpAddress2
                .where("country_code = ?", r["country_code"])
                .select("'0.0.0.0'::inet + CAST(ip_from AS bigint) AS mfr,
                         '0.0.0.0'::inet + CAST(ip_to AS bigint) AS mto,
                	  country_code, country_name, region_name, city_name,
                          latitude, longitude, zip_code, time_zone")
      ranges.each_with_index do |range,index|
        puts "from: #{range.mfr}, to: #{range.mto}"
        if !range.mfr.blank? && !range.mto.blank? then
          ips = convert_ip_range(range.mfr.to_s, range.mto.to_s)
          elements = []
          cnt = 0
          ips_size = ips.size
          puts " ips_size: #{ips_size.to_s}"
          ips.each_with_index do |ip,index2|
            s = Server.new
            s.ip = ip
            s.country_code     = range.country_code
            s.geo_region_name  = range.region_name.gsub("'", "")
            s.geo_city_name    = range.city_name.gsub("'", "")
            s.geo_latitude     = range.latitude
            s.geo_longitude    = range.longitude
            s.geo_zip_code     = range.zip_code
            s.geo_time_zone    = range.time_zone
            cnt = cnt + 1
            elements << s
            if cnt >= 500 || index2+1 == ips_size then
              puts " #{cnt.to_s}: importing #{elements.size.to_s}"
              Server.import(elements, returning: :ip)
              elements = []
              cnt = 0
            end
          end # ips
        end # if blank
      end # IP ranges
    end # SQL res
  end # task
The range generation has several imperfections. The final number of the resulting addresses is greater than that declared by ip2location and it is not due to the generation of subnet and broadcast addresses. However, this is of little importance in the overall scale. Generating in this form takes several hours depending on the adopted size of the batch package (500, 1000 or other).
zmap scanning of HTTP servers
Quantitative qualification using zmap
There are two approaches to performing a scan and it is not about distinguishing whether we are scanning from a location other than ours or scanning at a slow pace. It’s about the launch mode. We can scan in series or in parallel. Serial scanning is slow and range merges are difficult to accomplish in a short time. We can try to merge smaller ranges (subnets / 24) into larger ones (e.g. / 16) using the Ruby NetAddr module:
result = NetAddr.summ_IPv4Net(cidrs)
Unfortunately, the code of this module is suboptimal and fails to execute properly due to memory error, cavities and overall huge processing time. Perhaps someday I will find a moment to write an alternative, but the problem is only apparently simple. In any case, in order to generate a CIDR range from a numeric range, we again need the code snippet as below:
 def iprange2netmask(ipstart, ipend)
    if ipstart.kind_of?(String) || ipend.kind_of?(String)
      startR = ip2long(ipstart)
      endR = ip2long(ipend)
    else
      startR = ipstart
      endR = ipend
    end
    result = Array.new
    while endR >= startR do
      maxSize = 32
      while maxSize > 0 do
        mask = (iMask(maxSize - 1))
        maskBase = startR & mask
        if maskBase != startR
          break
        end
          maxSize-=1
      end
      x = Math.log(endR - startR + 1)/Math.log(2)
      maxDiff = (32 - x.floor).floor
      if maxSize < maxDiff
        maxSize = maxDiff
      end
      ip = long2ip(startR)
      netmask = cidr2netmask(maxSize)
      cidr = [ip, netmask].join('/')
      result.push("#{ip}/#{maxSize.to_s}")
      startR += 2**(32-maxSize)
    end
    return result
  end
  def iMask(s)
    return (2**32 - 2**(32-s))
  end
  def long2ip(num)
    return IPAddr.new(num, Socket::AF_INET).to_s
  end
  def ip2long(ip)
    return IPAddr.new(ip).to_i
  end
  def cidr2netmask(cidr)
    IPAddr.new('255.255.255.255').mask(cidr).to_s
  end
Having a ready method for translating a numerical range into a CIDR range, we can generate scanning scripts using the following task. The task creates the necessary directory structure where the scripts using the zmap program will be placed. The parameters used for scanning are 100 Mbps bandwidth and 2 attempts. In the zmap configuration in the /etc/zmap/zmap.conf file, I also indicated the waiting time for the response in the cooldown-time parameter of 2 seconds.
 desc "zmap to port X"
  task :generate => :environment do
    port = 80
    countries = Server.all
                  .select("country_code, count(*) AS cnt")
                  .group("country_code").order(Arel.sql("COUNT(*) ASC"))
    countries.each do |c|
      puts "#{c.country_code}: #{c.cnt}"
      ranges = IpAddress2
                 .where("country_code = ?", c.country_code)
                 .select("'0.0.0.0'::inet + cast(ip_from AS bigint) AS mfr,
                          '0.0.0.0'::inet + CAST(ip_to AS bigint) AS mto, country_code")
      if Dir.exist?("/opt/repos/zmap/#{port}/{c.country_code}") then
        next
      else
        FileUtils.mkdir_p("/opt/repos/zmap/#{port}/#{c.country_code}")
        FileUtils.mkdir_p("/opt/repos/zmap/#{port}/#{c.country_code}/scripts")
        FileUtils.mkdir_p("/opt/repos/zmap/#{port}/#{c.country_code}/scripts/done")
        FileUtils.mkdir_p("/opt/repos/zmap/#{port}/#{c.country_code}/results")
      end
      ranges.each_with_index do |range,index|
        path = "/opt/repos/zmap/#{port}/#{c.country_code}/scripts/run_#{range.mfr}_#{range.mto}.sh"
        iprange2netmask(range.mfr.to_s, range.mto.to_s).each_with_index do |cidr,index2|
          puts "RANGE: #{range.mfr} do #{range.mto}"
          command = "zmap --bandwidth=100M --target-port=#{port}
           --output-file=/opt/repos/zmap/#{port}/
                         #{c.country_code}
                         /results/#{range.mfr}_#{range.mto}.csv
           --probes=2 #{cidr}\n"
          File.write(path, command, mode: "a")
        end # cidrs
        command2 = "ping -c 1 1.1.1.1\n"
        File.write(path, command2, mode: "a")
        command3 = "if [ $? -eq 0 ];
                    then mv #{path} /opt/repos/zmap/#{port}/#{c.country_code}/scripts/done;
                    else echo '!';
                    fi\n"
        File.write(path, command3, mode: "a")
      end # ranges
    end # countries
  end # task
Regardless of how we run the task, whether in series or in parallel, we will face the same problems when it comes to completeness of the results obtained. We are talking about waiting time for an answer. By default, zmap uses up to 8 seconds of waiting, which means a lot of delays with many subnets with the CIDR / 24 mask. Scanning 256 hosts (minus the network address and broadcast address) takes a blink of an eye, so the subsequent waiting of 8 seconds is definitely redundant here. At the same time, if we set this parameter to 1 second, it may turn out that we lose correct answers that have not reached us due to delays on the backbone network or even on our local network.
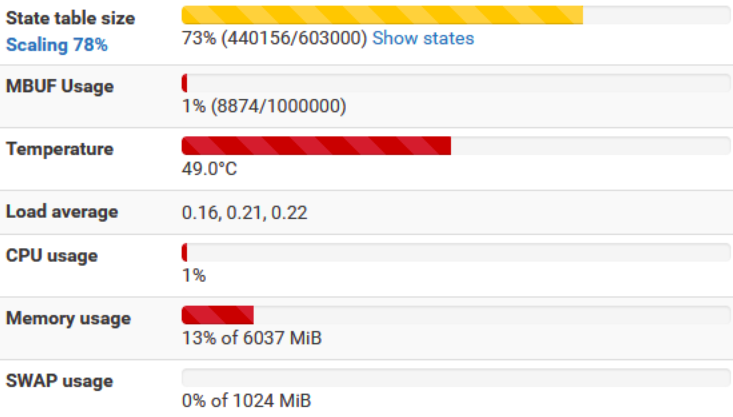
If we don’t want to aggressively optimize the pfSense configuration in terms of state performance, then we have to increase the RAM memory so that all the redundant states fit. You need at least 4 GB to be able to start such a scan. Anything above increases the possibilities, and 16 GB is preferable. By the way, we will have the opportunity to know, as well as I, that pfSense has special optimization mechanisms when there are a number of states above certain thresholds.
Fig. Scaling the state table at high traffic saturation
Parallel processing was achieved by using the Parallel library. By trial and error, I determined that with 6 GB of memory, it would be optimal to use 4 processes. I also tried higher values, e.g. 16 processes, but I would have to install 16 or even 32 GB of memory into pfSense. It could also have a negative impact on the use of the local network as such. I used the following task for parallel processing.
  desc "run zmap in parallel"
  task :run => :environment do
    country_code = "RU"
    port         = 80
    scripts = Dir["/opt/repos/zmap/#{port}/#{country_code}/scripts/*"]
    Parallel.map(scripts, in_processes: 4) do |script|
      puts "#{Parallel.worker_number} => #{script}"
      system(script)
    end
  end
Scanning took 20 hours. During this time, zmap only sent 5 GB of data packets. 45 million atomic IP addresses were scanned from 68k ranges and 177k lowest order networks. The result is 630k addresses where listening on port 80. This does not mean that there are HTTP servers there, just that the server responds to packets sent by zmap. This is a quantitative qualification. In the last step, the results were transferred to the database, to a dedicated table based on the results.
Note: I know from my own experience that zmap scans can be detected using signatures in IPS / IDS applications such as Suricata. Perhaps, therefore, some hosts did not respond, because they detected in proactive mode that a zmap scan was being performed. What is certain is that a system of this kind may block further communication from the source address for some time. It is therefore a good practice to wait 24 hours before attempting qualitative verification on these hosts.
Qualitative verification
Analysis of content offered by remote hosts
I started working with HTTP servers by saying that on such a large population of hosts there is too much variation in protocol implementations that the use of a simple and convenient HTTParty library is insufficient. At first glance, I needed a dedicated method that wouldn’t make any far-reaching assumptions about the operation of the remote host. Here is the code.
module FetchUtil
  # Fetch a URL, with a given max bytes, and a given timeout
  def self.fetch_url url, timeout_sec=4, max_bytes=1*1024*1024
    uri = URI.parse(url)
    t0 = Time.now.to_f
    body = ''
    code = nil
    headers = []
    Net::HTTP.start(uri.host, uri.port,
               :use_ssl => (uri.scheme == 'https'),
               :open_timeout => timeout_sec,
               :read_timeout => timeout_sec) { |http|
      # First make a HEAD request and check the content-length
      check_res = http.request_head(uri.path)
      code = check_res.code
      raise "File too big" if check_res['content-length'].to_i > max_bytes
      # Then fetch in chunks and bail on either timeout or max_bytes
      # (Note: timeout won't work unless bytes are streaming in...)
      http.request_get(uri.path) do |res|
        res.each_header do |k,v|
          headers << [k,v]
        end
        res.read_body do |chunk|
          raise "Timeout error" if (Time.now().to_f-t0 > timeout_sec)
          raise "Filesize exceeded" if (body.length+chunk.length > max_bytes)
          body += chunk
        end
      end
    }
    return [code, body, headers]
  end # fetch_url
end # module
This code has two constraints, size and time. We limit the size to 1 MB of data and 4 seconds of waiting for the result. This is part of a larger task that is responsible for concurrent verification. The module described above is used, but also HTTParty, where there is a 3xx response code. I am also trying to convert the ASCII-8BIT to UTF-8 encoding, but this is a very extensive topic, especially that the selected territory does not use the Latin alphabet.
def perform_verify
    @reconnected ||= Server.connection.reconnect! || true
    port = 80
    Parallel.each_with_index(Server80.where("is_checked is false ")
            .limit((1024*64)), in_processes: ENV['PC'].to_i * 1) do |s,index|
      $stdout.sync = true
      @reconnected ||= Server80.connection.reconnect! || true
      puts "#{Parallel.worker_number}: #{index}: (#{ENV['PC'].to_i*1}): #{s.ip}: #{s.country_code}"
      start = Time.now
      begin
        resp     = FetchUtil.fetch_url("http://#{s.ip}:#{port}/")
        code     = resp[0]
        body     = resp[1]
        hdrs     = resp[2]
        if code.to_s[0] == '3' then
          puts " switching to httparty as 3xx"
          response = HTTParty.get("http://#{s.ip}:#{port}", timeout: 2)
          code = response.code
          body = response.body
          hdrs = response.headers
        end
        if true
          str = body
          enc = body.encoding rescue nil
          puts " #{enc}"
          if enc.to_s == "ASCII-8BIT" then
            str = body.force_encoding(enc).encode('utf-8', invalid: :replace, undef: :replace)
            str.scrub!("")
            str.gsub!(/[[:cntrl:]&&[^\n\r]]/,"")
          end
          doc = Nokogiri::HTML(str)
          s.headers  = hdrs
          s.content  = str
          s.csize    = str.size
          s.title    = doc.xpath("//title").text
          s.start    = start
          s.finish   = Time.now
          s.diff     = (s.finish - s.start).in_milliseconds
          s.result   = code[0..999]
          if    code.to_s[0] == '1' then
            s.is_1xx = true
          elsif code.to_s[0] == '2' then
            s.is_2xx = true
          elsif code.to_s[0] == '3' then
            s.is_3xx = true
          elsif code.to_s[0] == '4' then
            s.is_4xx = true
          elsif code.to_s[0] == '5' then
            s.is_5xx = true
          end
          puts " .. #{s.result} -#{s.result.size}- .. #{s.title} .."
          s.is_checked = true
          s.save!
        end
      rescue Exception => e
        puts " exception: #{e}"
        s.content = nil
        s.title = nil
        s.result = e.to_s[0..999]
        s.is_checked = false
        s.is_http_error = true
        s.save!
      end
    end # parellel
  end # task
I use Nokogiri and xpath selectors to process responses. When the task with 24 processes was running, the number of states on pfSense was from 30k to 40k. The combination of Parallel and HTTParty and closer to unknown hosts often causes processes to be blocked. It seems that the main culprits here are Parallel and its compatibility with other elements, because this behavior is also observed in other projects, where there is no HTTParty library used, but only ActiveRecord. There is an option of full process separation, but it causes a drastic drop in performance, which generally disqualifies this option. There is also another explanation that may explain this behavior in part. Well, some of the hosts offer streaming services which is difficult to identify. They might send fake HTTP metadata, but actually offer something completely different.
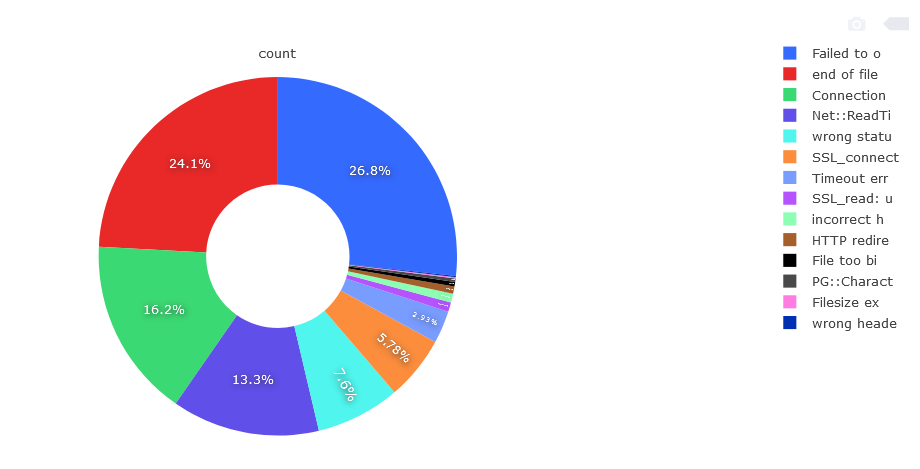
Moving on to the analysis of the results, the correct answer was sent by 522k hosts plus 8k hosts in the retry. This gives a total of 530k correct answers and 99k various types of connection errors on the HTTP protocol. I did 5 full runs to confirm that the failed hosts did indeed permanently offer no HTTP content. 16% of the hosts that answered port 80 are incorrect. The division among incorrect answers is as follows.
Fig. Detailed analysis of connection errors
“Failed to open TCP connection” is responsible for the biggest part of errors, 26.8%, 26398 items. Second in line is “end of file reached“, 24.1%, 23817 units. Third place is “Connection reset by peer“, 16.2%, 15986 units. Next are Net :: ReadTimeout, “wrong status line“, SSL_connect, TimeoutError, SSL_read, HTTP redirects, “File too big“. The remaining error messages are responsible for a small percentage and there are a lot of different types. They result from running non-HTTP services on port 80 and 443. Among correct HTTP responses, i.e. a pool of 530k hosts are divided into the following division.
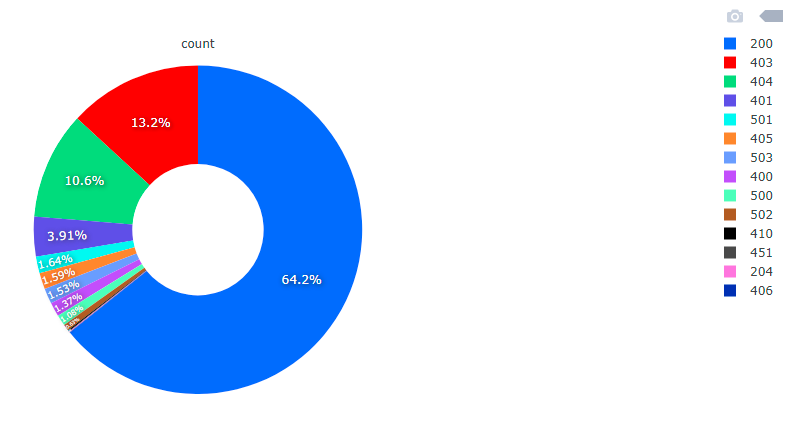
Fig. The division into codes of correct responses of HTTP servers
HTTP response codes are divided into 5 categories. Codes starting with 1 are info codes. Codes starting with 2 are correct answers. Codes starting with 3 are redirects of various types, additional action is required. Codes starting with 4 are client errors that prevent further processing of the request. Codes starting with 5 are server errors. The list of HTTP response codes is maintained by IANA.
HTTP 200 codes are 340k. We have codes 403 with number of 69k. We have 56k codes 404. We have 20k codes 401. The remaining group of a dozen or so types of answers is below 10k each of these types.
Analysis of the results
Configuration and content
We can consider the content offered by HTTP servers from several angles. First of all, it should be noted that when we talk about public IPv4 addresses, we are talking about either physical or virtual network adapters. In both cases, multiple domains may be running on a given host based on SNI. These hosts can and certainly act as entry points for a subnet (NAT or proxy). Of course, this does not apply to all addresses, only parts. What, it is not known. The analysis may concern the HTTP server as such, its type, version and configuration, or the content returned by this server. Both analyzes bring many interesting facts.
Configuration analysis
Operating systems and runtime platforms
When examining the configuration, I find that among all the answers, 217k hosts are supported by the NGINX server, 96k through the Apache server, and 20k by the Microsoft IIS server. The most popular HTTP servers are responsible for a total of 334k addresses. There are 7810 of all the varieties of the reported servers. The more interesting less popular servers are Webrick, Lotus-Domino or Mongrel, but also MinIO and WowzaStreamingEngine. There are also print servers, Couchbase and many more. From the series of these strange ones, I would single out “Aeroflot“, “Stalin” or the “ZX Spectrum“. However, to indicate something specific, I would say that it is NGINX 0.4.13 from 2006 or Phusion Passenger in an older version. In general, all older versions of HTTP servers may be subject to exploit tools.
Another aspect of the configuration study is the operating systems and runtime platforms on which the HTTP hosts and servers are running. Servers with a declared Windows system are 5257 pieces. By contrast, Ubuntu Linux is 52473 units, Debian is 16438 units. Among other popular systems, it is CentOS in the amount of 31176 units. The FreeBSD system is also popular with a total of 3326 units. The most popular technology stack we know about from the headers is PHP. It is not, however, that this information is confirmed, because basically only this language module is widely advertised, and the others are simply not. We will not find such information in the case of Java or Ruby languages. The exception will be the Perl as Apache module. It occurs in 662 pieces.
Information about the operating system or runtime platform, and in particular their versions, is important from the point of view of the security of such hosts. A Linux or FreeBSD host is just as vulnerable as a Windows host . This is because they can be misconfigured in the first place, and not so much vulnerable. Windows systems are much more popular from workstations than servers, hence the large majority of threats present on this system. When it comes to vulnerabilities, the first choice is metasploit, which will give us information whether the vulnerabilities on the hosts can be exploited.
Note: it is important to know that “Data Mining & Exploration” is about information and fact-finding, not security hacking and misconfiguration.
Content analysis
Systems and applications
In addition to the configuration of servers, we can examine what content they return. This allows us to get to know the specificity of the studied region better. For different services are launched in Europe, others in Asia and others in Africa. There are some common points, but in general, the level of development of a given territory has an impact on how many and what services we can find there in the Internet space. I analyze the content by looking for a few of the most popular systems that may most often be incorrectly configured. These are GitLab, Kibana and Elasticsearch, file servers, Zabbix and Grafana. In each of these, there may be an open registration situation, no access control, or an active guest account.
GitLab
Starting with GitLab , I found 598 installations. I tried registration on several of them. Most of them required confirmation of the account by the administrator, but on a few I was able to register and have an active account with access to resources right away. By resources, I mean mostly code repositories. I estimate a fully functional account could be obtained for approximately 5-10% of installations.
Note: Let me not give you specific addresses. It is true that I informed the administrators of these installations about a configuration error, but none of them responded to my report. They may be abandoned installations or the contact is out of date.
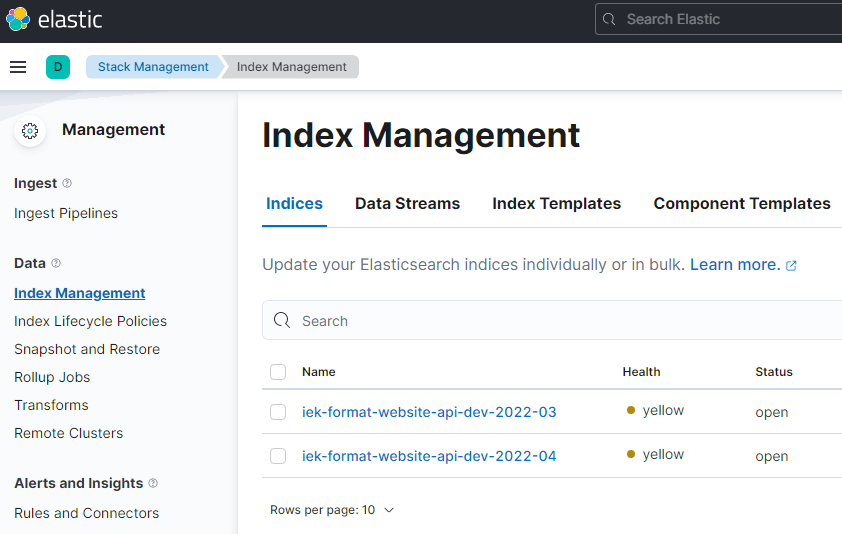
Elasticsearch, Kibana
The second system I was looking for was Kibana connected to Elasticsearch. I consider the fact that there are installations on port 80 as an obvious example of a configuration error, because by default Kibana runs on port 5601, so someone had to reconfigure or set up a reverse proxy.
Fig. Opening the available configuration of the Kibana installation
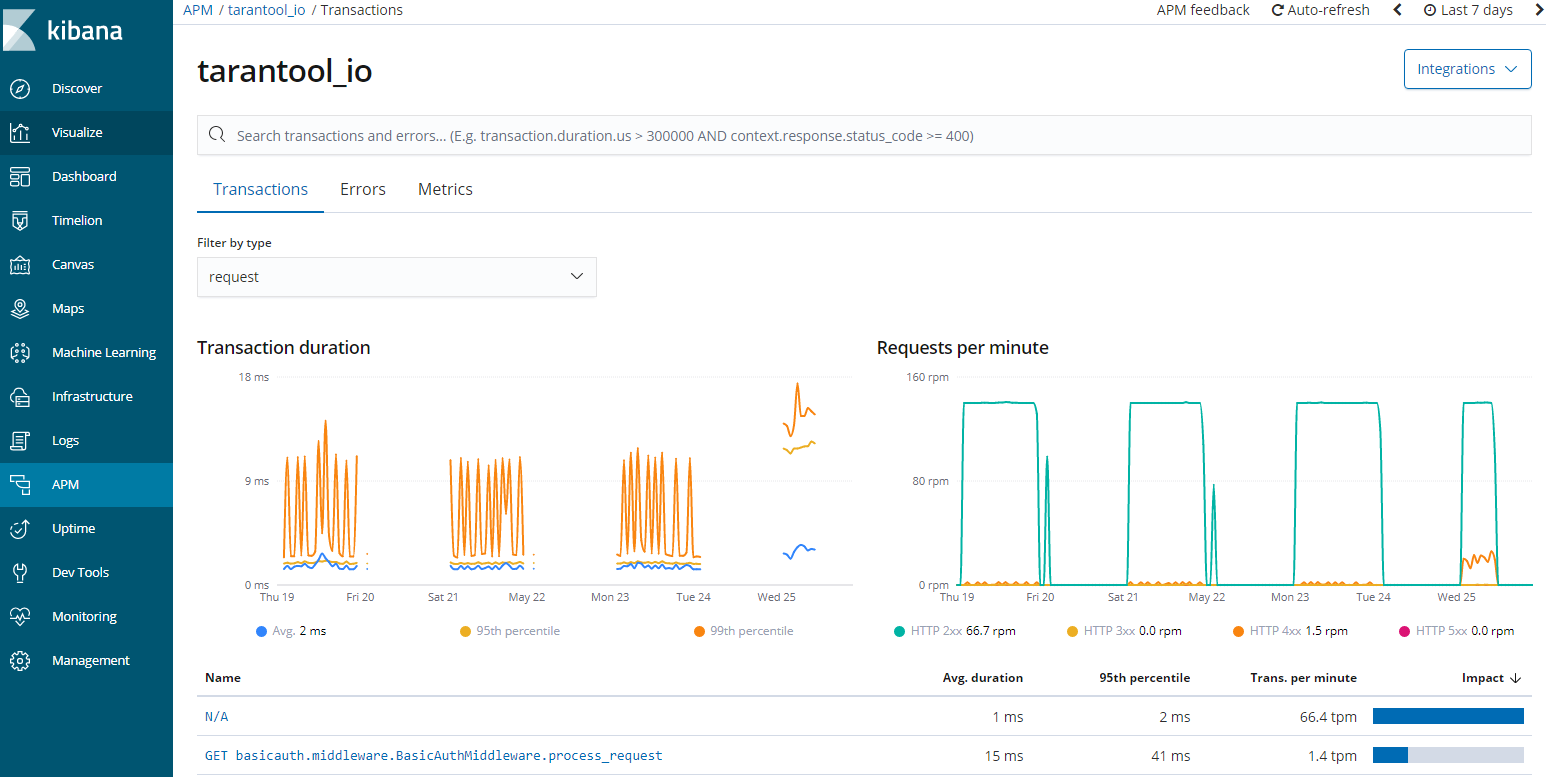
Providing Kibana may result in the display of indexes (logs, metrics and network packages), including the possibility of downloading or even deleting them. By default, the interface does not allow you to retrieve the content of indexes, but if you use the appropriate console tool, it will be able to do so. Often times, if port 80 contains Kibana, the 9200 and 9300 contain Elasticsearch services, also publicly available. As part of the Elasticsearch and Kibana systems, we have one more service, namely the APM server, i.e. application monitoring.
Fig. APM server
Exposing diagnostic data about the application results in increased possibilities of exploring such an application, because APM provides information about the database, related services and addresses on which the application operates on the HTTP layer. Elasticsearch, beats and Kibana is a powerful tool that can give us a lot of information in the form of a reconnaissance of the network environment.
Fig. High exposure of infrastructure details
Files listing
The third type of resource is file stores in the form of file listings on the HTTP server . I found almost 3000 of such installations. Among the more interesting finds I can mention copies of databases, video surveillance archive or code repositories . There are also scans of documents, bank transfer confirmations, certificates and many more. Some users of these servers may not know they have a public IP. Their IP can be dynamic but public. The second category are people who think that only they know this IP address, which is an obvious mistake, because addresses are commonly known.
Note: Domain addresses (especially subdomains) are not widely known, unless we are talking about reverse DNS mapping. The DNS issue is material for the next article.
Zabbix
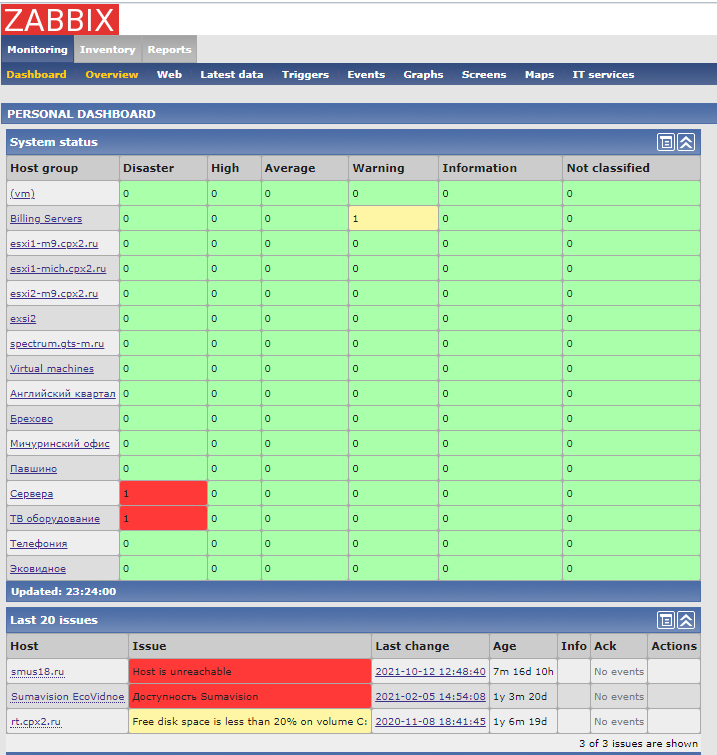
The fourth type is 636 Zabbix monitoring system installations. It should be on a private network with access behind WAF or VPN, but that’s not the case in these cases. Moreover, many of them allow access under the guest account. Basically, it is wrong that such data is publicly available because it identifies the system on multiple layers.
Fig. Access to Zabbix on the guest account
We learn that the systems are run on VMware, what is the logical division of the application, etc. We obtain information about addressing. This can be the basis for further exploration of this particular organization.
Grafana
As in the case of Kibana and Zabbix, the same Grafana, if unsecured, provides us with a lot of valuable information about the system infrastructure, addressing and resource usage. It is a base for further exploration.
Fig. Infrastructure monitoring
The situation is even more interesting because we have the ability to create our own screens, where we can place control panels or multi-level monitoring. This is also the case with the most interesting example that was found in this scan run.It is a monitoring and control panel for heating devices.
Fig. Monitoring and control panel for heating devices
I’ve seen various panels, mainly related to video surveillance, wind turbines or photovoltaics, but I haven’t found such one before. Since someone provides monitoring and buttons to perform various actions (on another panel), I suppose it may have an impact on the operation of physical devices. Therefore, we are entering a dangerous area, because the devices work with high temperature and pressure and it would be bad if they worked outside the parameters. Right?
Note: Some of the systems released to the public are either testing or abandoned systems. Some are clearly honey-pot systems. Most, that is, almost all, however, are production systems or will become production systems in some time. Regardless of their nature, they should not be available to the public, as it is against good practice.
Going to the end
Turkish cryptocurrency exchange
For the ones who managed to make it to the end of this article, there will be one more curiosity. Well, in 2021, when I made my first attempts to scan, in 200 territories I found something more interesting than the finds described here. The scanning did not cover Turkey, but the country where the Turkish cryptocurrency exchange was located. I found a log monitoring system that stored usernames and their passwords. This data allowed access to the accounts . That is why it is so important to inventory resources, check configuration and perform security audits.
Note: The system explorations described are just an example. They do not cover all possible services, or even analyze everything that has been identified. In no way was the obtained information and access used against anyone. Neither of the systems has been tampered with.
Contact
If you are interested in this article, please do not hesitate to contact me. I am open to various forms of cooperation, both commercial and non-commercial, in the field of infrastructure, architecture and security.
“Mamy rok 2022. Minęła ponad dekada od pojawienia się OpenCL. Omówię standard, przykładowy sprzęt, a także zaprezentuję rzeczywiste przykłady, które można wykorzystywać obecnie zarówno na historycznym jak i najnowszym sprzęcie, co ma pokazać swego rodzaju uniwersalność tego rozwiązania. Przy okazji zobaczymy jak ewoluowała technologia na przestrzeni ostatnich lat i czy teoria odpowiada praktyce. Udostępnione przykłady pokażą, że dzięki stosowaniu standardu OpenCL możemy uzyskać nawet 50-krotne przyspieszenie działania algorytmu (na korzyść GPU) porównując czas pracy CPU i GPU. Zacznijmy jednak od podstaw, tak aby zrozumieć, dlaczego tak się dzieje…“
Podstawy elektroniki i budowa komputera w symulatorze
“Jest to pierwsza część serii Simple High Performance Computing o tytule Podstawy elektroniki i budowa komputera w symulatorze. Swoim zakresem obejmuje zagadnienia związane z elektroniką, a konkretnie jej podstawami, począwszy od pierwotnych zasad fizyki przekładających się na komponenty elektroniczne, z których można budować złożone układy, a finalnie najprostszą obliczeniową maszynę cyfrową. Największy nacisk kładę na praktyczną część zagadnienia, aczkolwiek teoria również jest przedstawiana.“