Frigate on ROCm in LXC container

I thought that the best option to run Frigate is to run bare metal and skip virtualization and system containers. However now situation changed a little bit as I was able to fire up Frigate on LXC container on Proxmox with little help of AMD ROCm hardware assisted video decryption.

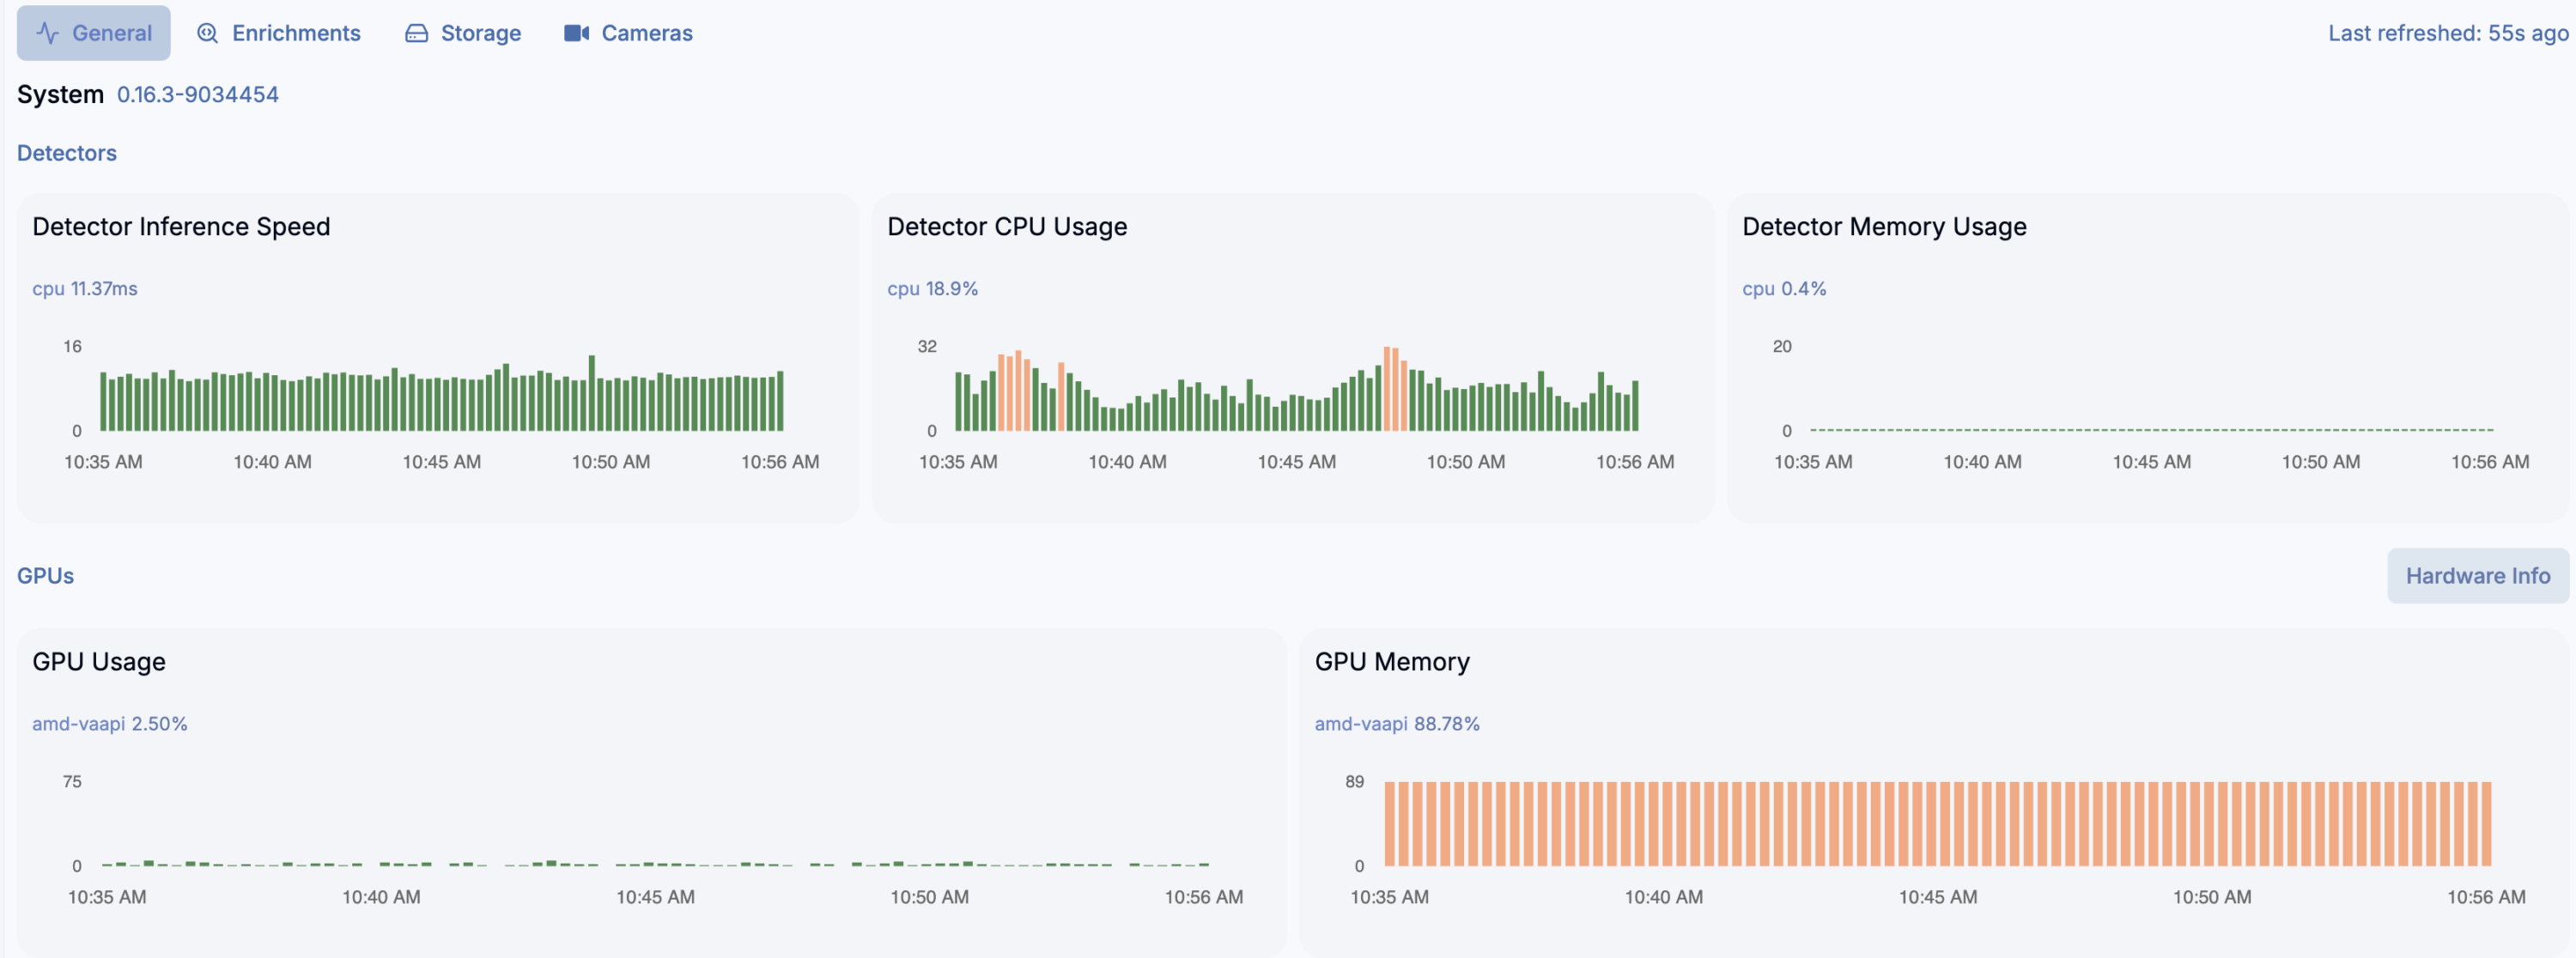
And yes, detection crashes on ONNX and need to run on CPU instead… but video decryption works well. And even more, detection on 16 x AMD Ryzen 7 255 w/ Radeon 780M Graphics (1 Socket) works very well for almost 20 video streams (mixed H264 and H265). You can switch to Google Coral as USB device passed to the LXC container, but what for?

LXC container

You need to have the following settings:

/dev/dri/renderD128
fuse
mknod
nesting
privileged

ROCm installation

https://rocm.docs.amd.com/projects/install-on-linux/en/latest/install/quick-start.html
wget https://repo.radeon.com/amdgpu-install/7.1.1/ubuntu/noble/amdgpu-install_7.1.1.70101-1_all.deb
sudo apt install ./amdgpu-install_7.1.1.70101-1_all.deb
sudo apt update
sudo apt install python3-setuptools python3-wheel
sudo usermod -a -G render,video $LOGNAME # Add the current user to the render and video groups
sudo apt install rocm

Docker CE

# Add Docker's official GPG key:
sudo apt update
sudo apt install ca-certificates curl
sudo install -m 0755 -d /etc/apt/keyrings
sudo curl -fsSL https://download.docker.com/linux/ubuntu/gpg -o /etc/apt/keyrings/docker.asc
sudo chmod a+r /etc/apt/keyrings/docker.asc

# Add the repository to Apt sources:
sudo tee /etc/apt/sources.list.d/docker.sources <<EOF
Types: deb
URIs: https://download.docker.com/linux/ubuntu
Suites: $(. /etc/os-release && echo "${UBUNTU_CODENAME:-$VERSION_CODENAME}")
Components: stable
Signed-By: /etc/apt/keyrings/docker.asc
EOF

sudo apt update
sudo apt install docker-ce docker-ce-cli containerd.io docker-buildx-plugin docker-compose-plugin

Frigate container setup

docker run --name=frigate --privileged --volume /frigate-config:/config --volume /frigate-media:/media/frigate --expose=5000 -p 8554:8554 -p 8555:8555 -p 8555:8555/udp -p 8971:8971 --restart=unless-stopped --device /dev/dri/renderD128:/dev/dri/renderD128 --detach=true --mount type=tmpfs,target=/tmp/cache,tmpfs-size=1000000000 --shm-size=2000m ghcr.io/blakeblackshear/frigate:stable-rocm

Frigate configuration

environment_vars:
  LIBVA_DRIVER_NAME: radeonsi
  HSA_OVERRIDE_GFX_VERSION: 10.3.0

ffmpeg:
  hwaccel_args: preset-vaapi

Further reading

https://forum.proxmox.com/threads/tutorial-run-llms-using-amd-gpu-and-rocm-in-unprivileged-lxc-container.157920/
https://github.com/blakeblackshear/frigate/discussions/5773
https://community.home-assistant.io/t/frigate-coral-usb-proxmox/752563
https://github.com/blakeblackshear/frigate/discussions/18732

PV production metering using Huawei API integrated with Fibaro HC3 as QuickApp

We are using Huawei PV installation on top of our house roof. It has web panel and application available to preview every detail about its settings and working conditions. However I would like to integrate PV power production into my Fibaro HC3. So:

First things first: create Northbound API user in web panel. Select all privileges for data acquisition.

Then grab auth token:

curl -X POST "https://eu5.fusionsolar.huawei.com/thirdData/login" \
-H "Content-Type: application/json" \
-d '{
"userName": "USERNAME",
"systemCode": "PASSWORD"
}' -v

In response you will get xsfr-token in headers data. Now using this auth token you need to get installations list (stations):

url -X POST "https://eu5.fusionsolar.huawei.com/thirdData/getStationList" \
  -H "Content-Type: application/json" \
  -H "xsrf-token: TOKEN" \
  -d '{}' -v

Now using your station ID get list of your devices:

curl -X POST "https://eu5.fusionsolar.huawei.com/thirdData/getDevList" \
-H "Content-Type: application/json" \
  -H "xsrf-token: TOKEN" \
  -d '{
"stationCodes": "NE=123456789"
}' -v

To retrieve sort of real time data you need to know your device ID from previous request:

curl -X POST "https://eu5.fusionsolar.huawei.com/thirdData/getDevRealKpi" \
-H "Content-Type: application/json" \
  -H "xsrf-token: TOKEN" \
  -d '{
"devIds": "112233445566778899",
"devTypeId":"1"
}' -v

Now you should be looking for active_power field which is your PV production power (in Watts).

Now lets say you want it in Fibaro. I went with QuickApp (Lua) as follows:

function QuickApp:onInit()
    self:debug("onInit Huawei Falownik")
    self:loop()
end

function QuickApp:loop()
    fibaro.setTimeout(1000*60*5, function() 
        self:debug("Huawei Falownik")
        self:debug("Huawei Falownik: login")
        local token   = ''
        local url     = "https://eu5.fusionsolar.huawei.com/thirdData/login"
        local payload = json.encode({userName="USERNAME",systemCode="PASSWORD"})
        net.HTTPClient():request(url, {
            options={
            data    = payload,
            method  = 'POST',
            headers = {
                ["Content-Type"] = "application/json"
            },
            timeout = tcpTimeout,
            },
            success = function(response) 
                token = response.headers['xsrf-token']
                self:debug("Huawei Falownik: getDevRealKpi")
                local url2 = "https://eu5.fusionsolar.huawei.com/thirdData/getDevRealKpi"
                local payload2 = json.encode({devIds="112233445566778899",devTypeId="1"})
                net.HTTPClient():request(url2, {
                    options={
                    data    = payload2,
                    method  = 'POST',
                    headers = {
                        ["Content-Type"] = "application/json",      
                        ["xsrf-token"]= token
                    },
                    timeout = tcpTimeout,
                    },
                    success = function(response) 
                        print(response.status) 
                        print(response.data) 
                        activepower=json.decode(response.data)['data'][1]['dataItemMap']['active_power']
                        self:updateProperty("value", activepower*1000)
                        self:debug(activepower)
                    end,
                    error = function(message)
                        print("error:", message) 
                    end 
                })
            end,
            error = function(message)
                print("error:", message)
            end 
        })
        self:loop(text)
    end)
end 

Finally you can setup production meter using this QuickApp. Last thing to remember is traffic limiting on Huawei side sa request data lets say once per 5 minutes or so, otherwise you will get error message instead.