Electric voltage

Measure of the strength of electric charges. Electrostatic potential difference.

Table of Contents

Electronics is based on physics. The basic concepts here are voltage, current and resistance. We should start with that. The voltage is therefore a measure of the strength of electric charges. The voltage between two points of an electric circuit or electric field is the difference in electrostatic potential between these points. We measure voltage in volts. We use a voltmeter to measure the voltage. We always measure voltage between two points because it is a potential difference.

The voltage can be constant, variable, alternating. Why we use a given form of tension depends on the purpose, losses, efficiency and probably also safety. The difference between volatility and commutation is a question of waveform shape and its distribution along the axis. Voltage and current are inextricably linked concepts. If there is no voltage in the circuit, no current is flowing in it.

Alternation

Periodic form of a signal with waveforms on both sides of the axis

[204] The current is represented as a shape, the signal can have different forms depending on how it is initiated.

Fig. Alternating waveforms [204]

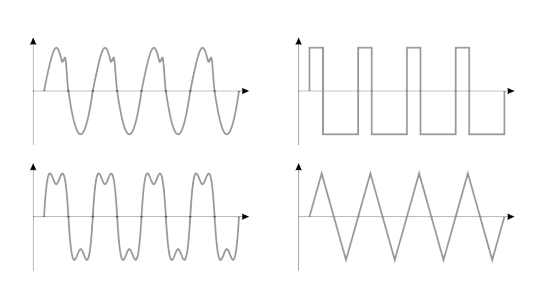
If we give it a given periodic form, in which its value will alternately take a negative and a positive form, then we will call such a current alternating.
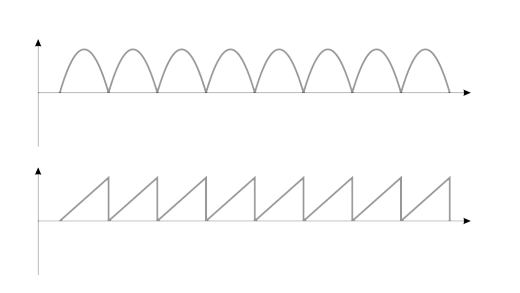
Variability

The periodic form of a signal on one side of the axis

[204] However, if this form is periodic, but not commutative, then we can only speak of a periodic but a variable current. Such a signal is repeatable, but its amplitude waveform does not exceed the axis on the graph. The difference between a constant, alternating and alternating signal is important from the point of view of circuit design.

Fig. Variable waveforms [204]

If a given form of a signal, be it a variable or an alternating one, should have a specific form, the task of various components and systems is to provide them with this target form in the simplest possible way.

Peak frequency and voltage

Signal amplitudes and actual voltage

[204] In a house, we have alternating current with specific parameters, such as 230V and 50Hz frequency. This means that in 1 second there are 50 changes (alternations) from the peak value, then as it falls down, the axis is crossed at the zero point (more precisely across the equilibrium level) to reach the opposite value. These changes create an alternating current sinusoid. There may be a voltage in the network with a certain deviation, between 5 and 10%, depending on the characteristics of the supplied voltage and the installation itself that supports it. Therefore, assuming the maximum values, it is about 250V effective voltage. For a perfectly sinusoidal waveform, the peak value of the ac signals will be

Umax = Usk * √2

For a triangular waveform, this would be the first a square root of 2. For a square wave it will be 1. For an average outlet voltage, the peak voltage may be around 350-360V.

Note: Amplitude is the maximum deviation of the signal from the equilibrium level. Voltage amplitude is denoted as Um, and the current as Im. Finishing this topic, it is worth mentioning that the shape of the current waveform is sinusoidal because the generator core works in a circular motion, which is inseparable from the shape of the sinusoid.

Examples available at https://github.com/michalasobczak/simple_hpc/tree/master/SeriesPartOne

Recovering Elasticsearch 7 after power outage

In case you encounted power outage or just blindly pressed restart button on your machine, there is high chance you will have some issues with your cluster. Mine has only one node, so there is no redundancy. If I lose indices then data is gone. Fortunately starting Elasticsearch and having red indicators not necessarily means data lose. I recently went that path. Log says that primary shards was missing. In such case you need to check if there are those indices listed:

curl -s 'localhost:9200/_cat/indices?v'

With that command look for red statuses. Internal mechanisms have this delay rule, so check every minute if count decreases. If not then instead od “indices” write “allocations” and you may have some unassigned indices. Now you can try this one:

url -X PUT "localhost:9200/_cluster/settings?pretty" -H 'Content-Type: application/json' -d'
{
    "transient" : {
        "cluster.routing.allocation.enable" : "all"
    }
}
'

It possible could re-enable allocation. Other failure factor could be low free space. You need to keep it above 15%. If you have more than one node, please check whether it is available and working.

Install qemu-guest-agent with Ansible on Proxmox 7.2

I already have over 10 virtual machines in my home virtual environment. It is the number I find enough to start using some automation tools like Ansible. Installing Ansible on Ubuntu or CentOS systems is straightforward, just use regular apt or yum commands. With Ansible you can use commands or create scripts. First you should start with hosts definition file which by default is located at /etc/ansible/hosts.

[servers]
myhostname              ansible_host=192.168.1.1

You can use different hosts file but then you need to point it while running commands. This one is default, so no need to do anything special here. Now going quickly to Proxmox’s qemu-guest-agent. What it is for? By using it, Proxmox knows what’s going on inside your VM, for example it will know IP addresses. Install package using apt or yum modules:

ansible all -m apt -a "name=qemu-guest-agent" --become -K -o

Go to each and every VM in Proxmox’s UI and enable QEMU Guest Agent. Then stop and start all VM. You will know that it works when there will be IP address shown on Summary page. Still you can check if service is running using Ansible:

ansible all -m shell -a "service qemu-guest-agent status | grep Active" --become -K -o -f 4

Trapping ctrl+c in Bash scripts

If you happen to have some Bash scripts and would like to abort it in clean way there is way to do it. You need to trap ctrl+c command. In case you have some while loop in your scripts, without it, pressing any abort commands is only half way effective.

#!/bin/bash

trap ctrl_c INT

function ctrl_c() {
  echo "** Trapped CTRL-C"
  exit
}

while
do
  echo -n "."
done

Now, with ctrl+c trapped, you can cleanly abort your script without things still running.

Installing Metricbeat 7.17 agent on Ubuntu

Once you have installed Elasticsearch and Kibana servers you need to grab some data. First choice could be beats modules, either Metricbeat or Packetbeat. There is also Filebeat. Altough installation instructions are available at https://www.elastic.co/guide/en/beats/metricbeat/7.17/metricbeat-installation-configuration.html I found it useful to describe it separately as this page might just disappear out of a sudden.

curl -L -O https://artifacts.elastic.co/downloads/beats/metricbeat/metricbeat-7.17.5-amd64.deb
sudo dpkg -i metricbeat-7.17.5-amd64.deb

After installation you need to change the configuration file at:

/etc/metricbeat/metricbeat.yml

Change Kibana and Elasticsearch output addresses. Then start the agent:

sudo service metricbeat start

In case this is the first time you are installing the agent against this particular Elasticsearch server you need to load visualizations and dashboard definitions:

metricbeat setup -e

Now you’re done and should be able to see you newly added host on Observability:Metrics:Inventory page. Remember to press Auto-refresh button.

Apple MacBook Pro 15 inch (2007)

I have this nice MacBook Pro (3,1) from 2007. It has Intel’s Core 2 Duo running 2.2 GHz. Unfortunately the battery is dead or electronics reponsible for charging it. It arrived fully charged and was working for like 2 hours or so. In case the battery runs our of any kind of charge and it is not recognized by the system, then the computer will not start at all. This was like a shock to me, but it’s the Apple hardware.

To start MacBook without the battery you need to:

  • press and hold power button for 10 seconds with power cord unplugged
  • without releasing power button, but with power cord plugged in, keep power button for another 10 seconds
  • release power button for a second
  • press power button one more time
  • computer should start

Then buy new battery or replace charging electronics.

Elasticsearch 7: Could not locate that index-pattern

Recently I’ve been tryout Elasticsearch 7 with Kibana and Metricbeat as well as Filebeat. I encountered some issues with indices so I dropped dashboards and visualizations and tried to load them again. I also cleared indices and patterns thru index management page. If you get error message like “could not locate that index-pattern” or something with fields being non-optimized then you should take few actions.

Please note that it was my lab Elastic installation so I do not care about deleting indices.

First you need to either stop all of your metricbeat modules sending data to the cluster or do some magic with the indices itself to prevent from auto-creating. Then delete all indices related to those two modules as well as its index patterns. Then go to Saved objects and delete all visualizations and dashboards. If you have custom things, then most probably you need to remember not to select them for deletion. If you have cleared out all of these you may go to sample machine with metricbeat node and run:

sudo metricbeat setup --index-management
sudo metricbeat setup --dashboards

Effectively you will get a index alias and bare index pointing at each other. This is the main difference between manually creating pattern and letting metricbeat doing its things properly. Now you should have visualizations created correctly which means that also dashboads should work fine. Neither Elasticsearch 7 is working correctly nor messages are saying anything useful. Maybe version 8 brings little more in this aspect, but I thought that writing about this case might save some time for someone looking for similar issue happening on their environment.

(X)Ubuntu on ThinkPad T61

Recently I got Lenovo ThinkPad T61 in working conditions. It has Intel Core 2 Duo T7100 @1.8 GHz, 4 GB of DDR2. At its maximum it can have up to 8 GB of RAM and C2D T9500, altough I’m not quite sure if changing CPU would be straightforward operation – it seems to be socketed, not BGA. I purchased it because of NVIDIA NVS 140M dicrete GPU onboard and unconventionally high screen resolution of 1680×1050. This comes as a benefit but makes few things difficult.

Windows 10 works just fine. But if you want to have Ubuntu on it… it will not be easy. I have tried Ubuntu 18, 20, 21, 22 and none of it worked out of the box. The only one working flawlessly was Ubuntu 16. It is however too old not to be consider as a obsolete experience. Even after upgrading from 16 do 18 and so on, there are GPU locks and freezes.

There is a out of the box distro called XUbuntu, which is based on regular Ubuntu with lightweight window manager Xfce. It has lower memory requirements. First I have tried with the latest XUbuntu which is 22, however the only available NVIDIA driver was 510 which is not compatible with NVS 140M. Nouveau drivers do not work either. Finally I have tried XUbuntu 18 and it works just fine. By default it offers NVIDIA 340 driver at Software & Updates section.

In other works, if you have ThinkPad T61 and would like to have decent working experience, go for XUbuntu 16. It even has ability to install as a dual boot with Windows and recognizes previous Ubuntu installations offering understandable messages what will happen during installation.

OpenCL

Programowanie CPU i GPU

Mamy rok 2022. Minęła ponad dekada od pojawienia się OpenCL. Omówię standard, przykładowy sprzęt, a także zaprezentuję rzeczywiste przykłady, które można wykorzystywać obecnie zarówno na historycznym jak i najnowszym sprzęcie, co ma pokazać swego rodzaju uniwersalność tego rozwiązania. Przy okazji zobaczymy jak ewoluowała technologia na przestrzeni ostatnich lat i czy teoria odpowiada praktyce. Udostępnione przykłady pokażą, że dzięki stosowaniu standardu OpenCL możemy uzyskać nawet 50-krotne przyspieszenie działania algorytmu (na korzyść GPU) porównując czas pracy CPU i GPU. Zacznijmy jednak od podstaw, tak aby zrozumieć, dlaczego tak się dzieje…