If you happen to use Proxmox’s LXC which stands for Linux Containers, then you might be interested in this one. Proxmox has this turnkey containers available to download from its UI. Among them there is WordPress. If you create a container using template then while creating remember to select nesting=on, because without this it will show permission denied on starting Apache2. Not quite familiar with nesting option but it is necessary to run this container.
Month: August 2022
Installing PostgreSQL 14 on CentOS 7
PostgreSQL 14 has few improvements over previous versions, especially older ones, like 9.6. This includes automatic data direction using partitioning. So, let’s install it on CentOS 7.
yum -y install https://download.postgresql.org/pub/repos/yum/reporpms/EL-7-x86_64/pgdg-redhat-repo-latest.noarch.rpm
yum install -y postgresql14-server postgresql14
/usr/pgsql-14/bin/postgresql-14-setup initdb
systemctl enable postgresql-14
service postgresql-14 start
Then you should login to the database and set password:
sudo -u postgres -i
psql
\password
Basic configuration includes firewall setup (if it’s active), access control and performance settings:
/var/lib/pgsql/14/data/pg_hba.conf
/var/lib/pgsql/14/data/postgresql.auto.conf
I strongly recommend visiting pgtune.leopard.in.ua for tuning parameters. Last thing is to set interface address on which server will be listening, it’s set in:
/var/lib/pgsql/14/data/postgresql.confNow you are good to go.
Ohm’s law
Theory and practice
[204] This is the SI unit of resistance. 1 ohm is the electrical resistance between two points on a conductor when a constant potential difference of one volt between the two points causes a current of one ampere in the conductor.

Most, if not all, components have internal resistance, such as batteries. It is not a property that is easily measurable. Circuits intended to show some principles assume that, for example, the power source is an ideal cell and any internal resistances are compensated by additional components of such a circuit, assuming a certain margin of error.
Feeding a resistor with too low resistance in a single-element system causes de facto short-circuit of the contacts of the power source, e.g. a battery, which will probably lead to its degradation. The larger the cross-section of the conductor, the lower its resistance and the larger the surface capable of dissipating heat – hence the conductor can withstand a higher current intensity.
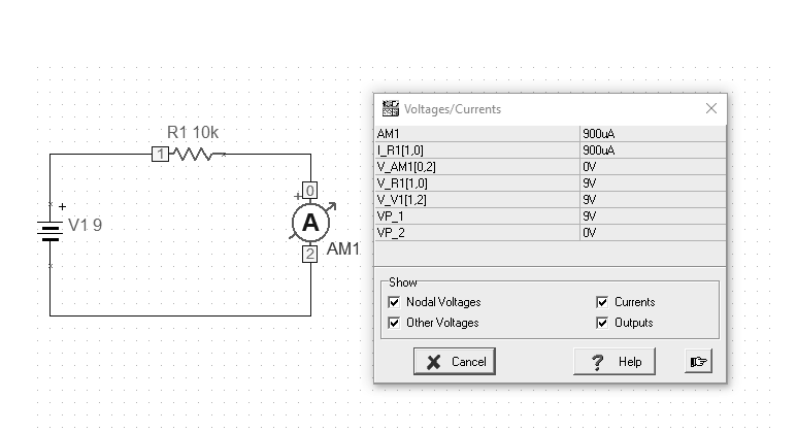
[202] The intensity of the current through a conductor is directly proportional to the voltage applied between its ends. If the resistance is kept constant, then increasing the voltage will increase the amperage. At constant voltage, increasing the resistance reduces the amperage.
[202] Assuming that the battery has a voltage of 9V as the source of electrical energy and the resistor shows a resistance of 10k Ω, then the ammeter, which is connected in series to the circuit, will give a result of about 900mA. This result should also include the internal resistance of the ammeter and the actual battery voltage. The resistance of the circuit itself should also be taken into account. The result of 0.9A will therefore only be an approximation.
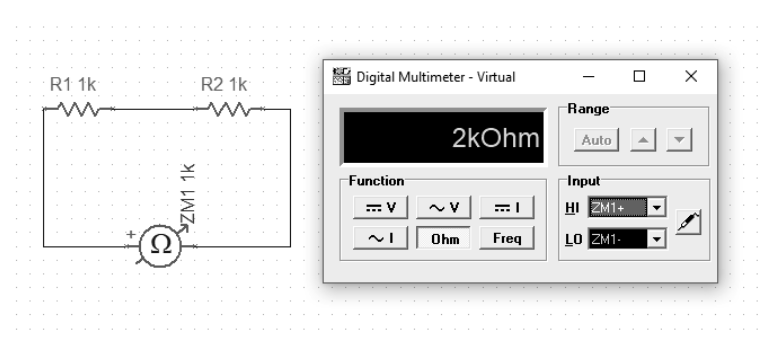
The next example will show how we measure the resistance of series-connected resistors. It is simply their sum.
For comparison, we can connect the resistors in parallel. Here, the calculation of the output value of the resistance is slightly different and is described by the formula:

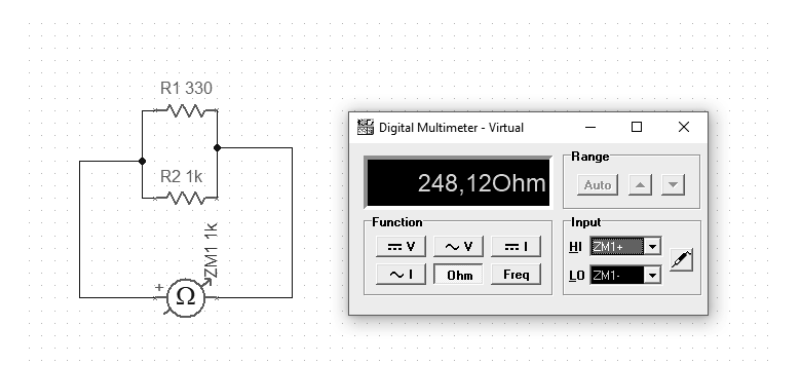
With this connection, the effective resistance will be less than the smallest component in such a parallel configuration.
“[Georg Simon Ohm] He formulated (1827) a law describing the relationship between the intensity of an electric current and electric voltage, known today as Ohm’s law. He investigated the heating of conductors with the flow of electric current. He found the dependence of resistance from the geometric form of the conductor” [W]
Examples available at https://github.com/michalasobczak/simple_hpc/tree/master/SeriesPartOne
Circuit simulation
Construction and testing of circuits in the TINA TI program
To translate theory into practice, we can use the TINA package from DesignSoft for Texas Instruments. It is a tool for building virtual analog and digital circuits. The basic version provides the minimum necessary set of elements that can be arranged in the form of a circuit. However, the most important function (at least for me) is the ability to run simulations.

All presented examples of simulations are prepared in TINA TI V9 (Schematic Editor), Special Complementary Basic Edition available free of charge. The schema sources are in the repository for this publication, for independent study github.com/michalasobczak/simple_hpc in the folder SeriesPartOne.

[101] For the purpose of studying a system, the concepts of linearity and non-linearity are adopted. A system with at least one nonlinear element will be a nonlinear system. Nonlinearity consists in the inability to describe the current-voltage characteristic of a given element in the form of a straight equation. When describing a mixed system, consisting of both linear and nonlinear elements, the point of intersection of their characteristics will be the working point.
Note: If we do not need to test the circuit, we can use other packages for electronics such as Frizting, LibrePCB or EAGLE.
Examples available at https://github.com/michalasobczak/simple_hpc/tree/master/SeriesPartOne
Electric voltage
Measure of the strength of electric charges. Electrostatic potential difference.
Table of Contents
Electronics is based on physics. The basic concepts here are voltage, current and resistance. We should start with that. The voltage is therefore a measure of the strength of electric charges. The voltage between two points of an electric circuit or electric field is the difference in electrostatic potential between these points. We measure voltage in volts. We use a voltmeter to measure the voltage. We always measure voltage between two points because it is a potential difference.
The voltage can be constant, variable, alternating. Why we use a given form of tension depends on the purpose, losses, efficiency and probably also safety. The difference between volatility and commutation is a question of waveform shape and its distribution along the axis. Voltage and current are inextricably linked concepts. If there is no voltage in the circuit, no current is flowing in it.
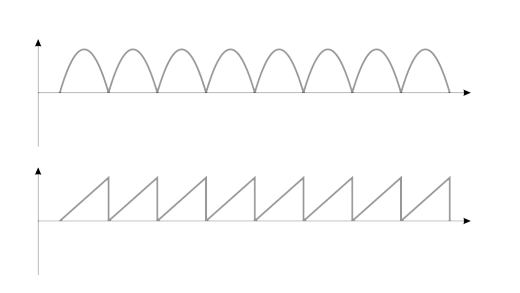
Alternation
Periodic form of a signal with waveforms on both sides of the axis
[204] The current is represented as a shape, the signal can have different forms depending on how it is initiated.
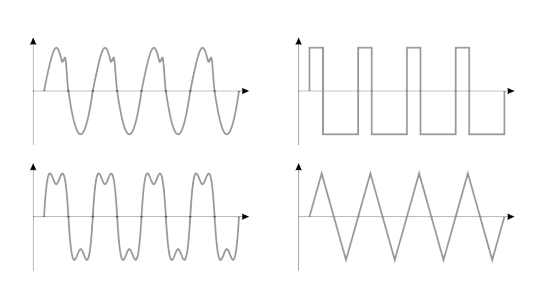
If we give it a given periodic form, in which its value will alternately take a negative and a positive form, then we will call such a current alternating.
Variability
The periodic form of a signal on one side of the axis
[204] However, if this form is periodic, but not commutative, then we can only speak of a periodic but a variable current. Such a signal is repeatable, but its amplitude waveform does not exceed the axis on the graph. The difference between a constant, alternating and alternating signal is important from the point of view of circuit design.
If a given form of a signal, be it a variable or an alternating one, should have a specific form, the task of various components and systems is to provide them with this target form in the simplest possible way.
Peak frequency and voltage
Signal amplitudes and actual voltage
[204] In a house, we have alternating current with specific parameters, such as 230V and 50Hz frequency. This means that in 1 second there are 50 changes (alternations) from the peak value, then as it falls down, the axis is crossed at the zero point (more precisely across the equilibrium level) to reach the opposite value. These changes create an alternating current sinusoid. There may be a voltage in the network with a certain deviation, between 5 and 10%, depending on the characteristics of the supplied voltage and the installation itself that supports it. Therefore, assuming the maximum values, it is about 250V effective voltage. For a perfectly sinusoidal waveform, the peak value of the ac signals will be
Umax = Usk * √2
For a triangular waveform, this would be the first a square root of 2. For a square wave it will be 1. For an average outlet voltage, the peak voltage may be around 350-360V.
Note: Amplitude is the maximum deviation of the signal from the equilibrium level. Voltage amplitude is denoted as Um, and the current as Im. Finishing this topic, it is worth mentioning that the shape of the current waveform is sinusoidal because the generator core works in a circular motion, which is inseparable from the shape of the sinusoid.
Examples available at https://github.com/michalasobczak/simple_hpc/tree/master/SeriesPartOne
Recovering Elasticsearch 7 after power outage
In case you encounted power outage or just blindly pressed restart button on your machine, there is high chance you will have some issues with your cluster. Mine has only one node, so there is no redundancy. If I lose indices then data is gone. Fortunately starting Elasticsearch and having red indicators not necessarily means data lose. I recently went that path. Log says that primary shards was missing. In such case you need to check if there are those indices listed:
curl -s 'localhost:9200/_cat/indices?v'With that command look for red statuses. Internal mechanisms have this delay rule, so check every minute if count decreases. If not then instead od “indices” write “allocations” and you may have some unassigned indices. Now you can try this one:
url -X PUT "localhost:9200/_cluster/settings?pretty" -H 'Content-Type: application/json' -d'
{
    "transient" : {
        "cluster.routing.allocation.enable" : "all"
    }
}
'
It possible could re-enable allocation. Other failure factor could be low free space. You need to keep it above 15%. If you have more than one node, please check whether it is available and working.
Install qemu-guest-agent with Ansible on Proxmox 7.2
I already have over 10 virtual machines in my home virtual environment. It is the number I find enough to start using some automation tools like Ansible. Installing Ansible on Ubuntu or CentOS systems is straightforward, just use regular apt or yum commands. With Ansible you can use commands or create scripts. First you should start with hosts definition file which by default is located at /etc/ansible/hosts.
[servers]
myhostname              ansible_host=192.168.1.1
You can use different hosts file but then you need to point it while running commands. This one is default, so no need to do anything special here. Now going quickly to Proxmox’s qemu-guest-agent. What it is for? By using it, Proxmox knows what’s going on inside your VM, for example it will know IP addresses. Install package using apt or yum modules:
ansible all -m apt -a "name=qemu-guest-agent" --become -K -oGo to each and every VM in Proxmox’s UI and enable QEMU Guest Agent. Then stop and start all VM. You will know that it works when there will be IP address shown on Summary page. Still you can check if service is running using Ansible:
ansible all -m shell -a "service qemu-guest-agent status | grep Active" --become -K -o -f 4Trapping ctrl+c in Bash scripts
If you happen to have some Bash scripts and would like to abort it in clean way there is way to do it. You need to trap ctrl+c command. In case you have some while loop in your scripts, without it, pressing any abort commands is only half way effective.
#!/bin/bash

trap ctrl_c INT

function ctrl_c() {
  echo "** Trapped CTRL-C"
  exit
}

while
do
  echo -n "."
done
Now, with ctrl+c trapped, you can cleanly abort your script without things still running.
Installing Metricbeat 7.17 agent on Ubuntu
Once you have installed Elasticsearch and Kibana servers you need to grab some data. First choice could be beats modules, either Metricbeat or Packetbeat. There is also Filebeat. Altough installation instructions are available at https://www.elastic.co/guide/en/beats/metricbeat/7.17/metricbeat-installation-configuration.html I found it useful to describe it separately as this page might just disappear out of a sudden.
curl -L -O https://artifacts.elastic.co/downloads/beats/metricbeat/metricbeat-7.17.5-amd64.deb
sudo dpkg -i metricbeat-7.17.5-amd64.deb
After installation you need to change the configuration file at:
/etc/metricbeat/metricbeat.ymlChange Kibana and Elasticsearch output addresses. Then start the agent:
sudo service metricbeat startIn case this is the first time you are installing the agent against this particular Elasticsearch server you need to load visualizations and dashboard definitions:
metricbeat setup -eNow you’re done and should be able to see you newly added host on Observability:Metrics:Inventory page. Remember to press Auto-refresh button.